|
|
|
|
|
|
|
|
|
|
|
|
|
|
|
|
|
|
|
|
|
|
|
|
| Connections to other equipment |
|
| (continued) |
|
| |||||||||||||||
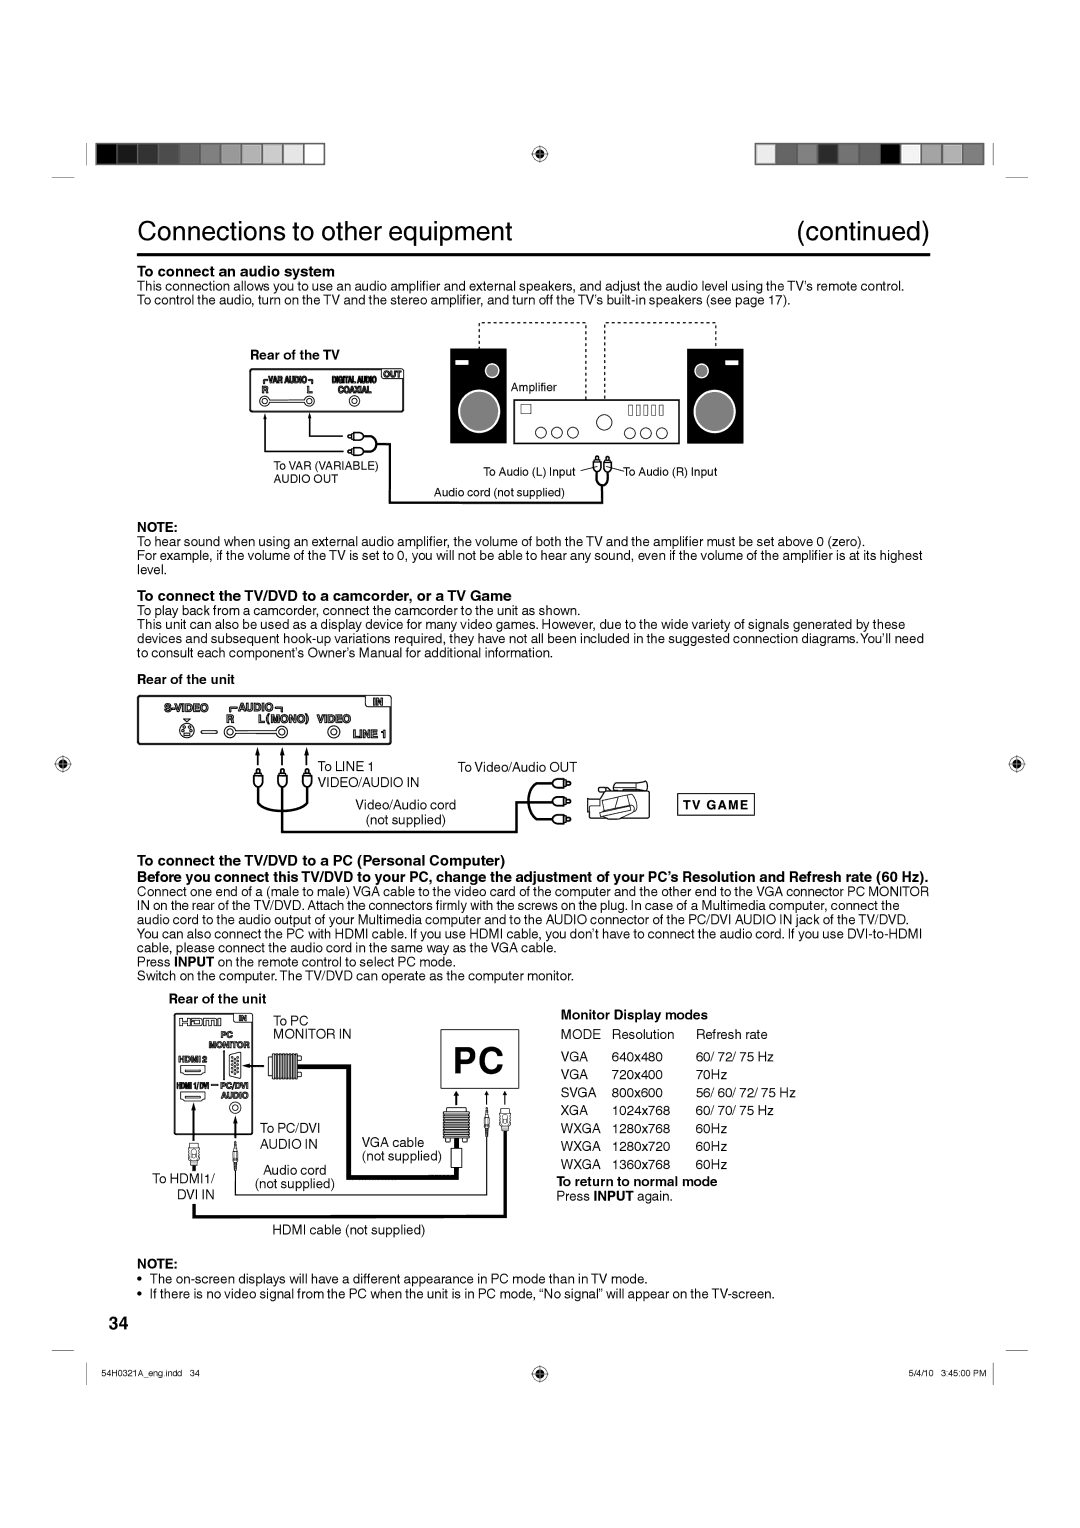
To connect an audio system
This connection allows you to use an audio amplifier and external speakers, and adjust the audio level using the TV’s remote control. To control the audio, turn on the TV and the stereo amplifier, and turn off the TV’s
Rear of the TV
Amplifier
To VAR (VARIABLE) | To Audio (L) Input | To Audio (R) Input | |
AUDIO OUT | |||
Audio cord (not supplied) |
| ||
|
|
NOTE:
To hear sound when using an external audio amplifier, the volume of both the TV and the amplifier must be set above 0 (zero).
For example, if the volume of the TV is set to 0, you will not be able to hear any sound, even if the volume of the amplifier is at its highest level.
To connect the TV/DVD to a camcorder, or a TV Game
To play back from a camcorder, connect the camcorder to the unit as shown.
This unit can also be used as a display device for many video games. However, due to the wide variety of signals generated by these devices and subsequent
Rear of the unit
To LINE 1 | To Video/Audio OUT |
VIDEO/AUDIO IN |
|
Video/Audio cord | or |
(not supplied) |
|
To connect the TV/DVD to a PC (Personal Computer)
Before you connect this TV/DVD to your PC, change the adjustment of your PC’s Resolution and Refresh rate (60 Hz). Connect one end of a (male to male) VGA cable to the video card of the computer and the other end to the VGA connector PC MONITOR IN on the rear of the TV/DVD. Attach the connectors firmly with the screws on the plug. In case of a Multimedia computer, connect the audio cord to the audio output of your Multimedia computer and to the AUDIO connector of the PC/DVI AUDIO IN jack of the TV/DVD. You can also connect the PC with HDMI cable. If you use HDMI cable, you don’t have to connect the audio cord. If you use
Press INPUT on the remote control to select PC mode.
Switch on the computer. The TV/DVD can operate as the computer monitor.
Rear of the unit
To PC
MONITOR IN
| To PC/DVI | VGA cable |
| AUDIO IN | |
To HDMI1/ | Audio cord | (not supplied) |
(not supplied) |
| |
DVI IN |
|
|
HDMI cable (not supplied)
Monitor Display modes
MODE | Resolution | Refresh rate |
VGA | 640x480 | 60/ 72/ 75 Hz |
VGA | 720x400 | 70Hz |
SVGA | 800x600 | 56/ 60/ 72/ 75 Hz |
XGA | 1024x768 | 60/ 70/ 75 Hz |
WXGA | 1280x768 | 60Hz |
WXGA | 1280x720 | 60Hz |
WXGA | 1360x768 | 60Hz |
To return to normal mode
Press INPUT again.
NOTE:
• The
• If there is no video signal from the PC when the unit is in PC mode, “No signal” will appear on the
34
54H0321A_eng.indd 34
5/4/10 3:45:00 PM