When using electrical appliances, basic safety precautions should always be taken including the following:
1.Read all instructions before using this appliance.
2.Use fan only for purposes described in the instruction manual.
3.To protect against electrical shock do not immerse unit, plug or cord in water or spray with liquids and plug the appliance directly into a electrical outlet.
4.Close supervision is necessary when any appliance is used by or near children.
5.Unplug from outlet when not in use, when moving fan from one location to another, before putting on or taking off parts and before cleaning.
6.Avoid contact with moving parts.
7.Do not operate in the presence of explosive and/or flammable fumes.
8.To avoid fire hazard, NEVER place the cord under rugs or any parts near an open flame, cooking or other heating appliance.
9.Do not operate any appliance with a damaged cord or plug after the appliance malfunctions, or has been dropped/damaged in any manner.
10.The use of attachments not recommended or sold by the appliance manufacturer may cause hazards.
11.Do not let the cord hang over the edge of a table, counter or come in contact with hot surfaces or leave exposed to high traffic areas.
12.To disconnect, grip plug and pull from wall outlet. Never yank on cord.
13.Always use on a dry, level surface.
14.Do not operate fan until fully assembled with all parts properly in place.
15.This product is intended for household use ONLY and not for commercial or industrial applications.
16.WARNING: To reduce the risk of fire or electric shock, DO NOT use this fan with any solid-state speed control device.
PLEASE READ AND SAVE THESE IMPORTANT SAFETY INSTRUCTIONS
ASSEMBLY INSTRUCTIONS
NOTE: MAKE SURE YOU REMOVE ALL CONTENTS OF THE PACKAGE. PLEASE CHECK PACKAGING MATERIALS FOR PARTS THAT COULD BE REQUIRED TO ASSEMBLE YOUR FAN.
Base/Pole Assembly
You will need the base, Round Weight, pole assembly, pole ring, washer and L-shaped locking lever
(See Figure 1-2).
1.Slide the bottom end of the outer pole through the pole ring.
2.Turn the base upside down and place the weighted insert and washer into the base cover.
3.Secure the base and round weight to the bottom of the outer pole using the L-shaped locking lever and washer.
4.Turn the L-shaped locking lever clockwise to securely attach the pole to the base.
5.Set the base on the floor, weight side down. Push the pole ring down until it sits directly on the base.
Fan Head Assembly
You are now ready to assemble the fan head (See Figure 1-2).
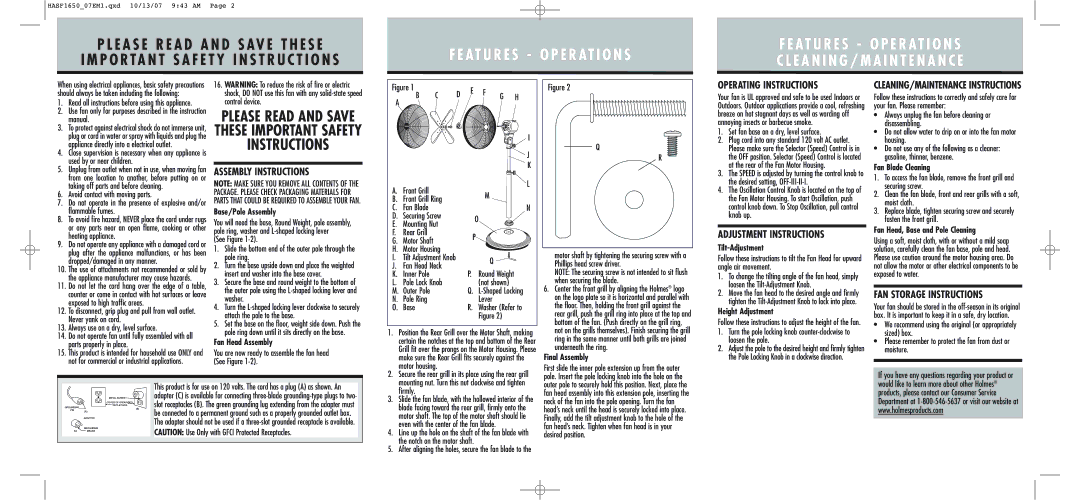
Figure 1 | | D | E | F | | |
| B | C | G | H |
A | |
| | | | | | |
| | | | | | | I |
| | | | | | | J |
| | | | | | | K |
A. | Front Grill | | | | | | L |
| | | M | | |
B. | Front Grill Ring | | | | |
| | | | |
C. | Fan Blade | | | | | | N |
D. | Securing Screw | | | O | | |
E. | Mounting Nut | | | | |
| | | | |
F. | Rear Grill | | | P | | |
G. | Motor Shaft | | | | |
| | | | | |
H. | Motor Housing | | | | | |
I. | Tilt Adjustment Knob | | | Q | | |
J. | Fan Head Neck | | | | |
| | | | |
K. | Inner Pole | | | P. | Round Weight | |
L. | Pole Lock Knob | | | (not shown) | |
M. | Outer Pole | | | Q. | L-Shaped Locking |
N. | Pole Ring | | | | Lever | | |
O. | Base | | | R. | Washer (Refer to |
| | | | | Figure 2) | |
1. Position the Rear Grill over the Motor Shaft, making |
certain the notches at the top and bottom of the Rear |
Grill fit over the prongs on the Motor Housing. Please |
make sure the Rear Grill fits securely against the |
motor housing. |
motor shaft by tightening the securing screw with a Phillips head screw driver.
NOTE: The securing screw is not intended to sit flush when securing the blade.
6.Center the front grill by aligning the Holmes® logo on the logo plate so it is horizontal and parallel with the floor. Then, holding the front grill against the rear grill, push the grill ring into place at the top and bottom of the fan. (Push directly on the grill ring, not on the grills themselves). Finish securing the grill ring in the same manner until both grills are joined underneath the ring.
Final Assembly
First slide the inner pole extension up from the outer
OPERATING INSTRUCTIONS
Your fan is UL approved and safe to be used Indoors or Outdoors. Outdoor applications provide a cool, refreshing breeze on hot stagnant days as well as warding off annoying insects or barbecue smoke.
1.Set fan base on a dry, level surface.
2.Plug cord into any standard 120 volt AC outlet. Please make sure the Selector (Speed) Control is in the OFF position. Selector (Speed) Control is located at the rear of the Fan Motor Housing.
3.The SPEED is adjusted by turning the control knob to the desired setting, OFF-III-II-I.
4.The Oscillation Control Knob is located on the top of the Fan Motor Housing. To start Oscillation, push control knob down. To Stop Oscillation, pull control knob up.
ADJUSTMENT INSTRUCTIONS
Tilt-Adjustment
Follow these instructions to tilt the Fan Head for upward angle air movement.
1.To change the tilting angle of the fan head, simply loosen the Tilt-Adjustment Knob.
2.Move the fan head to the desired angle and firmly tighten the Tilt-Adjustment Knob to lock into place.
Height Adjustment
Follow these instructions to adjust the height of the fan.
1.Turn the pole locking knob counter-clockwise to loosen the pole.
2.Adjust the pole to the desired height and firmly tighten the Pole Locking Knob in a clockwise direction.
CLEANING/MAINTENANCE INSTRUCTIONS
Follow these instructions to correctly and safely care for your fan. Please remember:
•Always unplug the fan before cleaning or disassembling.
•Do not allow water to drip on or into the fan motor housing.
•Do not use any of the following as a cleaner: gasoline, thinner, benzene.
Fan Blade Cleaning
1.To access the fan blade, remove the front grill and securing screw.
2.Clean the fan blade, front and rear grills with a soft, moist cloth.
3.Replace blade, tighten securing screw and securely fasten the front grill.
Fan Head, Base and Pole Cleaning
Using a soft, moist cloth, with or without a mild soap solution, carefully clean the fan base, pole and head. Please use caution around the motor housing area. Do not allow the motor or other electrical components to be exposed to water.
FAN STORAGE INSTRUCTIONS
Your fan should be stored in the off-season in its original box. It is important to keep it in a safe, dry location.
•We recommend using the original (or appropriately sized) box.
•Please remember to protect the fan from dust or moisture.