HE420A STEAM POWER HUMIDIFIER

M10580B

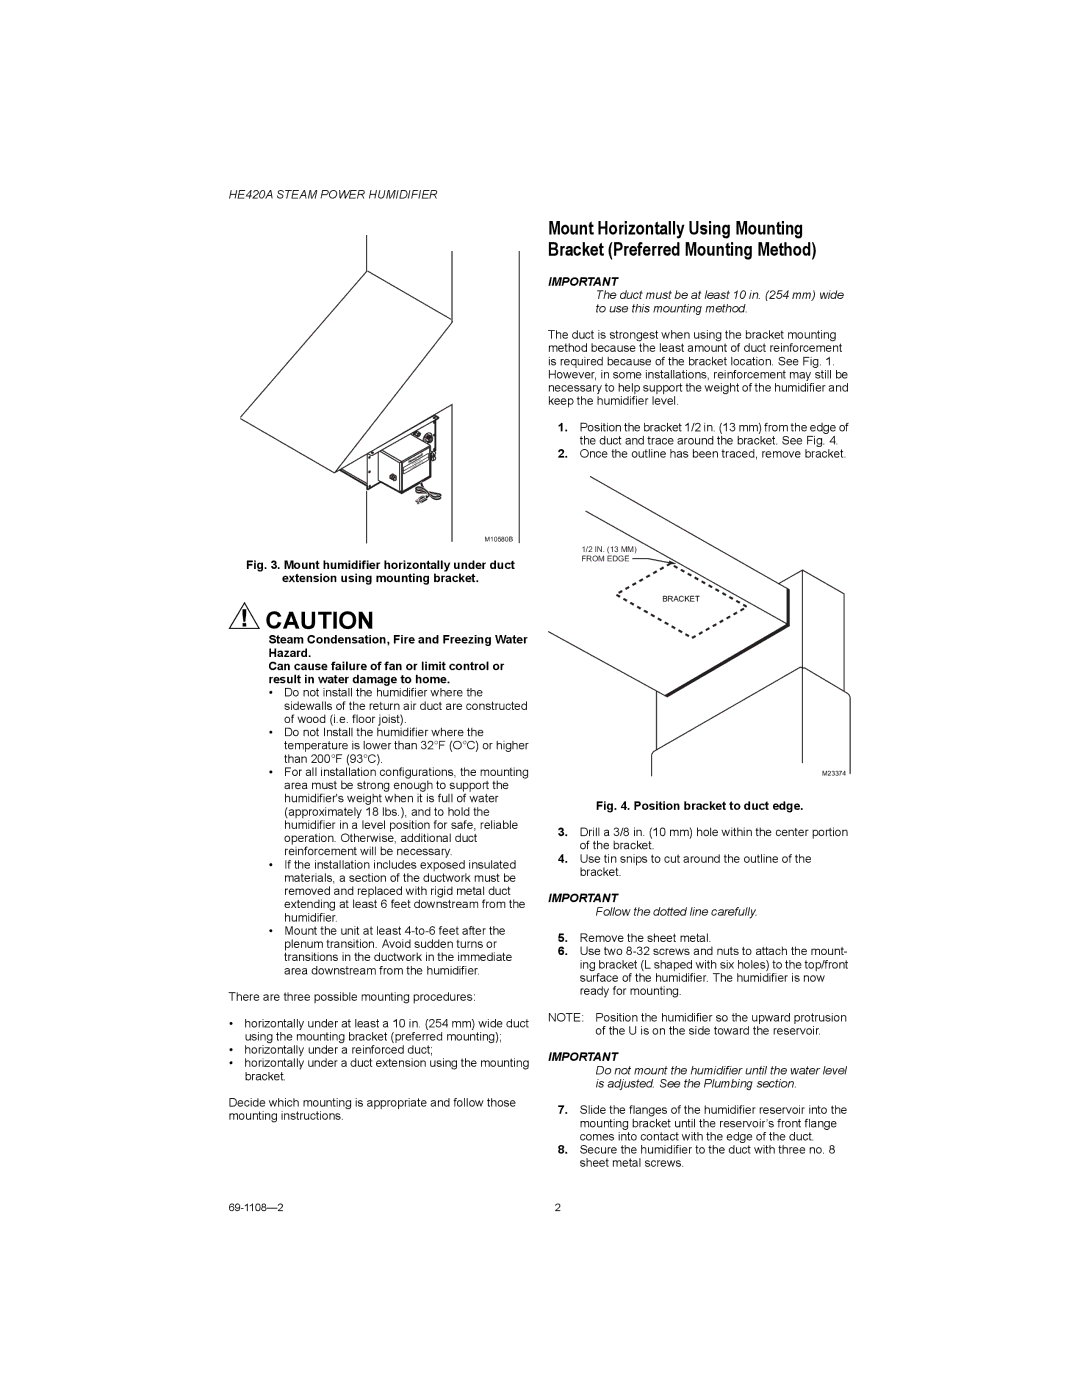
Fig. 3. Mount humidifier horizontally under duct

extension using mounting bracket.

CAUTION

Steam Condensation, Fire and Freezing Water Hazard.

Can cause failure of fan or limit control or result in water damage to home.

Do not install the humidifier where the sidewalls of the return air duct are constructed of wood (i.e. floor joist).

Do not Install the humidifier where the temperature is lower than 32°F (O°C) or higher than 200°F (93°C).

For all installation configurations, the mounting area must be strong enough to support the humidifier's weight when it is full of water (approximately 18 lbs.), and to hold the humidifier in a level position for safe, reliable operation. Otherwise, additional duct reinforcement will be necessary.

If the installation includes exposed insulated materials, a section of the ductwork must be removed and replaced with rigid metal duct extending at least 6 feet downstream from the humidifier.

Mount the unit at least 4-to-6 feet after the plenum transition. Avoid sudden turns or transitions in the ductwork in the immediate area downstream from the humidifier.

There are three possible mounting procedures:

horizontally under at least a 10 in. (254 mm) wide duct using the mounting bracket (preferred mounting);

horizontally under a reinforced duct;

horizontally under a duct extension using the mounting bracket.

Decide which mounting is appropriate and follow those mounting instructions.

Mount Horizontally Using Mounting Bracket (Preferred Mounting Method)

IMPORTANT

The duct must be at least 10 in. (254 mm) wide to use this mounting method.

The duct is strongest when using the bracket mounting method because the least amount of duct reinforcement is required because of the bracket location. See Fig. 1.

However, in some installations, reinforcement may still be necessary to help support the weight of the humidifier and keep the humidifier level.

1.Position the bracket 1/2 in. (13 mm) from the edge of the duct and trace around the bracket. See Fig. 4.

2.Once the outline has been traced, remove bracket.

1/2 IN. (13 MM)

FROM EDGE

BRACKET

M23374

Fig. 4. Position bracket to duct edge.

3.Drill a 3/8 in. (10 mm) hole within the center portion of the bracket.

4.Use tin snips to cut around the outline of the bracket.

IMPORTANT

Follow the dotted line carefully.

5.Remove the sheet metal.

6.Use two 8-32 screws and nuts to attach the mount- ing bracket (L shaped with six holes) to the top/front surface of the humidifier. The humidifier is now ready for mounting.

NOTE: Position the humidifier so the upward protrusion of the U is on the side toward the reservoir.

IMPORTANT

Do not mount the humidifier until the water level is adjusted. See the Plumbing section.

7.Slide the flanges of the humidifier reservoir into the mounting bracket until the reservoir’s front flange comes into contact with the edge of the duct.

8.Secure the humidifier to the duct with three no. 8 sheet metal screws.

69-1108—2

2

Page 2
Image 2
Honeywell HE420A installation instructions Position bracket to duct edge, Follow the dotted line carefully

HE420A specifications

The Honeywell HE420A is a versatile and efficient whole-home humidification system designed for residential use. This unit is particularly noteworthy for its ability to enhance indoor air quality by adding moisture to the air, thus alleviating the discomfort associated with dry air in the home. With its advanced features and technologies, the HE420A stands out in the realm of humidifiers.

One of the key features of the HE420A is its evaporative technology. Unlike some humidifiers that simply spray water into the air, the HE420A uses a specially designed evaporative pad to absorb moisture. As air passes over the pad, it picks up humidity and distributes it evenly throughout the home. This mechanism not only ensures a consistent and comfortable humidity level but also helps to prevent the growth of mold and bacteria, common problems associated with overly wet environments.

The HE420A is designed for easy integration with existing HVAC systems, making it a practical choice for homeowners looking to enhance their indoor comfort without the need for additional equipment. The unit typically covers an area of up to 4,200 square feet, making it suitable for larger homes. Its capacity to deliver significant moisture output—up to 17 gallons per day—ensures that even during the driest winter months, residents can maintain a healthy humidity level.

Installation and maintenance are also user-friendly with the HE420A. The system features a built-in water panel and a user-friendly control panel that allows homeowners to easily monitor and adjust humidity levels according to their preferences. Additionally, the digital humidistat ensures accurate humidity readings and responds to fluctuations in the home environment, promoting energy efficiency.

Energy efficiency is another hallmark of the Honeywell HE420A. The unit operates quietly and consumes minimal energy, making it an environmentally friendly option that also helps reduce utility bills. It is equipped with features that optimize water usage and minimize waste, aligning with modern sustainability goals.

In summary, the Honeywell HE420A is an exemplary whole-home humidifier that combines effective humidification technology with easy installation and user-friendly features. Its evaporative design, generous coverage area, and energy-efficient operation make it an excellent choice for homeowners seeking to improve their indoor air quality and comfort. By incorporating the HE420A into their HVAC system, families can enjoy the benefits of balanced humidity levels year-round.