Installation
Chime Position
The Chime can be free standing or wall mounted using the wall mounting bracket provided. If wall mounting is preferred, screw the bracket to the wall (see Fig 7). The Chime hooks onto the wall bracket as illustrated.
Fig. 7
M27203
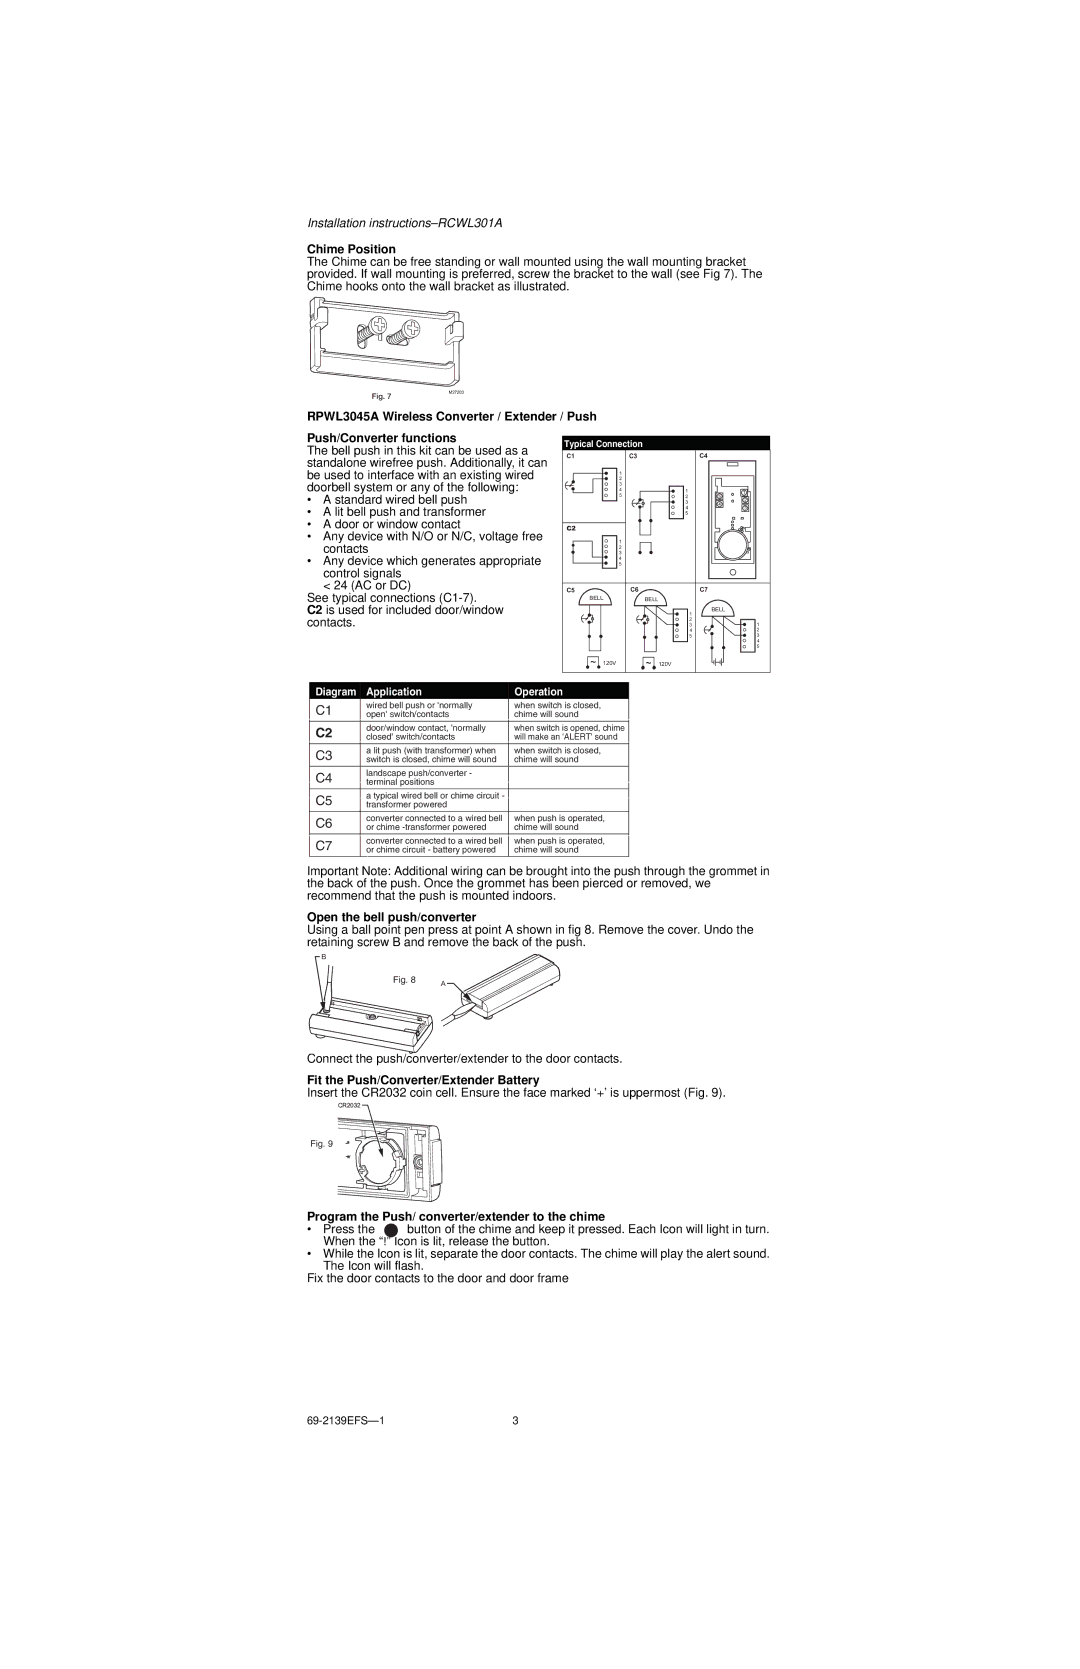
RPWL3045A Wireless Converter / Extender / Push
Push/Converter functions
The bell push in this kit can be used as a standalone wirefree push. Additionally, it can be used to interface with an existing wired doorbell system or any of the following:
•A standard wired bell push
•A lit bell push and transformer
•A door or window contact
•Any device with N/O or N/C, voltage free contacts
•Any device which generates appropriate control signals
< 24 (AC or DC)
See typical connections
C2 is used for included door/window contacts.
Typical Connection
C1 |
| C3 |
| C4 |
| 1 |
|
|
|
| 2 |
|
|
|
| 3 |
|
|
|
| 4 |
| 1 | 1 |
| 5 |
| 2 | 5 |
|
|
| 3 | 2 |
|
|
| 4 | |
|
|
| 4 | |
|
|
| 3 | |
|
|
| 5 |
|
C2 |
|
|
|
|
| 1 |
|
|
|
| 2 |
|
|
|
| 3 |
|
|
|
| 4 |
|
|
|
| 5 |
|
|
|
C5 |
| C6 |
| C7 |
BELL | BELL |
|
| |
|
|
| 1 | BELL |
|
|
|
| |
|
|
| 2 | 1 |
|
|
| 3 | |
|
|
| 4 | 2 |
|
|
| 5 | 3 |
|
|
|
| 4 |
|
|
|
| 5 |
~ | 120V | ~ | 120V |
|
Diagram | Application | Operation |
C1 | wired bell push or 'normally | when switch is closed, |
open' switch/contacts | chime will sound | |
|
|
|
C2 | door/window contact, 'normally | when switch is opened, chime |
closed' switch/contacts | will make an 'ALERT' sound | |
|
|
|
C3 | a lit push (with transformer) when | when switch is closed, |
switch is closed, chime will sound | chime will sound | |
C4 | landscape push/converter - |
|
terminal positions |
| |
| ||
|
|
|
C5 | a typical wired bell or chime circuit - |
|
| ||
transformer powered |
| |
|
|
|
C6 | converter connected to a wired bell | when push is operated, |
or chime | chime will sound |
C7
converter connected to a wired bell | when push is operated, | |
or chime circuit - battery powered | chime will sound | |
|
|
|
Important Note: Additional wiring can be brought into the push through the grommet in the back of the push. Once the grommet has been pierced or removed, we recommend that the push is mounted indoors.
Open the bell push/converter
Using a ball point pen press at point A shown in fig 8. Remove the cover. Undo the retaining screw B and remove the back of the push.
B
Fig. 8 | A |
|
Connect the push/converter/extender to the door contacts.
Fit the Push/Converter/Extender Battery
Insert the CR2032 coin cell. Ensure the face marked ‘+’ is uppermost (Fig. 9).
CR2032
Fig. 9
Program the Push/ converter/extender to the chime
• Press the button of the chime and keep it pressed. Each Icon will light in turn. When the “!” Icon is lit, release the button.
•While the Icon is lit, separate the door contacts. The chime will play the alert sound. The Icon will flash.
Fix the door contacts to the door and door frame