| | | | | | | | | | | | | | | | | | 1. FEATURES | | | | | | | | | | | | | | | | | | | | 3. LED INDICATOR GUIDE | | | | | | | FRANÇAIS | | | | | |
| | | | | | | | | | | | | | | | | | | | | | | | | | | | | | | | | | | | | | CET ASPIRATEUR A ÉTÉ CONÇU POUR USAGE DOMESTIQUE SEULEMENT |
| | | | | | | | | | | | | | | | | | | | | | | | | | | | | | | | | | | | | | | | | | | | | | The LED will momentarily light when the charger is plugged into an outlet. The LED will then perform as noted below. | | CONSIGNES DE SÉCURITÉ IMPORTANTES |
| | | | | | | | | | | | | | | | | | | | | | | | | | | | | | | | | | | | | | | | | | | | | | | | | | | | | | | | AVERTISSEMENT : | | | | |
| | | | | | | | | | | | | | | | | | | | | | | | | | | | | | | | | | | | | | | | | | | | | | PROBLEM | POSSIBLE REASON | | POSSIBLE SOLUTION | | | | | | | | | | |
| | | | | | | | | | | | | | | | | | | | | | | | | | | | | | | | | | | | | | | | | | | | | | | | | | | | L’ASSEMBLAGE DE L’APPAREIL COMPREND DES PETITES PIÈCES. CES |
| | | | | | | | | | | | | | | | | | | | | | | | | | | | | | | | | | | | | | | | | | | | | | LED not lit when | 1. Charger is not plugged into wall | | 1. Plug charger into wall outlet. | | |
| | | | | | | | | | | | | | | | 1 | | | | | | | | | | | | | | | | | | | | | | | | | | | battery is inserted | outlet. | | 2. Make sure battery is fully seated in battery cavity. | | | | | DERNIÈRES PRÉSENTENT UN DANGER D’ÉTOUFFEMENT. | | | |
| | | | | | | | | | | | | | | | | | | | | | | | | | | | | | | | | | | | | | | | | | | 2. Battery is not inserted properly. | | | Lorsque vous utilisez un appareil électrique, vous devez toujours respecter |
| | | | | | | | | | | | | | | | | | | | | | | | | | | | | | | | | | | | | | | | | | | | | | | 3. Battery cannot communicate with | | 3. Remove battery and unplug charger, wait 10 | |
| | | | | | | | | | | | | | | | | | | | | | | | | | | | | | | | | | | | | | | | | | | | | | | charger. | | seconds, then plug charger into wall outlet and | | certaines consignes de sécurité, dont les suivantes : | | | | | |
| | | | | | | | | | | TM | | | | | | | | | | | | | | | | | | | | | | | | | | | | | | | | | | | | | | | | reinsert battery. | | • LIRE TOUTES LES INSTRUCTIONS AVANT D’UTILISER CET APPAREIL. | | | |
| | | | | | | | | | | | | | | | | | | | | | | | | | | | | | | | | | | | | | | | | | | | | | | 4. Battery is too hot. | | 4. Remove battery and let cool for 30 minutes, | | • TOUJOURS SUIVRE CES CONSIGNES DE SÉCURITÉ. | | | | | |
| | | | | | | | | | | | | | | | | | | | | | | | | | | | | | | | | | | | | | | | | | | | | | | | | | | replace battery and retry or replace with second | | | | | | |
| | | | | | | | | | | | | | | | | | | | | | | | | | | | | | | | | | | | | | | | | | | | | | | | | | | | • MISE EN GARDE : CE PRODUIT CONTIENT DES SUBSTANCES CHIMIQUES RECONNUES |
| | | | | | | | | | | | | | | | | | | | | | | | | | | | | | | | | | | | | | | | | | | | | | | | | | | charged battery. | |
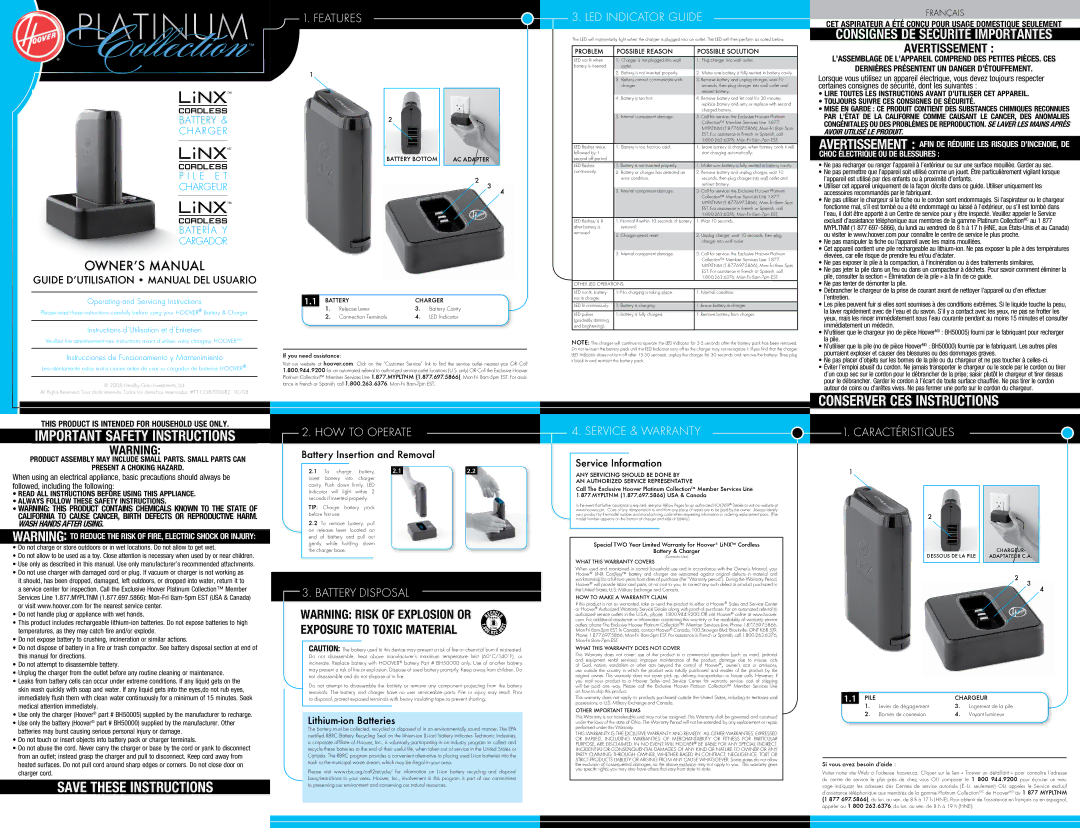
| | BATTERY & | | | | | | | | | | | | | | | | 2 | | | | | | | | | | | | | | | | | 5. Internal component damage. | | 5. Call for service: the Exclusive Hoover Platinum | | | PAR L’ÉTAT DE LA CALIFORNIE COMME CAUSANT LE CANCER, DES ANOMALIES |
| | | | | | | | | | | | | | | | | | | | | | | | | | | | | | | | | | | | | Collection™ Member Services Line 1.877. | | | CONGÉNITALES OU DES PROBLÈMES DE REPRODUCTION. SE LAVER LES MAINS APRÈS |
| | CHARGER | | | | | | | | | | | | | | | | | | | | | | | | | | | | | | | | | | | | | | | | EST. For assistance in French or Spanish, call | | | AVOIR UTILISÉ LE PRODUIT. | | | | | | | | |
| | | | | | | | | | | | | | | | | | | | | | | | | | | | | | | | | | | | | | | | | | | | | | | | | | | MYPLTNM (1.877.697.5866), Mon-Fri 8am-5pm | | | | | | | | | | | | | | | | |
| | | | | | | | | | | MC | | | | | | | | | | | | | | | | | | | | | | | | | | | | | | | | | | | LED flashes twice, | 1. Battery is too hot/too cold. | | 1. Leave battery in charger, when battery cools it will | | AVERTISSEMENT : AFIN DE RÉDUIRE LES RISQUES D’INCENDIE, DE |
| | | | | | | | | | | | | | | | | | | | | | | | | | | | | | | | | | | | | | | | | | | | | | | | | | | 1.800.263.6376, Mon-Fri 8am-7pm EST. | | CHOC ÉLECTRIQUE OU DE BLESSURES : | | | | | | | | |
| | | | | | | | | | | | | | | | | | | | | | | | | | | BATTERY BOTTOM | | AC ADAPTER | | | | | | followed by 1 | | | | | start charging automatically. | | | | | | | | | |
| | | | | | | | | | | | | | | | | | | | | | | | | | | | | | | | | | | | | | | | | | | | | |
| | | | | | | | | | | | | | | | | | | | | | | | | | | | | | | | | second off period | | | | | | | | • Ne pas recharger ou ranger l’appareil à l’extérieur ou sur une surface mouillée. Garder au sec. |
| | | | | | | | | | | | | | | | | | | | | | | | | | | | | | | | | | | | | | | | | | | | | | LED flashes | 1. Battery is not inserted properly. | | 1. Make sure battery is fully seated in battery cavity. | |
| | P I L E E T | | | | | | | | | | | | | | | | | | | | | | | 2 | | | | | | | continuously | 2. Battery or charger has detected an | | 2. Remove battery and unplug charger, wait 10 | | • Ne pas permettre que l’appareil soit utilisé comme un jouet. Être particulièrement vigilant lorsque |
| | | | | | | | | | | | | | | | | | | | | | | | 3 | | | | | | | error condition. | | seconds, then plug charger into wall outlet and | | | l’appareil est utilisé par des enfants ou à proximité d’enfants. | | | | | |
| | CHARGEUR | | | | | | | | | | | | | | | | | | | | | | | | | | | | | 4 | | | | | | | | | | reinsert battery. | | • Utiliser cet appareil uniquement de la façon décrite dans ce guide. Utiliser uniquement les |
| | | | | | | | | | | | | | | | | | | | | | | | | | | | | | | | | | | | 3. Internal component damage. | | 3. Call for service: the Exclusive Hoover Platinum | | | accessoires recommandés par le fabriquant. | | | | | | | | |
| | | | | | | | | | | | | | | | | | | | | | | | | | | | | | | | | | | | | | | | | | | | | | | | | | | Collection™ Member Services Line 1.877. | | • Ne pas utiliser le chargeur si la fiche ou le cordon sont endommagés. Si l’aspirateur ou le chargeur |
| | | | | | | | | | | TM | | | | | | | | | | | | | | | | | | | | | | | | | | | | | | | | | | | | | | | | MYPLTNM (1.877.697.5866), Mon-Fri 8am-5pm | |
| | | | | | | | | | | | | | | | | | | | | | | | | | | | | | | | | | | | | | | | | | | | | | | | | | | | fonctionne mal, s’il est tombé ou a été endommagé ou laissé à l’extérieur, ou s’il est tombé dans |
| | | | | | | | | | | | | | | | | | | | | | | | | | | | | | | | | | | | | | | | | | | | | | | | | | | EST. For assistance in French or Spanish, call | | |
| | | | | | | | | | | | | | | | | | | | | | | | | | | | | | | | | | | | | | | | | | | | | | | | | | | | |
| | | | | | | | | | | | | | | | | | | | | | | | | | | | | | | | | | | | | | | | | | | | | | | | | | | 1.800.263.6376, Mon-Fri 8am-7pm EST. | | | l’eau, il doit être apporté à un Centre de service pour y être inspecté. Veuillez appeler le Service |
| | | | | | | | | | | | | | | | | | | | | | | | | | | | | | | | | | | | | | | | | | | | | | | | | | | | |
| | | | | | | | | | | | | | | | | | | | | | | | | | | | | | | | | | | | | | | | | | | | | | | | | | | | |
| | | | | | | | | | Y | | | | | | | | | | | | | | | | | | | | | | | | | | | | | | | | | | | LED flashes/is lit | 1. Normal if within 10 seconds of battery | | 1. Wait 10 seconds. | | | exclusif d’assistance téléphonique aux membres de la gamme Platinum CollectionMC au 1 877 |
| | BATERÍA | | | | | | | | | | | | | | | | | | | | | | | | | | | | | | | | | | | | | removed | 2. Charger needs reset. | | 2. Unplug charger, wait 10 seconds, then plug | | | ou visiter le www.hoover.com pour connaître le centre de service le plus proche. | | | | |
| | CARGADOR | | | | | | | | | | | | | | | | | | | | | | | | | | | | | | | | | | | after battery is | removal. | | | | | | MYPLTNM (1 877 697-5866), du lundi au vendredi de 8 h à 17 h (HNE, aux États-Unis et au Canada) |
| | | | | | | | | | | | | | | | | | | | | | | | | | | | | | | | | | | | | | | | | charger into wall outlet | | • Ne pas manipuler la fiche ou l’appareil avec les mains mouillées. | | | | | |
| | | | | | | | | | | | | | | | | | | | | | | | | | | | | | | | | | | | | | | | | | | | | | | 3. Internal component damage. | | 3. Call for service: the Exclusive Hoover Platinum | | • Cet appareil contient une pile rechargeable au lithium-ion. Ne pas exposer la pile à des températures |
| | | | | | | | | | | | | | | | | | | | | | | | | | | | | | | | | | | | | | | | | | | | | | | | | | élevées, car elle risque de prendre feu et/ou d’éclater. | | | | | |
| OWNER’S MANUAL | | | | | | | | | | | | | | | | | | | | | | | | | | | | | | | | | | | | | | | | Collection™ Member Services Line 1.877. | | • Ne pas jeter la pile dans un feu ou dans un compacteur à déchets. Pour savoir comment éliminer la |
| | | | | | | | | | | | | | | | | | | | | | | | | | | | | | | | | | | | | | | | EST. For assistance in French or Spanish, call | |
| | | | | | | | | | | | | | | | | | | | | | | | | | | | | | | | | | | | | | | | | | | | | | | | | | | MYPLTNM (1.877.697.5866), Mon-Fri 8am-5pm | | • Ne pas exposer la pile à la compaction, à l’incinération ou à des traitements similaires. | | | |
| | | | | | | | | | | | | | | | | | | | | | | | | | | | | | | | | | | | | | | | | | | | | | | | | | | | | | | | | | | | | | | | | | |
| GUIDE D’UTILISATION • MANUAL DEL USUARIO | | | | | | | | | | | | | | | | | | | | | | | | | | | | | | | | | | | | 1.800.263.6376, Mon-Fri 8am-7pm EST. | | | pile, consulter la section « Élimination de la pile » à la fin de ce guide. | | | | |
| | | | | | | | | | | | | | | | | | | | | | | | | | | | | | | OTHER LED OPERATIONS: | | | | | • Ne pas tenter de démonter la pile. | | | | | | | | |
| | | | | | | | | | | | | | | | | | | | | | | | | | | | | | | | | | | | | | | | | | | | | | | | | | | • Débrancher le chargeur de la prise de courant avant de nettoyer l’appareil ou d’en effectuer |
| | | | | | | | | | | | | | | | | | | | | | | | | | | | | | | | | | | | | | | | | | | | | | LED not lit, battery | 1. No charging is taking place. | | 1. Normal condition. | |
| Operating and Servicing Instructions | | | | | | | | 1.1 | | BATTERY | | | | | | | | | CHARGER | | | | | | | not in charger | | | | | | | | | l’entretien. | | | | | | | | | | |
| | | | | | | | | | | | | | | | | | | | | | | | | | | | • Les piles peuvent fuir si elles sont soumises à des conditions extrêmes. Si le liquide touche la peau, |
| | | | | | | | | | | | | | | | | | | | | | | LED lit continuously | 1. Battery is charging. | | 1. Leave battery in charger. | |
| Please read these instructions carefully before using your HOOVER® Battery & Charger. | | | | | | 1. | Release Lever | | | | | | 3. | Battery Cavity | | | | | | | | | | | | | la laver rapidement avec de l’eau et du savon. S’il y a contact avec les yeux, ne pas se frotter les |
| | | | | | | | | | | | | | | | | LED pulses | 1. Battery is fully charged. | | 1. Remove battery from charger. | | |
| | | | | | | | | | | | | | | | | | | | | 2. | Connection Terminals | | 4. | LED Indicator | | | | | | | (gradually dimming | | | | | | | | | yeux, mais les rincer immédiatement sous l’eau courante pendant au moins 15 minutes et consulter |
| Instructions d’Utilisation et d’Entretien | | | | | | | | | | | | | | | | | | | | | | | | | | | | | | | | | | | and brightening) | | | | | | | | | immédiatement un médecin. | | | | | | | | |
| | | | | | | | | | | | | | | | | | | | | | | | | | | | | | | | | | | | | | | | | | | • N’utiliser que le chargeur (no de pièce HooverMD : BH50005) fourni par le fabriquant pour recharger |
| | | | | | | | | | | | | | | | | | | | | | | | | | | | | | | | | | | | | | | | | | |
| Veuillez lire attentivement ces instructions avant d’utiliser votre chargeur HOOVER | MD | . | | | | | | | | | | | | | | | | | | | | | | | | | | | | | | | | | NOTE: The charger will continue to operate the LED Indicator for 3-5 seconds after the battery pack has been removed. | | la pile. | | | | | | | | | | |
| | | | | | | | | | | | | | | | | | | | | | | | | | | | | | | | | | • N’utiliser que la pile (no de pièce HooverMD : BH50000) fournie par le fabriquant. Les autres piles |
| | | | | | | | | | | | | | | | | | | | | | | | | | | | | | | | | | | | | | | | | | | | | | Do not re-insert the battery pack until the LED Indicator turns off as the charger may not recognize it. If you find that the charger | | pourraient exploser et causer des blessures ou des dommages graves. | | | | |
| Instrucciones de Funcionamiento y Mantenimiento | | | | | If you need assistance: | | | | | | | | | | | | | | | | | | | | | | | LED Indicator does not turn off after 15-30 seconds, unplug the charger for 30 seconds and remove the battery. Then plug | | | | | |
| | ® | | | Visit our website at hoover.com. Click on the “Customer Service” link to find the service outlet nearest you OR Call | | it back in and re-insert the battery pack. | | | | | • Ne pas placer d’objets sur les bornes de la pile ou du chargeur et ne pas toucher à celles-ci. |
| | | | | | | | | | | | | | | | | | | | | | | | • Éviter l’emploi abusif du cordon. Ne jamais transporter le chargeur ou le socle par le cordon ou tirer |
| Lea atentamente estas instrucciones antes de usar su cargador de baterías HOOVER . | 1.800.944.9200 for an automated referral to authorized service outlet locations (U.S. only) OR Call the Exclusive Hoover | | | | | | | | | |
| | | | | | | | | | | d’un coup sec sur le cordon pour le débrancher de la prise; saisir plutôt le chargeur et tirer dessus |
| | | | | | | | | | | | | | | | Platinum Collection™ Member Services Line 1.877.MYPLTNM (1.877.697.5866), Mon-Fri 8am-5pm EST. For assis- | | | | | | | | | | |
| | | | | | | | | | | | | | | | | | | | | | | | | | pour le débrancher. Garder le cordon à l’écart de toute surface chauffée. Ne pas tirer le cordon |
| © 2008 Healthy Gain Investments, Ltd. | | | | | tance in French or Spanish, call 1.800.263.6376, Mon-Fri 8am-7pm EST. | | | | | | | | | | | | | | | | | | | | | |
| | | | | | | | | | | | | | | | | | | | | | | | | | autour de coins ou d’arêtes vives. Ne pas fermer une porte sur le cordon du chargeur. | | | |
| All Rights Reserved. Tous droits réservés. Todos los derechos reservados. #1113387000-R2. 10/08 | | | | | | | | | | | | | | | | | | | | | | | | | | | | | | | | | | | | | | | | | | | | | | | | | | | | | |
| | | | | | | | | | | | | | | | | | | | | | | | | | | | | | | | | | | | | | CONSERVER CES INSTRUCTIONS | | | | |
| | | | | | | | | | | | | | | | | | | | | | | | | | | | | | | | | | | | | | | | | | | | | | | | | | | | | | | | | |
| THIS PRODUCT IS INTENDED FOR HOUSEHOLD USE ONLY. | | | | | | | 2. HOW TO OPERATE | | | | | | | | | | | | | | 4. SERVICE & WARRANTY | | | 1. CARACTÉRISTIQUES | | | | | | | | |
| IMPORTANT SAFETY INSTRUCTIONS | | | | | | | | | | | | | | | | | | | | | | | | | | | | | |
| WARNING: | | | | | | | Battery Insertion and Removal | | | | | | | | | | | | | | | | | | | | | | | | | | | | | | | | | | | |
PRODUCT ASSEMBLY MAY INCLUDE SMALL PARTS. SMALL PARTS CAN | | | | | | | | | | | | | | | Service Information | | | | | | | | | | | | | | | | | | | |
| | | | | | | | | | | | | | | | | | | | | | | | | | | | | | | | | | | | | | | | | | | | | | | | |
| PRESENT A CHOKING HAZARD. | | | | | | | | 2.1 | | To charge | battery, | | | 2.1 | | | | | | | 2.2 | | | | | | | | | | | | 1 | | | | | | | | | | | |
| | | | | | | | | | | | | | | | | | | | | | | | ANY SERVICING SHOULD BE DONE BY | | | | | | | | | | | | | | | |
When using an electrical appliance, basic precautions should always be | | | | | | | | | | | | | | | | | | | | | | | | | | | | | | | | | | | | | | |
| | | | | | | insert | battery into | charger | | | | | | | | | | | | | | | | | | | | | | | | | | | | | | | | | | | | | | |
| | | | | | | | | | | | | | | | | | | | | | | | | | AN AUTHORIZED SERVICE REPRESENTATIVE | | | | | | | | | | | | | | | | | | | |
followed, including the following: | | | | | | | | cavity. Push down firmly. LED | | | | | | | | | | | | | | | | | | | | | | | | | | | | | | | | | | | | | | |
| | | | | | | | | | | | | | | | | | | | | | | | | | Call The Exclusive Hoover Platinum Collection™ Member Services Line | | | | | | | | | | | | | | | |
• READ ALL INSTRUCTIONS BEFORE USING THIS APPLIANCE. | | | | | | | | Indicator will light within 2 | | | | | | | | | | | | | | | | | | | | 1.877.MYPLTNM (1.877.697.5866) USA & Canada | | | | | | | | | | | | | | | |
• ALWAYS FOLLOW THESE SAFETY INSTRUCTIONS. | | | | | | | | seconds if inserted properly. | | | | | | | | | | | | | | | | | | | | In the event that further assistance is required, see your Yellow Pages for an authorized HOOVER® Dealer or visit our website at | | | | | | | | | | | | | | | |
| | | | | | | TIP: | Charge | battery pack | | | | | | | | | | | | | | | | | | | | | | | | | | | | | | | | | | |
• WARNING: THIS PRODUCT CONTAINS CHEMICALS KNOWN TO THE STATE OF | | | | | | | | | | | | | | | | | | | | | | | www.hoover.com. Costs of any transportation to and from any place of repair are to be paid by the owner. Always identify | | | | | | | 2 | | | | | | | | |
CALIFORNIA TO CAUSE CANCER, BIRTH DEFECTS OR REPRODUCTIVE HARM. | | | | before first use. | | | | | | | | | | | | | | | | | | | | | | | model number appears on the bottom of charger and side of battery.) | | | | | | | | | | | | | | | | | | |
| | | | | | | | | | | | | | | | | | | | | | | | | | | | | | | | | | | | | | | | | | | | | | your product by the model number and manufacturing code when requesting information or ordering replacement parts. (The | | | | | | | | | | | | | | | |
WASH HANDS AFTER USING. | | | | | | | | 2.2 To remove battery, pull | | | | | | | | | | | | | | | | | | | | | | | | | | | | | | | | | | | | | | | | | | |
WARNING: TO REDUCE THE RISK OF FIRE, ELECTRIC SHOCK OR INJURY: | | | | | on release lever located on | | | | | | | | | | | | | | | | | | | | | | | | | | | | | | | | | | | | | | | | | | |
| | | | end of battery and pull out | | | | | | | | | | | | | | | | | | | | | | | | | | | | | | | | | | | | | | | | | | |
| | | | | | | | | | | | | | | | | | | | | | | | | | | | | | | | | | | | | | | | | | | | | |
| | | | | | | | | | | | | | | | | | | gently | while | holding | | down | | | | | | | | | | | | | | | | | | | | Special TWO Year Limited Warranty for Hoover® LiNX™ Cordless | | | | | | | | | | | | | | | | | |
• Do not charge or store outdoors or in wet locations. Do not allow to get wet. | | | | | | | | | | | | | | | | | | | | | | | | | | | | | | | | | | | | | | | | | |
| | | | | | | the charger base. | | | | | | | | | | | | | | | | | | | | | | | | | Battery & Charger | | | | | | | | | | | | | CHARGEUR- | | | | |
• Do not allow to be used as a toy. Close attention is necessary when used by or near children. | | | | | | | | | | | | | | | | | | | | | | | | | | | | | | | | | | | | DESSOUS DE LA PILE | | | | | | |
| | | | | | | | | | | | | | | | | | | | | | | | | | | | | | | | | (Domestic Use) | | | | | | | | | | | | | ADAPTATEUR C.A. | | | |
• Use only as described in this manual. Use only manufacturer’s recommended attachments. | | | | | | | | | | | | | | | | | | | | | | | | | | | | | | | WHAT THIS WARRANTY COVERS | | | | | | | | | | | | | | | | | | | |
| | | | | | | | | | | | | | | | | | | | | | | | | | | | | | | | | | | | | | | | | | | | | | | | |
| | | | | | | | | | | | | | | | | | | | | | | | | | | | | | When used and maintained in normal household use and in accordance with the Owner’s Manual, your | | | | | | | | | | | | | | | | | |
• Do not use charger with damaged cord or plug. If vacuum or charger is not working as | | | | | | | | | | | | | | | | | | | | | | | | | | | | | | | | | | | | | | | | | | | | | | | |
| | | | | | | | | | | | | | | | | | | | | | | | | | | | | | ® | | | | | | | | | | | | | | | | | | | | | | |
| | | | | | | | | | | | | | | | | | | | | | | | | | | | | | | | | | | | | | | | | | | | | | | | | | |
| | | | | | | | | | | | | | | | | | | | | | | | | | | | | | | | | | | | | | | | | | | | | | Hoover LiNX Cordless™ battery and charger are warranted against original defects in material and | | | | | | | | | | | | | 2 | | | | |
it should, has been dropped, damaged, left outdoors, or dropped into water, return it to | | | | | | | | | | | | | | | | | | | | | | | | | | | | | | | workmanship for a full two years from date of purchase (the “Warranty period”). During the Warranty Period, | | | | | | | | | | | | | 3 | | | |
| | | 3. BATTERY DISPOSAL | | | | | | | | | | | | | | Hoover® will provide labor and parts, at no cost to you, to correct any such defect in product purchased in | | | | | | | | | | | | | | 4 | | |
Services Line 1.877.MYPLTNM (1.877.697.5866): Mon-Fri 8am-5pm EST (USA & Canada) | | | | | | | | | | | | | | | | | HOW TO MAKE A WARRANTY CLAIM | | | | | | | | | | | | | | | | | | |
a service center for inspection. Call the Exclusive Hoover Platinum Collection™ Member | | | | | | | | | | | | | | | | | | | | | | | | | | | | | | | the United States, U.S. Military Exchange and Canada. | | | | | | | | | | | | | | | | | | |
or visit www.hoover.com for the nearest service center. | | | | | | | | | | | | | | | | | | | | | | | | | | | | | | | | | | | If this product is not as warranted, take or send the product to either a Hoover® Sales and Service Center | | | | | | | | | | | | | | | | | |
| | | | | | | | | | | | | | | | | | | | | | | | | | | | | | | | | | | | | | | | | | | | | | | |
| | | | | | WARNING: RISK OF EXPLOSION OR | | | | | | | or Hoover® Authorized Warranty Service Dealer along with proof of purchase. For an automated referral to | | | | | | | | | | | | | | | | | |
• Do not handle plug or appliance with wet hands. | | | | | | | | | | | | | authorized service outlets in the U.S.A., phone: 1.800.944.9200 OR visit Hoover® online at www.hoover. | | | | | | | | | | | | | | | | | |
• This product includes rechargeable lithium-ion batteries. Do not expose batteries to high | | | | | | | | | | | | | | | | | | | | | | | | | | | | | | | com. For additional assistance or information concerning this warranty or the availability of warranty service | | | | | | | | | | | | | | | | | |
| | EXPOSURE TO TOXIC MATERIAL | | | | | | | outlets, phone The Exclusive Hoover Platinum Collection™ Member Services Line, Phone 1.877.697.5866, | | | | | | | | | | | | | | | | | |
temperatures, as they may catch fire and/or explode. | | | | | | | | | | | | | Mon-Fri 8am-5pm EST. In Canada, contact Hoover® Canada, 100 Strowger Blvd. Brockville, ONT K6B 5J9, | | | | | | | | | | | | | | | | | |
• Do not expose battery to crushing, incineration or similar actions. | | | | | | | | | | | | | | | | | | | | | | | | | | | | | | | | | | | Phone: 1.877.697.5866, Mon-Fri 8am-5pm EST. For assistance in French or Spanish, call 1.800.263.6376, | | | | | | | | | | | | | | | | | |
| | | | | | | | | | | | | | | | | | | | | | | | | | | | | | | | | | Mon-Fri 8am-7pm EST. | | | | | | | | | | | | | | | | | | | |
| | | | | | | CAUTION: The battery used in this device may present a risk of fire or chemical burn if mistreated. | | | | | | | | | | | | | | | | | | | | |
• Do not dispose of battery in a fire or trash compactor. See battery disposal section at end of | | | | | WHAT THIS WARRANTY DOES NOT COVER | | | | | | | | | | | | | | | | | | | |
this manual for directions. | | | | | | | | Do not disassemble, | heat above | manufacturer’s maximum | temperature limit (60˚C/140˚F), or | | This Warranty does not cover: use of the product in a commercial operation (such as maid, janitorial | | | | | | | | | | | | | | | | | |
• Do not attempt to disassemble battery. | | | | | | | | incinerate. Replace battery with HOOVER | ® | battery Part # BH50000 only. Use of another battery | | and equipment rental services), improper maintenance of | the product, damage due to misuse, acts | | | | | | | | | | | | | | | | | |
| | | | | | | | | of God, nature, vandalism or other acts beyond the control of Hoover®, owner’s acts or omissions, | | | | | | | | | | | | | | | | | |
• Unplug the charger from the outlet before any routine cleaning or maintenance. | | | | | | | | may present a risk of fire or explosion. Dispose of used battery promptly. Keep away from children. Do | | use outside the country in which the product was initially purchased and resales of the product by the | | | | | | | | | | | | | | | | | |
| | | | | | | not disassemble and do not dispose of in fire. | | | | | | | | | | | | | | original owner. This warranty does not cover pick up, delivery, transportation or house calls. However, if | | | | | | | | | | | | | | | | | |
• Leaks from battery cells can occur under extreme conditions. If any liquid gets on the | | | | | | | | | | | | | | | | | | | | | | | | | | | | | | | | | | | | |
| | | | | | Do not attempt to disassemble the battery or remove any component projecting from the battery | | you mail your product to a Hoover Sales and Service Center for warranty service, cost of shipping | | | | | | | | | | | | | | | | | |
skin wash quickly with soap and water. If any liquid gets into the eyes,do not rub eyes, | | | | | will be paid one way. Please call the Exclusive Hoover Platinum Collection™ Member Services Line | | | | | | | | | | | | | | | | | |
| | | terminals. The battery and charger have no user serviceable parts. Fire or injury may result. Prior | | on how to ship this product. | | | | | | | | 1.1 | PILE | | | CHARGEUR | | | | | |
immediately flush them with clean water continuously for a minimum of 15 minutes. Seek | | | | | | | | | | | | | | | | | | |
| | | to disposal, protect exposed terminals with heavy insulating tape to prevent shorting. | | | | | | | This warranty does not apply to products purchased outside the United States, including its territories and | | | | | | | | | | | | |
medical attention immediately. | | | | | | | | | | | | | | | | | | | | | | | | | | | | | | | | | | | possessions, a U.S. Military Exchange and Canada. | | | | | | | 1. | Levier de dégagement | 3. Logement de la pile | | | | |
| | | | | | | | | | | | | | | | | | | | | | | | | | | | | | | | | | OTHER IMPORTANT TERMS | | | | | | | | | | |
• Use only the charger (Hoover® part # BH50005) supplied by the manufacturer to recharge. | | | | | | | | | | | | | | | | | | | | | | | | | | | | | | | | | | | | | 2. | Bornes de connexion | 4. Voyant lumineux | | | | |
| | | Lithium-ion Batteries | | | | | | | | | | | | | | | | This Warranty is not transferable and may not be assigned. This Warranty shall be governed and construed | | | | | | | | |
• Use only the battery (Hoover® part # BH50000) supplied by the manufacturer. Other | | | | | | | | | | | | | | | | | | | | | | | under the laws of the state of Ohio. The Warranty Period will not be extended by any replacement or repair | | | | | | | | | | | | | | | | | |
batteries may burst causing serious personal injury or damage. | | | | | | | | The battery must be collected, recycled or disposed of in an environmentally sound manner. The EPA | | performed under this Warranty. | | | | | | | | | | | | | | | | | | | |
| | | | | | | | | | | | | | | | | | | | | | | | | | |
• Do not touch or insert objects into battery pack or charger terminals. | | | | | | | | certified RBRC Battery Recycling Seal on the lithium-ion (Li-ion) battery indicates Techtronic Industries, | | THIS WARRANTY IS THE EXCLUSIVE WARRANTY AND REMEDY. ALL OTHER WARRANTIES, EXPRESSED | | | | | | | | | | | | | | | | | |
| | | | | | | a corporate affiliate of Hoover, Inc., is voluntarily participating in an industry program to collect and | | OR IMPLIED, INCLUDING WARRANTIES OF MERCHANTABILITY OR FITNESS FOR PARTICULAR | | | | | | | | | | | | | | | | | |
• Do not abuse the cord. Never carry the charger or base by the cord or yank to disconnect | | | | | PURPOSE, ARE DISCLAIMED. IN NO EVENT WILL HOOVER® BE LIABLE FOR ANY SPECIAL, INDIRECT, | | | | | | | | | | | | | | | | | |
| | | recycle these batteries at the end of their useful life, when taken out of service in the United States or | | INCIDENTIAL OR CONSENQUENTIAL DAMAGES OF ANY KIND OR NATURE TO OWNER OR ANY | | | | | | | | | | | | | | | | | |
from an outlet; instead grasp the charger and pull to disconnect. Keep cord away from | | | | | | | Canada. The RBRC program provides a convenient alternative to placing used Li-ion batteries into the | | PARTY CLAIMING THROUGH OWNER, WHETHER BASED IN CONTRACT, NEGLIGENCE, TORT OR | | | | | | | | | | | | | | | | | |
heated surfaces. Do not pull cord around sharp edges or corners. Do not close door on | | | | trash or the municipal waste stream, which may be illegal in your area. | | | | | | | STRICT PRODUCTS LIABLILTY OR ARISING FROM ANY CAUSE WHATSOEVER. Some states do not allow | | | Si vous avez besoin d’aide : | | | | | | | | |
| | | | | | | | | the exclusion of consequential damages, so the above exclusion may not apply to you. This warranty gives | | | | | | | | | | |
charger cord. | | | | | | | | Please visit www.rbrc.org/call2recycle/ for information on Li-ion battery recycling and disposal | | you specific rights; you may also have others that vary from state to state. | | | Visiter notre site Web à l’adresse hoover.ca. Cliquer sur le lien « Trouver un détaillant » pour connaître l’adresse |
| | | | | | | | | | | | | | | | | | | bans/restrictions in your area. Hoover, Inc., involvement in this program is part of our commitment | | | | | | | | | | du centre de service le plus près de chez vous OU composer le 1 800 944.9200 pour écouter un mes- |
| SAVE THESE INSTRUCTIONS | | | | | | | | to preserving our environment and conserving our natural resources. | | | | | | | | | | | | | | | d’assistance téléphonique aux membres de la gamme Platinum CollectionMC de HooverMD au 1 877 MYPLTNM |
| | | | | | | | | | | | | | | | | | | | | | | | | | | | | | | | | sage indiquant les adresses des Centres de service autorisés (É.-U. seulement) OU appeler le Service exclusif |