RIONINT |
ODUCT |
|
R |
IREP |
PO |
ONS |
IM |
CAUT |
TANT |
|
BLYEM |
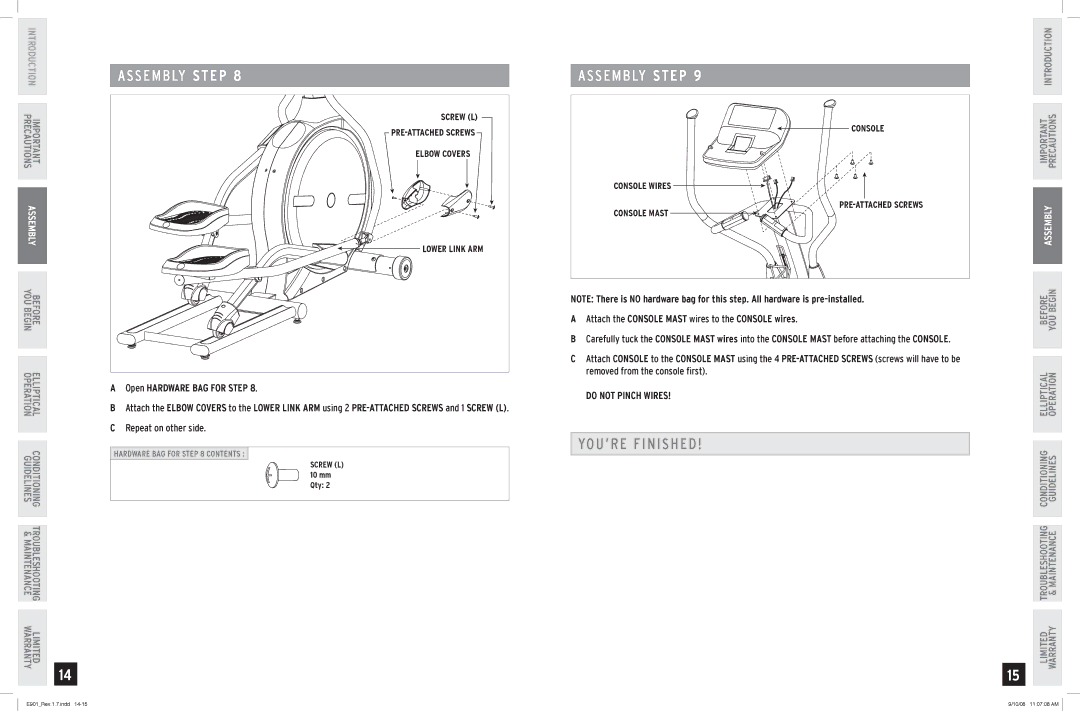
A S S E M B LY STEP 8 |
SCREW (L) |
ELBOW COVERS |
A S S E M B LY STEP 9
CONSOLE
CONSOLE WIRES
IMPORTANT PRECAUTIONS INTRODUCTION
ASS |
E |
RE |
LOWER LINK ARM |
CONSOLE MAST
ASSEMBLY
EFOB |
| ||
YOUBIN G |
| ||
ICAL |
|
| |
IPT |
| ||
ER |
|
| |
LLE |
|
| |
OPION |
|
| |
AT |
|
| |
ING |
|
| |
I E |
|
| |
IN |
|
| |
TION |
|
| |
LE |
|
| |
ID |
|
| |
GU |
|
| |
COND |
|
| |
E S |
|
| |
E E |
|
| |
R |
|
| |
T I |
| ||
I NANCNT&A |
|
| |
NG |
|
| |
M |
|
| |
OUBL |
|
| |
SHOOT |
|
| |
|
|
| |
DET |
|
| |
RR |
|
| |
L |
|
| |
WA |
|
| |
IMI |
|
| |
ANTY |
|
| |
14 | |||
|
| ||
|
|
| |
AOpen HARDWARE BAG FOR STEP 8.
BAttach the ELBOW COVERS to the LOWER LINK ARM using 2
CRepeat on other side.
HARDWARE BAG FOR STEP 8 CONTENTS :
SCREW (L) 10 mm Qty: 2
NOTE: There is NO hardware bag for this step. All hardware is
AAttach the CONSOLE MAST wires to the CONSOLE wires.
BCarefully tuck the CONSOLE MAST wires into the CONSOLE MAST before attaching the CONSOLE.
CAttach CONSOLE to the CONSOLE MAST using the 4
DO NOT PINCH WIRES!
YOU’RE FINISHED!
15
BEFORE YOU BEGIN
LIMITED TROUBLESHOOTING CONDITIONING ELLIPTICAL WARRANTY & MAINTENANCE GUIDELINES OPERATION
E901_Rev.1.7.indd | 9/10/08 11:07:08 AM |