Fixing

The appliance must be installed on a perfectly level supporting surface.

Any deformities caused by improper fixing could affect the features and operation of the hob.

The thickness of the supporting surface should be taken into account when choosing the length of the screws for the fixing hooks:

30 mm thick: 17.5 mm screws

40 mm thick: 7.5 mm screws

Fix the hob as follows:

1.Use short flat-bottomed screws to fix the 4 alignment springs in the holes provided at the central point of each side of the hob.

2.Place the hob in the cavity, make sure it is in a central position and push down on the whole perimeter until the hob is stuck to the supporting surface.

3.For hobs with raised sides: After inserting the hob into its cavity, insert the 4 fixing hooks (each has its own pin) into the lower edges of the hob, using the long pointed screws to fix them in place, until the glass is stuck to the supporting surface.

￿The screws for the alignment springs must remain accessible.

￿In order to adhere to safety standards, the appliance must not come into contact with electrical parts once it has been installed.

￿All parts which ensure the safe operation of the appliance must not be removable without the aid of a tool.

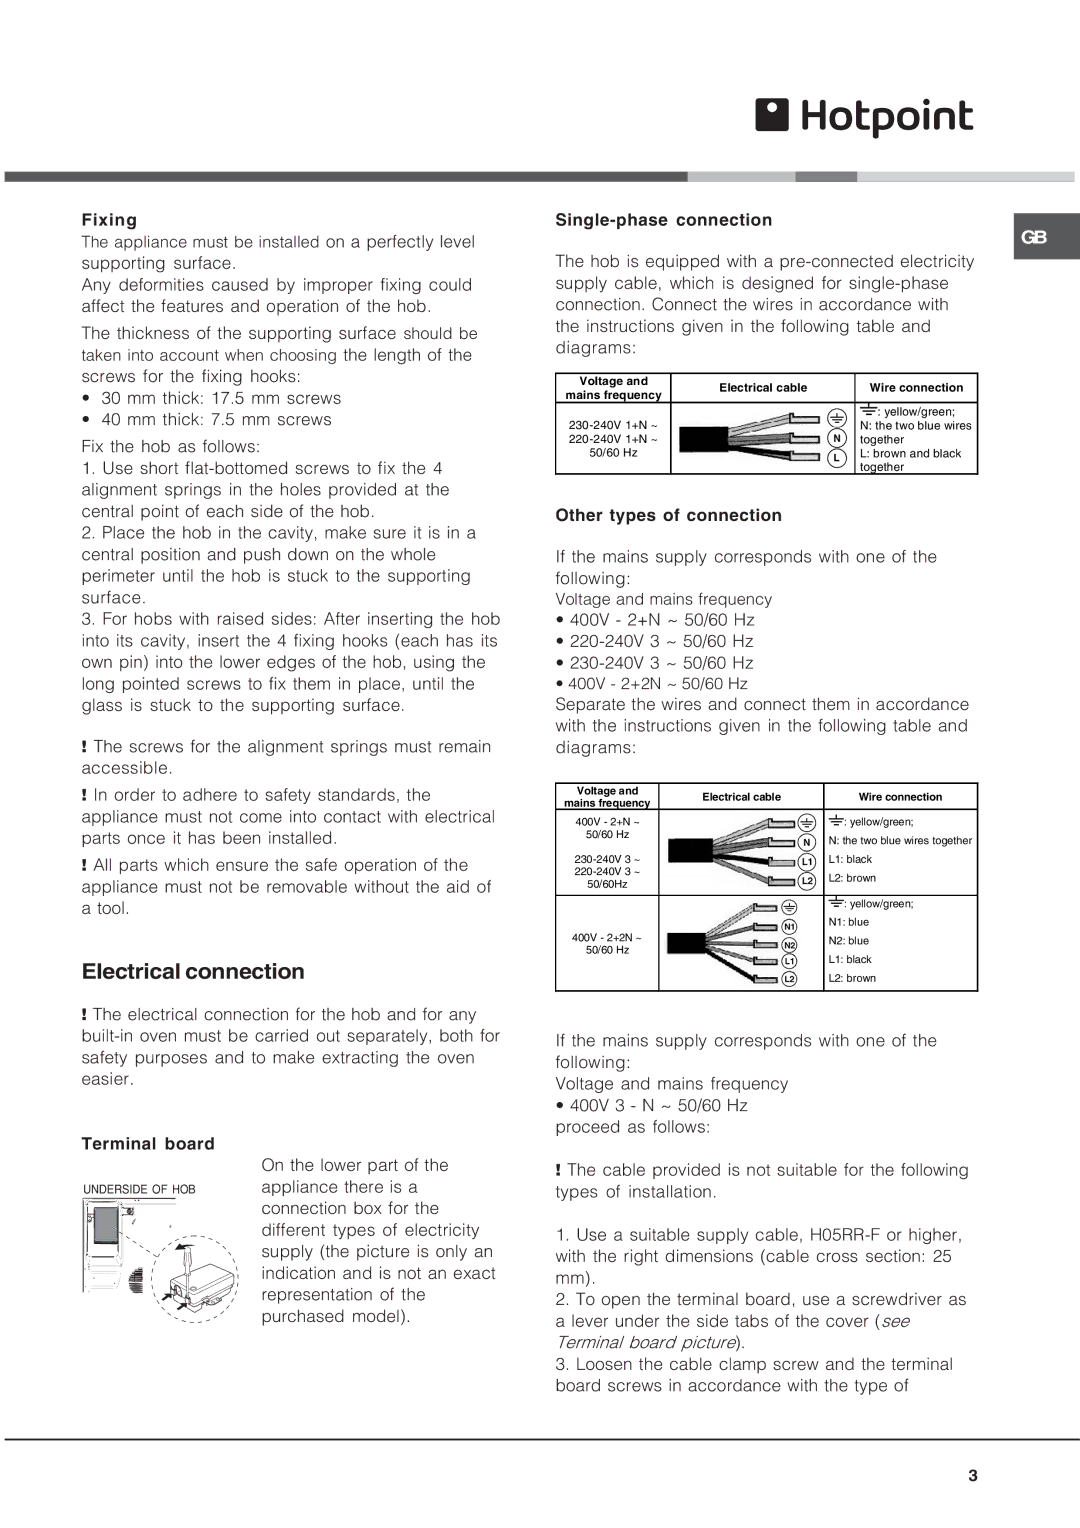
Electrical connection

￿The electrical connection for the hob and for any built-in oven must be carried out separately, both for safety purposes and to make extracting the oven easier.

Single-phase connection

GB

The hob is equipped with a pre-connected electricity supply cable, which is designed for single-phase connection. Connect the wires in accordance with the instructions given in the following table and diagrams:

Voltage and

Electrical cable

Wire connection

mains frequency


: yellow/green;

230

-240V 1+N ~


N: the two blue wires

220

-240V 1+N ~


together


50/60 Hz


L: brown and black


together

Other types of connection

If the mains supply corresponds with one of the following:

Voltage and mains frequency

400V - 2+N ~ 50/60 Hz

220-240V 3 ~ 50/60 Hz

230-240V 3 ~ 50/60 Hz

400V - 2+2N ~ 50/60 Hz

Separate the wires and connect them in accordance with the instructions given in the following table and diagrams:

Voltage and

Electrical cable

Wire connection

mains frequency


400V - 2+N ~


: yellow/green;

50/60 Hz


N: the two blue wires together


230-240V 3 ~


L1: black

220-240V 3 ~


L2: brown

50/60Hz


: yellow/green;


N1: blue

400V - 2+2N ~


N2: blue

50/60 Hz


L1: black


L2: brown


If the mains supply corresponds with one of the following:

Voltage and mains frequency

400V 3 - N ~ 50/60 Hz proceed as follows:

Terminal board

UNDERSIDE OF HOB

On the lower part of the appliance there is a connection box for the different types of electricity supply (the picture is only an indication and is not an exact representation of the purchased model).

￿The cable provided is not suitable for the following types of installation.

1.Use a suitable supply cable, H05RR-F or higher, with the right dimensions (cable cross section: 25 mm).

2.To open the terminal board, use a screwdriver as a lever under the side tabs of the cover (see Terminal board picture).

3.Loosen the cable clamp screw and the terminal board screws in accordance with the type of

3

Page 3
Image 3
Hotpoint CRA 641 DC operating instructions Electrical connection, Voltage Electrical cable Wire connection

CRA 641 DC specifications

The Hotpoint CRA 641 DC is an innovative and efficient cooking appliance that combines modern technology with user-friendly features for an exceptional culinary experience. Known for its sleek design and practical functions, this built-in gas cooktop is ideally suited for contemporary kitchens, making it an excellent choice for home chefs and cooking enthusiasts alike.

One of the standout features of the Hotpoint CRA 641 DC is its four high-efficiency burners. These burners provide varying levels of heat output, allowing for complete versatility when preparing meals. The powerful burners cater to different cooking techniques, from simmering sauces at low heat to boiling water or searing meat at high temperatures. This flexibility is crucial for multitasking in the kitchen, enabling users to manage different dishes simultaneously.

The cooktop's surface is crafted from durable stainless steel, which ensures longevity and ease of maintenance. Its smooth finish not only enhances the aesthetic appeal of the kitchen but also makes cleaning a hassle-free task. The surface is designed to resist stains and scratches, keeping the appliance looking new over time.

Safety is a priority in the design of the Hotpoint CRA 641 DC. It features a flame failure device that automatically shuts off the gas supply in case the flame goes out. This essential safety feature provides peace of mind while cooking, as users can focus on their culinary creations without worrying about potential hazards.

Another significant aspect of the Hotpoint CRA 641 DC is its ergonomic control knobs, which are designed for easy operation. The front-mounted knobs allow for straightforward access and control, ensuring that users can adjust the flame levels with precision.

Moreover, this cooktop is compatible with various cookware types, including cast iron, stainless steel, and non-stick materials. The versatility of the cooktop ensures that users can utilize their preferred pots and pans without limitation.

Overall, the Hotpoint CRA 641 DC is an excellent addition to any culinary space, marrying style, functionality, and safety. Its smart features and user-oriented design offer a seamless cooking experience that caters to both novice cooks and seasoned chefs, making it a noteworthy consideration for anyone looking to enhance their kitchen capabilities. The combination of advanced technology and considerate design embodies what modern cooking appliances should be. Whether preparing simple weeknight meals or hosting elaborate dinner parties, this cooktop can rise to the occasion, making it an essential kitchen ally.