Fixing

The appliance must be installed on a perfectly level supporting surface.

Any deformities caused by improper fixing could affect the features and operation of the hob.

The thickness of the supporting surface should be taken into account when choosing the length of the screws for the fixing hooks:

30 mm thick: 17.5 mm screws

40 mm thick: 7.5 mm screws

Fix the hob as follows:

1.Use short flat-bottomed screws to fix the 4 alignment springs in the holes provided at the central point of each side of the hob.

2.Place the hob in the cavity, make sure it is in a central position and push down on the whole perimeter until the hob is stuck to the supporting surface.

3.For hobs with raised sides: After inserting the hob into its cavity, insert the 4 fixing hooks (each has its own pin) into the lower edges of the hob, using the long pointed screws to fix them in place, until the glass is stuck to the supporting surface.

￿The screws for the alignment springs must remain accessible.

￿In order to adhere to safety standards, the appliance must not come into contact with electrical parts once it has been installed.

￿All parts which ensure the safe operation of the appliance must not be removable without the aid of a tool.

Electrical connection

￿The electrical connection for the hob and for any built-in oven must be carried out separately, both for safety purposes and to make extracting the oven easier.

Single-phase connection

GB

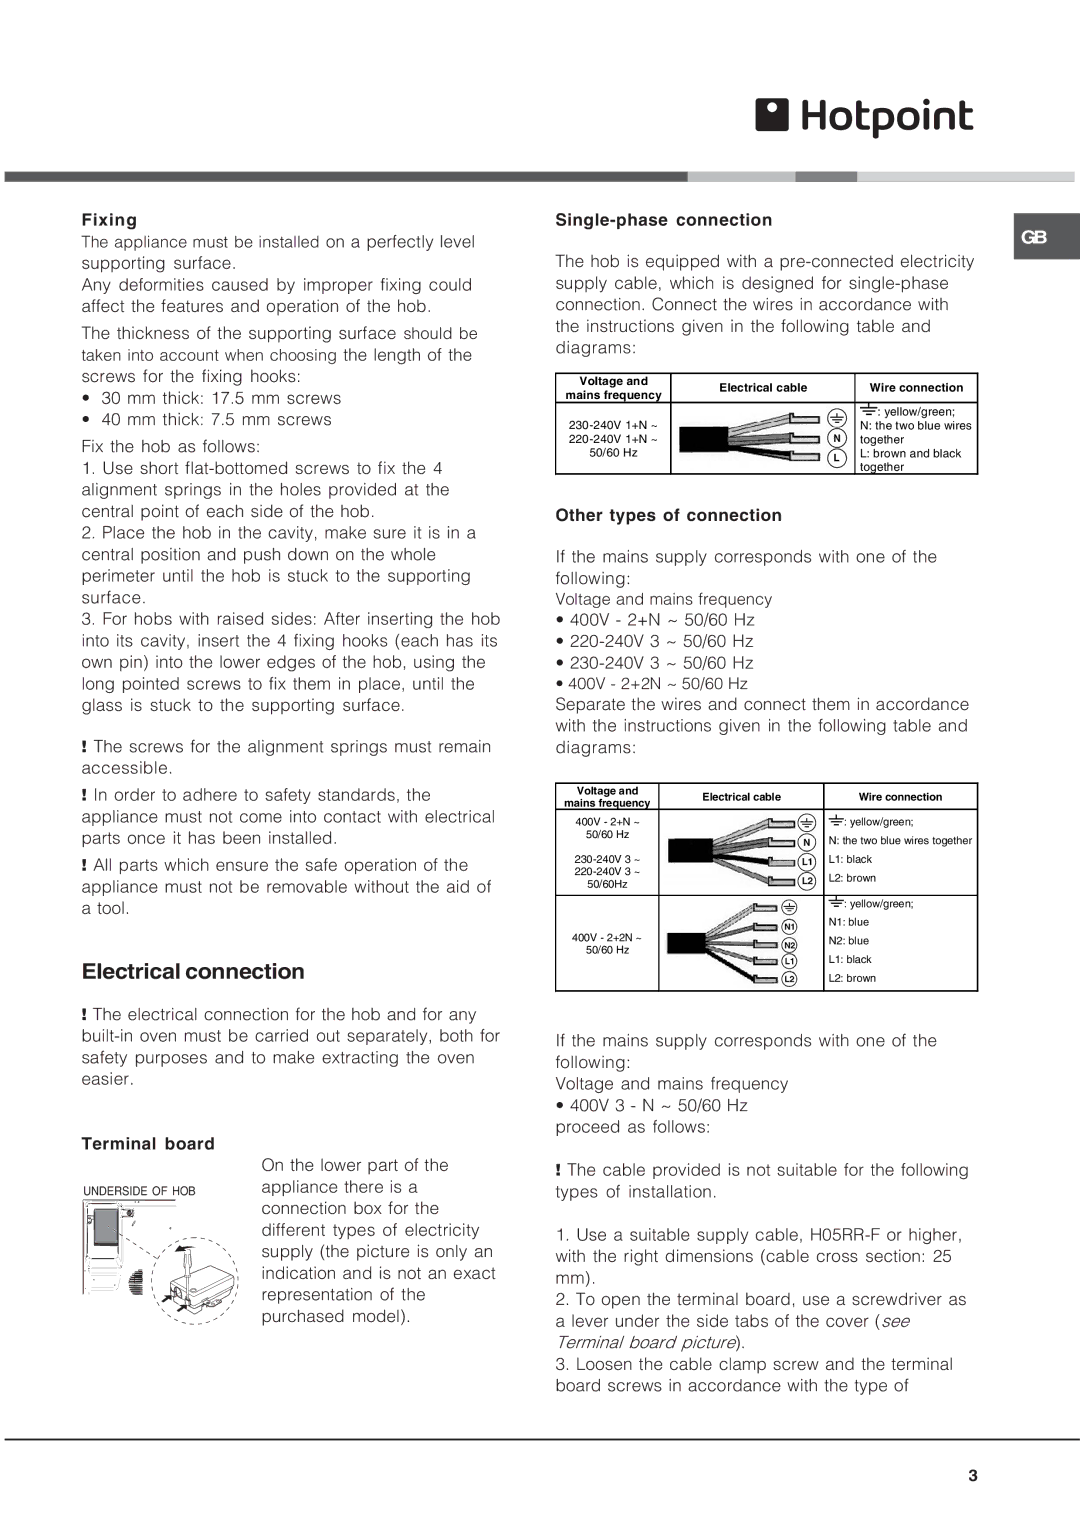
The hob is equipped with a pre-connected electricity supply cable, which is designed for single-phase connection. Connect the wires in accordance with the instructions given in the following table and diagrams:

Voltage and

Electrical cable

Wire connection

mains frequency


: yellow/green;

230

-240V 1+N ~


N: the two blue wires

220

-240V 1+N ~


together


50/60 Hz


L: brown and black


together

Other types of connection

If the mains supply corresponds with one of the following:

Voltage and mains frequency

400V - 2+N ~ 50/60 Hz

220-240V 3 ~ 50/60 Hz

230-240V 3 ~ 50/60 Hz

400V - 2+2N ~ 50/60 Hz

Separate the wires and connect them in accordance with the instructions given in the following table and diagrams:

Voltage and

Electrical cable

Wire connection

mains frequency


400V - 2+N ~


: yellow/green;

50/60 Hz


N: the two blue wires together


230-240V 3 ~


L1: black

220-240V 3 ~


L2: brown

50/60Hz


: yellow/green;


N1: blue

400V - 2+2N ~


N2: blue

50/60 Hz


L1: black


L2: brown


If the mains supply corresponds with one of the following:

Voltage and mains frequency

400V 3 - N ~ 50/60 Hz proceed as follows:

Terminal board

UNDERSIDE OF HOB

On the lower part of the appliance there is a connection box for the different types of electricity supply (the picture is only an indication and is not an exact representation of the purchased model).

￿The cable provided is not suitable for the following types of installation.

1.Use a suitable supply cable, H05RR-F or higher, with the right dimensions (cable cross section: 25 mm).

2.To open the terminal board, use a screwdriver as a lever under the side tabs of the cover (see Terminal board picture).

3.Loosen the cable clamp screw and the terminal board screws in accordance with the type of

3

Page 3
Image 3
Hotpoint CRO 642 D B, CRO 742 DO B operating instructions Electrical connection, Voltage Electrical cable Wire connection

CRO 642 D B, CRO 742 DO B specifications

Hotpoint has long been a trusted name in home appliances, consistently delivering innovative and reliable solutions for modern kitchens. Among their extensive product range, the Hotpoint CRO 742 DO B and CRO 642 D B stand out as highly regarded built-in ovens, combining advanced technology with user-friendly features.

The Hotpoint CRO 742 DO B boasts a sleek black design that fits seamlessly into any kitchen decor. One of its main features is the multi-functional cooking system. With eight cooking functions, including fan-assisted cooking, grill, and conventional baking, this oven offers versatility that caters to diverse culinary needs. The fan-assisted cooking function ensures even heat distribution, reducing cooking times and delivering perfectly baked dishes every time.

Furthermore, it includes a versatile telescopic shelf system that allows for easy access to dishes while minimizing the risk of burns. The oven's intuitive digital display not only enhances usability but also allows users to easily select and monitor cooking settings.

On the other hand, the Hotpoint CRO 642 D B is another exceptional built-in oven, recognized for its compact design and impressive performance. With a spacious capacity that is ideal for smaller kitchens, this model doesn’t compromise on functionality. It features multiple cooking modes, such as top and bottom heating, allowing for a range of culinary creations.

One of its standout technologies is the Eco function, which reduces energy consumption while still delivering excellent cooking results. The CRO 642 D B also incorporates an easy-clean enamel interior, making maintenance a breeze and ensuring that the oven remains in pristine condition even after frequent use.

Both ovens come equipped with a child safety lock feature, reflecting Hotpoint’s commitment to family-friendly designs. This ensures peace of mind for households with young children, allowing parents to have confidence in their kitchen appliances.

In summary, the Hotpoint CRO 742 DO B and CRO 642 D B represent a blend of advanced technology, thoughtful design, and user-centric features that make cooking an enjoyable experience. Whether you're an amateur chef or a seasoned cook, these ovens promise reliability and quality as you create delicious meals for your family and friends.