Electronic Clock & Automatic Cooking Feature

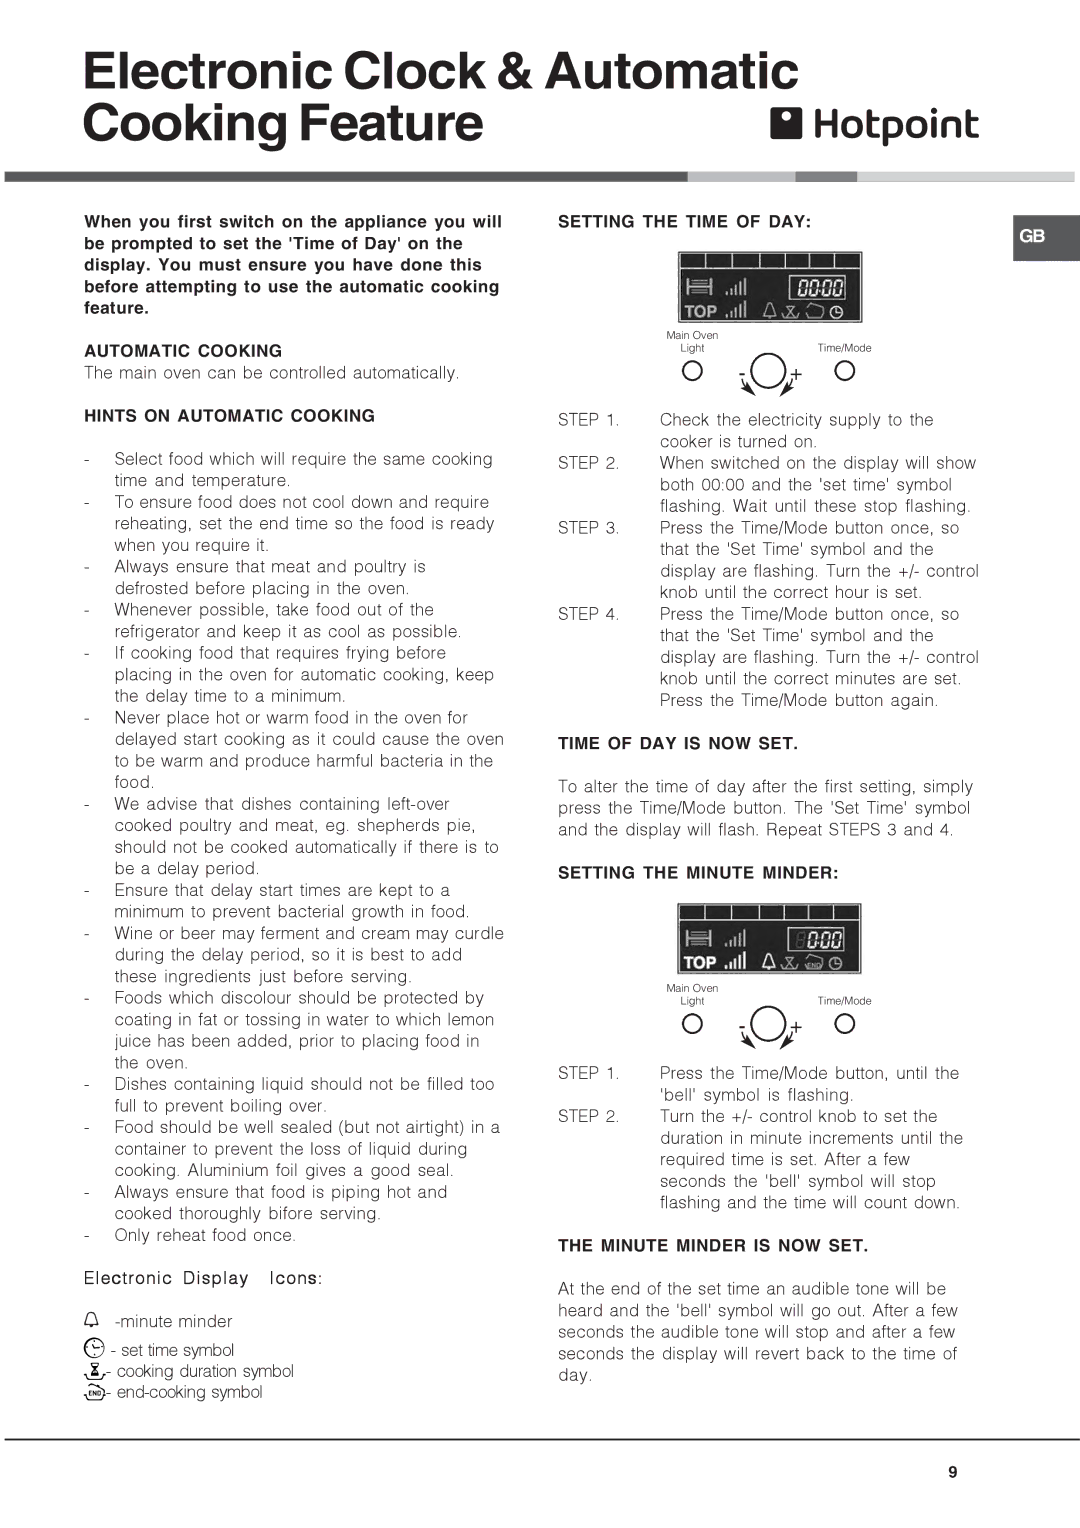
When you first switch on the appliance you will be prompted to set the 'Time of Day' on the display. You must ensure you have done this before attempting to use the automatic cooking feature.

SETTING THE TIME OF DAY:

Main Oven

GB

AUTOMATIC COOKING

The main oven can be controlled automatically.

HINTS ON AUTOMATIC COOKING

-Select food which will require the same cooking time and temperature.

-To ensure food does not cool down and require reheating, set the end time so the food is ready when you require it.

-Always ensure that meat and poultry is defrosted before placing in the oven.

-Whenever possible, take food out of the refrigerator and keep it as cool as possible.

-If cooking food that requires frying before placing in the oven for automatic cooking, keep the delay time to a minimum.

-Never place hot or warm food in the oven for delayed start cooking as it could cause the oven to be warm and produce harmful bacteria in the food.

-We advise that dishes containing left-over cooked poultry and meat, eg. shepherds pie, should not be cooked automatically if there is to be a delay period.

-Ensure that delay start times are kept to a minimum to prevent bacterial growth in food.

-Wine or beer may ferment and cream may curdle during the delay period, so it is best to add these ingredients just before serving.

-Foods which discolour should be protected by coating in fat or tossing in water to which lemon juice has been added, prior to placing food in the oven.

-Dishes containing liquid should not be filled too full to prevent boiling over.

-Food should be well sealed (but not airtight) in a container to prevent the loss of liquid during cooking. Aluminium foil gives a good seal.

-Always ensure that food is piping hot and cooked thoroughly bifore serving.

-Only reheat food once.

Electronic Display Icons:

n--minute minder

- set time symbol

- cooking duration symbol - end-cooking symbol

LightTime/Mode

- +

STEP 1. Check the electricity supply to the cooker is turned on.

STEP 2. When switched on the display will show both 00:00 and the 'set time' symbol flashing. Wait until these stop flashing.

STEP 3. Press the Time/Mode button once, so that the 'Set Time' symbol and the display are flashing. Turn the +/- control knob until the correct hour is set.

STEP 4. Press the Time/Mode button once, so that the 'Set Time' symbol and the display are flashing. Turn the +/- control knob until the correct minutes are set. Press the Time/Mode button again.

TIME OF DAY IS NOW SET.

To alter the time of day after the first setting, simply press the Time/Mode button. The 'Set Time' symbol and the display will flash. Repeat STEPS 3 and 4.

SETTING THE MINUTE MINDER:


Main Oven


Light

Time/Mode


-

+

STEP 1.

Press the Time/Mode button, until the


'bell' symbol is flashing.

STEP 2.

Turn the +/- control knob to set the


duration in minute increments until the


required time is set. After a few

seconds the 'bell' symbol will stop flashing and the time will count down.

THE MINUTE MINDER IS NOW SET.

At the end of the set time an audible tone will be heard and the 'bell' symbol will go out. After a few seconds the audible tone will stop and after a few seconds the display will revert back to the time of day.

9

Page 9
Image 9
Hotpoint HUE manual Electronic Clock & Automatic Cooking Feature

HUE specifications

The Hotpoint HUE series is a standout in the world of home appliances, particularly for those seeking reliability and cutting-edge technology in their cooking experience. This range of built-in ovens offers a perfect blend of performance, convenience, and style, making it a preferred choice for modern kitchens.

One of the main features of the Hotpoint HUE series is its innovative cooking technology. The ovens utilize Multifunction cooking, providing a variety of cooking modes including conventional, fan-assisted, and grilling options. This versatility is ideal for accommodating a wide range of recipes, from baking delicate pastries to roasting meats to perfection.

The Hotpoint HUE is equipped with the Dynamic Cooking system, which ensures even heat distribution throughout the oven cavity. This technology minimizes hot spots, leading to more consistent cooking results. Whether you're a novice or an experienced chef, this feature allows for professional-level results at home.

Another standout characteristic of the Hotpoint HUE series is its user-friendly interface. Featuring an intuitive digital display and easy-to-navigate controls, it allows for simple program selection and precise temperature settings. Additionally, the ovens often come with a variety of pre-set cooking programs that take the guesswork out of meal preparation, making it easier for users to achieve their desired results.

Energy efficiency is also a key attribute of the Hotpoint HUE series. With high energy ratings, these ovens are designed to minimize electricity consumption without compromising performance. This feature not only helps in reducing utility bills but also contributes to a more sustainable home environment.

Cleaning and maintenance are made easy with the Hotpoint HUE’s Hydro Easy Cleaning technology. This self-cleaning feature employs steam to loosen stubborn grease and grime, allowing for a hassle-free cleaning process. Users can simply wipe down the interior after a cleaning cycle, saving time and effort.

Finally, the striking design of the Hotpoint HUE series adds a touch of elegance to any kitchen. Available in various finishes, including stainless steel and sleek black, these ovens seamlessly blend with other appliances while enhancing the overall aesthetic appeal.

In summary, the Hotpoint HUE series combines advanced cooking technologies, user-friendly features, energy efficiency, and stylish design, making it an excellent choice for those looking to elevate their cooking experience at home. Whether preparing a family meal or hosting a dinner party, these ovens stand ready to deliver exceptional results.