GB Installation

!Please keep this instruction booklet in a safe place for future reference. If the appliance is sold, given away or moved, please make sure the booklet is also passed on to the new owners so that they may benefit from the advice contained within it.

!Please read this instruction manual carefully: it contains important information concerning the safe operation, installation and maintenance of the appliance.

Positioning

!Do not let children play with the packaging material; it should be disposed of in accordance with local separated waste collection standards (see Precautions and tips).

!The appliance must be installed by a qualified professional in accordance with the instructions provided. Incorrect installation may damage property or cause harm to people or animals.

Built-in appliances

Use an appropriate cabinet to ensure that the appliance operates properly:

The panels adjacent to the oven must be made of heat-resistant material.

Cabinets with a veneer exterior must be assembled with glues which can withstand temperatures of up to 100°C.

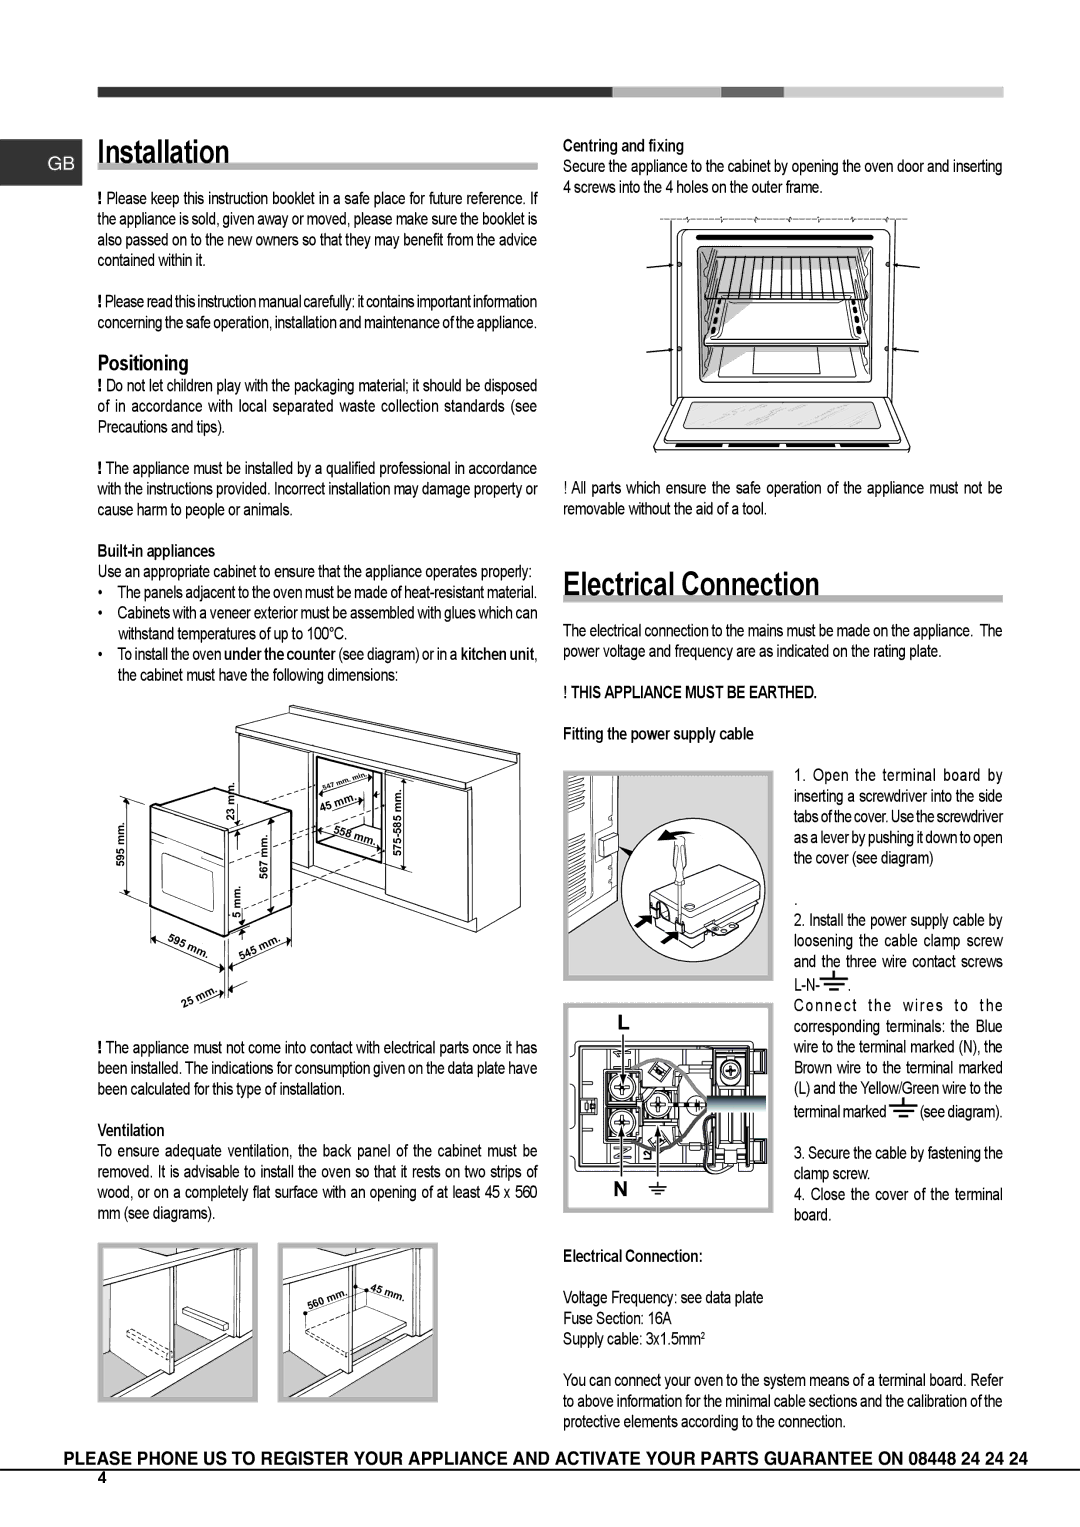
To install the oven under the counter (see diagram) or in a kitchen unit, the cabinet must have the following dimensions:

Centring and fixing

Secure the appliance to the cabinet by opening the oven door and inserting 4 screws into the 4 holes on the outer frame.

!All parts which ensure the safe operation of the appliance must not be removable without the aid of a tool.

Electrical Connection

The electrical connection to the mains must be made on the appliance. The power voltage and frequency are as indicated on the rating plate.

!THIS APPLIANCE MUST BE EARTHED. Fitting the power supply cable


.


23 mm.


.min

mm.595

mm.567

mm

585-575mm.


547


.


mm


45


558

mm.


595


5 mm.


mm.

.


mm


545


.


mm


25


!The appliance must not come into contact with electrical parts once it has been installed. The indications for consumption given on the data plate have been calculated for this type of installation.

Ventilation

To ensure adequate ventilation, the back panel of the cabinet must be removed. It is advisable to install the oven so that it rests on two strips of wood, or on a completely flat surface with an opening of at least 45 x 560 mm (see diagrams).

L

N

1.Open the terminal board by inserting a screwdriver into the side tabs of the cover. Use the screwdriver as a lever by pushing it down to open the cover (see diagram)

.

2.Install the power supply cable by loosening the cable clamp screw and the three wire contact screws L-N-.

Connect the wires to the corresponding terminals: the Blue wire to the terminal marked (N), the Brown wire to the terminal marked

(L) and the Yellow/Green wire to the terminal marked (see diagram).

3.Secure the cable by fastening the clamp screw.

4.Close the cover of the terminal board.

.

45

mm.

mm


560


Electrical Connection:

Voltage Frequency: see data plate

Fuse Section: 16A

Supply cable: 3x1.5mm2

You can connect your oven to the system means of a terminal board. Refer to above information for the minimal cable sections and the calibration of the protective elements according to the connection.

PLEASE PHONE US TO REGISTER YOUR APPLIANCE AND ACTIVATE YOUR PARTS GUARANTEE ON 08448 24 24 24

4

Page 4
Image 4
Hotpoint SH103PX S, KSO103PX S manual GB Installation, Electrical Connection, Positioning

KSO103PX S, SH103PX S specifications

The Hotpoint SH103PX S and KSO103PX S are modern kitchen appliances that combine style, functionality, and innovative technology to enhance your cooking experience. Both models are designed with user convenience in mind while providing excellent performance.

The SH103PX S, a built-in single electric oven, offers a sleek stainless-steel finish that complements any contemporary kitchen design. One of its main features is the spacious cavity with a 71-litre capacity, providing ample space for cooking multiple dishes simultaneously. This oven is equipped with a range of cooking functions, including fan-assisted cooking, conventional cooking, and grill settings, allowing for versatility in meal preparation. The fan-assisted cooking function ensures even heat distribution, resulting in consistently cooked meals every time.

On the other hand, the KSO103PX S is an elegant toaster that caters to those who love a crisp and perfectly toasted slice of bread. This model boasts four wide slots, accommodating various bread types, from artisanal loaves to bagels. The KSO103PX S features multiple browning settings, enabling users to select their preferred level of toasting, whether it be lightly golden or extra crispy. The canceled function allows for immediate stopping of the toasting, adding to its user-friendly design.

Both models incorporate advanced technologies aimed at enhancing performance and energy efficiency. The SH103PX S features a self-cleaning function that utilizes pyrolytic cleaning technology, turning food residues into ash that can be easily wiped away. This saves the user time and effort, making oven maintenance much simpler.

Energy efficiency is a hallmark of the Hotpoint brand, and both the SH103PX S and KSO103PX S reflect this commitment. The appliances are designed to operate with minimal energy consumption without compromising performance, which is beneficial for environmentally-conscious consumers.

Overall, the Hotpoint SH103PX S and KSO103PX S stand out with their combination of elegant design, functional features, and technological innovations. These appliances are perfect for individuals and families looking to streamline their cooking and toasting processes while ensuring satisfying results every time. With these models, Hotpoint continues to deliver quality and efficiency, making them excellent additions to any modern kitchen.