HP Open Source Middleware Stacks Blueprint
Copyright 2007 Hewlett-Packard Development Company, L.P
Table of Contents
Monitor Tomcat with OpenView Tomcat SPI
Oracle Database Test
Webalizer Usage Report
Page
List of Tables
Page
Introduction
HP Services
Executive Summary
Intended Audience
HP Encourages Your Comments
Typographic Conventions
UserInput
Feedback@fc.hp.com
Web Server Stack Architecture
HP Open Source Web Server Middleware Stack
Web Server Stack Architecture
Required Packages and Installation Recommendations
Installing and Verifying the Linux Distribution
Installing the Linux Distribution
YaST Software Selection and System Tasks
Verifying the Linux Distribution Installation
Installing and Configuring Sun JDK on an HP Proliant System
Configuring the Basic Apache Http Server
Tomcat
# /etc/init.d/apache2 start
For the alljava.csh file, add the following lines
# ln -s /usr/java/jdk1.5.010 /usr/local/jdk
For the alljava.sh file, add the following lines
# java -version
Installing and Configuring Tomcat
Following messages appear
# /usr/local/apache-tomcat/bin/startup.sh
Using the Apache Http Server Benchmarking Tool
Advanced Apache Http Server Features
If necessary, stop Tomcat by entering the following command
# /usr/local/apache-tomcat/bin/shutdown.sh
Apache Http Server Status and Information
You can correct the error by entering the following
Apachemodules definition should now look like the following
Restart the Apache Http Server for the changes take effect
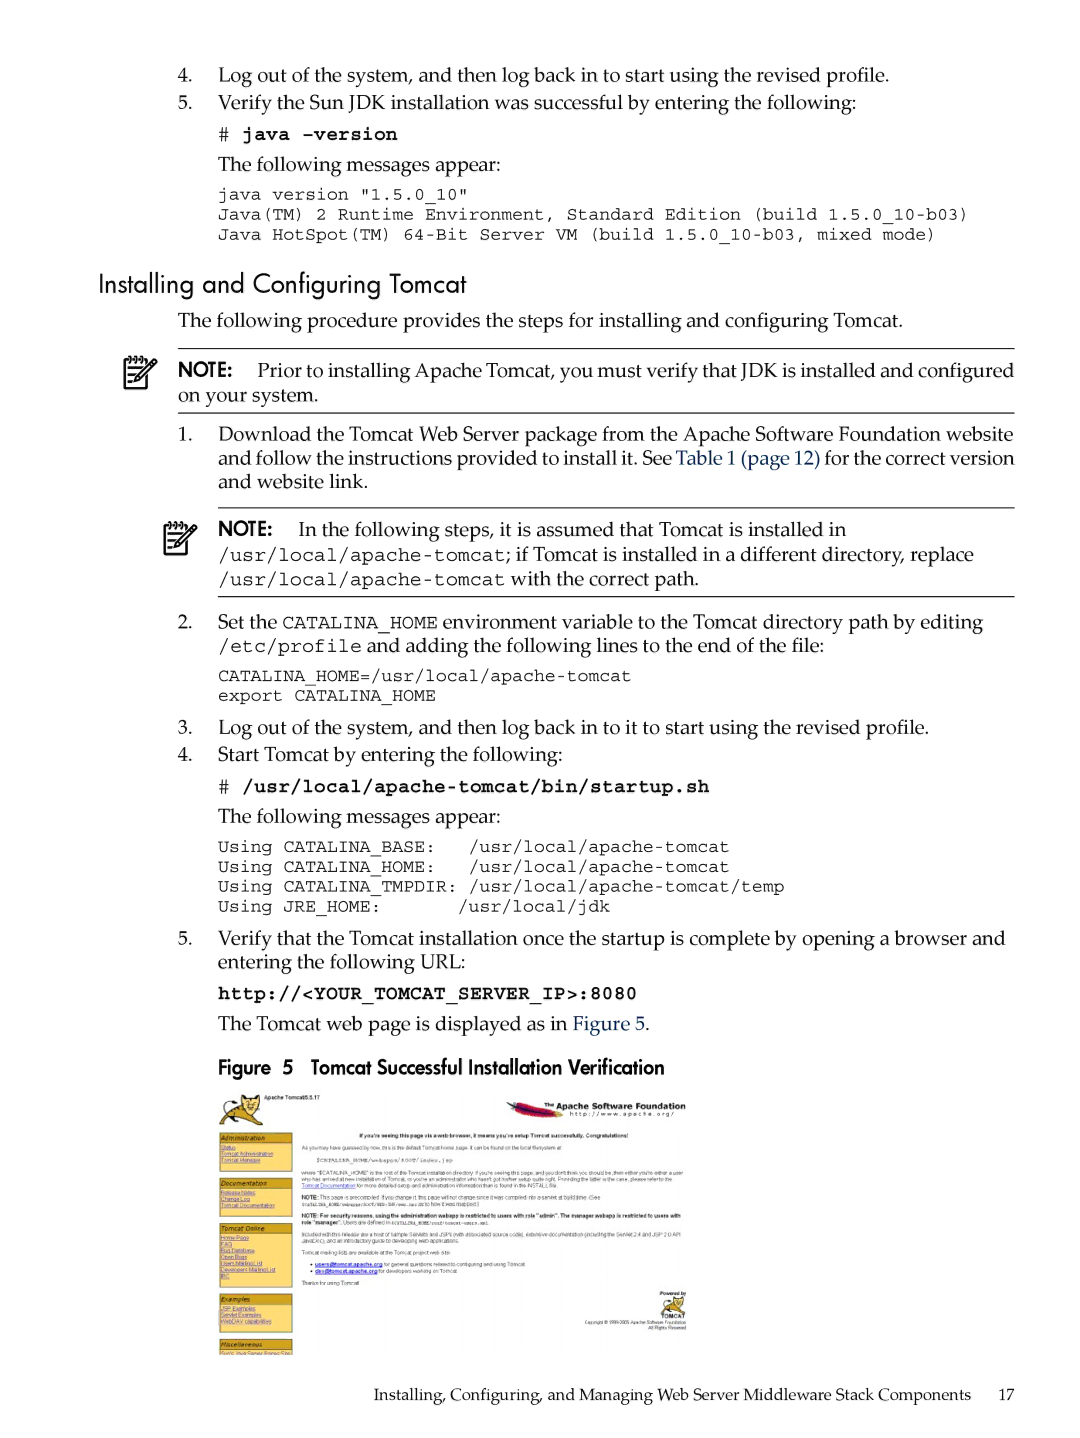
Apache Server Information web page opens, as shown in Figure
Apache Server Status web page opens, as shown in Figure
# webalizer
Apache Http Server Log
# /etc/init.d/apache2 restart
Create the following file
Using Virtual Host Support
For detailed information, see the Webalizer website at
On the second server, create the following Html file
Using Apache Http Server URL Redirection
Configure virtual hosting by creating a file named
Edit the following configuration file
Using Apache Http Server Proxy Features
Add the following line to the preceding file
Add the following lines to the preceding file
Create the following Html file
Error Responses and Redirects
Populate the preceding file with the following lines
Using Per-User Web Directories
Integrating the Web Server Stack Components
Configuring the Apache and Tomcat Connector
If there are any errors, check the following log files
Restart Apache by entering the following command
Insert the following line below the DocumentRoot line
Http//YOURHOSTNAME/jsp-examples
Integrating the Apache Web Server and Perl
Integrating the Apache Web Server and PHP
# rpm -q php5 apache2-modphp5
Create the following test file
Web page displays the following text
Connecting Tomcat to a Database
Integrating the Apache Web Server and Python
# tar zxf mysql-connector-java-version.tar.gz
Connecting Tomcat and MySQL
# $CATALINAHOME/bin/startup.sh
# mysqladmin -u root -p create osmsdb
# ps -efgrep mysqld
# /etc/init.d/mysql start
If needed, start Tomcat by entering the following command
Connecting Tomcat and Oracle
Http//YOURHOSTNAME8080/mysqltest.jsp
Test page opens as shown in Figure
Configuring the Oracle Server
Obtaining and Installing the Oracle Jdbc Driver
Testing the Oracle Database Connectivity
Creating an Oracle Data Source
Oracle Database Test
Http//YOURHOSTNAME8080/oracleTest.jsp
Installing Hibernate, Tomcat, and JDK
Connecting Tomcat to MySQL or Oracle Using Hibernate
Configuring a Database Driver in Tomcat
# mysql -u root -p Password
# sqlplus osmsusr/osmspass@osmsdbora
Creating a Simple Application in Tomcat
For a MySQL database server
For an Oracle database server
Asm.jar asm-attrs.jar antlr-2.7.6rc1.jar
File HibernateSessionFactory.class is generated
This directory, create a Hibernate Pojo file named
Preceding command creates a class file named
Http//YOURHOSTNAME8080/SimpleDemo/hibernate.jsp
Verifying the Simple Application Operation
Restart Apache by entering the following
Secure the Web Server Stack
Enabling Https Support in the Apache Http Server
Apache default document root is
Apache Http Server Authorization
Verify that the certificate is displayed as in Figure
Create the following test Html file
If the login fails, the following message appears
Protecting Apache Http Server Authorization with Symas CDS
Configuring Apache Http Server Services
Html Head
Protecting Tomcat Authorization with Symas CDS
Html Head
# $CATALINA/bin/shutdown.sh # $CATALINA/bin/startup.sh
Monitor Tomcat with OpenView Tomcat SPI
Tomcat SPI Components
Software Prerequisites and Reference Guides
Policies
Tools
Complete these steps
Complete these steps
# /sbin/SuSEfirewall2 stop
Appendix B Frequently Asked Questions
Appendix C Vendor Information Reference
Appendix D Hibernate Test Application Source Code
Following are the contents of the hibernate.jsp file
Page
Appendix D Hibernate Test Application Source Code