Getting Started Guide
USA
Table of Contents
Using the Memory Card Reader
Using a TV as a Monitor
Using the HP Personal Media Drive
Working with Digital Images
Creating Audio and Data Discs
Creating Video Discs and Movies
Index
Creating Movies Using muvee autoProducer
Getting Help
Setting Up Your PC
Putting Your PC Together
Serial
Connecting to the PC
Connector Description Symbol Mouse PS/2 connector
Connector Description Symbol Audio Line Out powered speakers
Turning On Your PC for the First Time
Setting Up and Connecting to Your Internet Account
Online Services, and then click Easy Internet Sign-up
Installing Software and Hardware Devices
Using HP products
Using Desktop Icons
Using HP Organize software
Icon Opens Use it to
Choose All Programs
Hp or
Using the Keyboard
Icon Feature Description
DVD/MP3
Customizing the keyboard buttons
Getting Started Guide
Setting Up Sound
Using Speakers
Setting up 3-connector sound
Connect speaker plugs for To PC Connector Speaker Icon Mode
Configuring multi-channel audio output for the DVD player
Click the Speaker Configuration tab
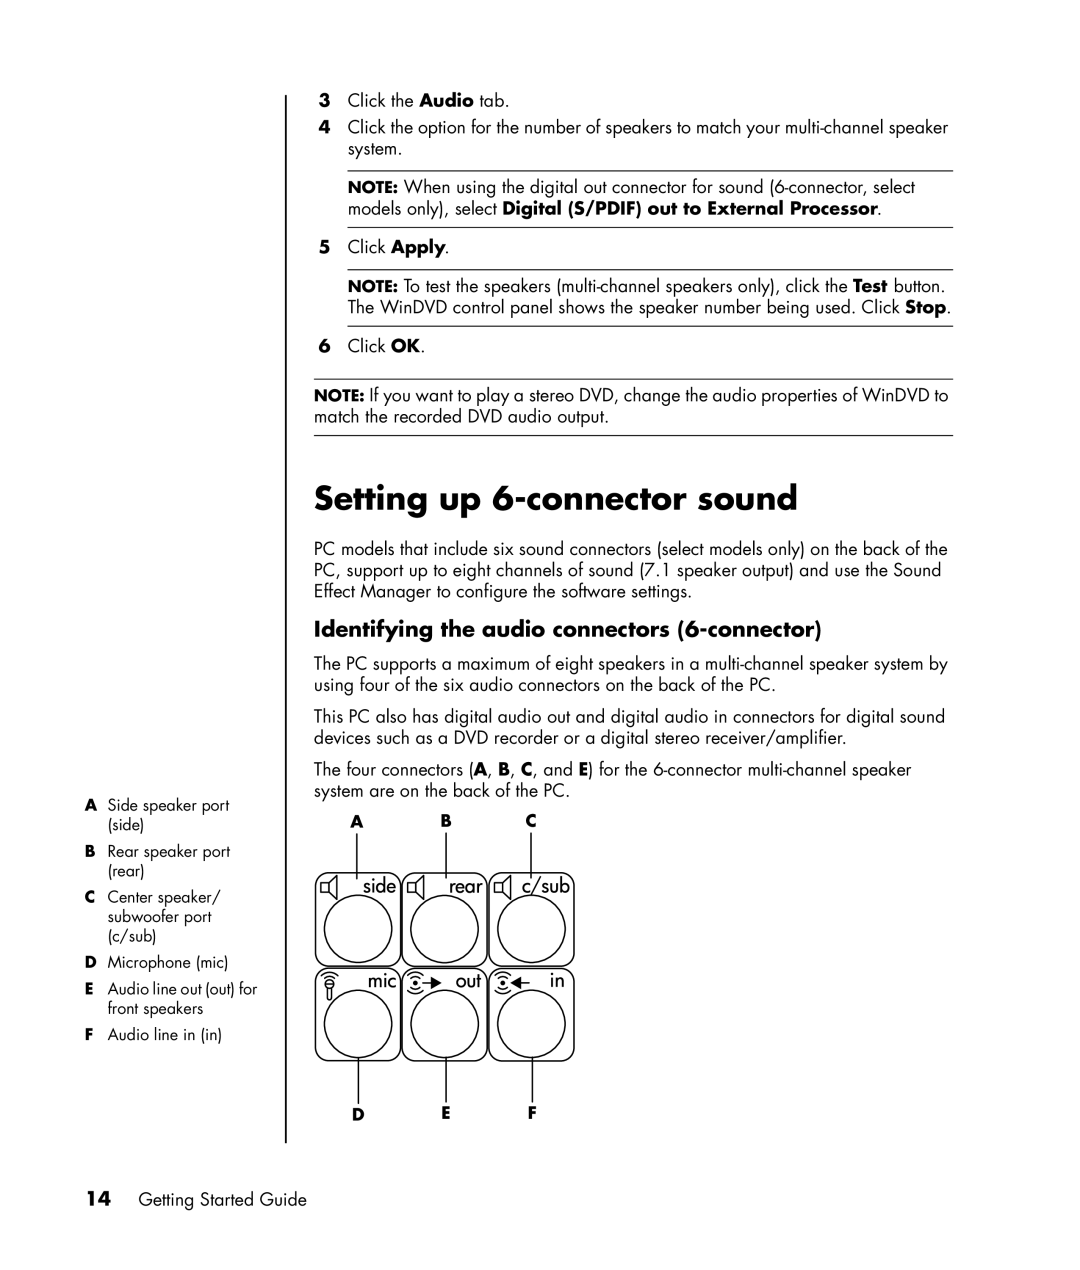
Setting up 6-connector sound
Identifying the audio connectors 6-connector
Connect speaker cable plug for To PC port label, name Color
Configuring the Sound Effect Manager 6-connector
Click the Speaker Configuration button
Page
Sound Effect Manager control screens
Using the Sound Effect Manager 6-connector
To open the Sound Effect Manager
Retasking using the Audio Wizard 6-connector
To enable the Audio Wizard
Connector Name Icon Color
Using Your PC Top
Using Your Docking Bay
To store CDs, DVDs, or memory cards
Page
Using Your Multistorage Bay
Multistorage bay chassis figure
Storing CDs, DVDs, or memory cards
Docking a peripheral device
Placing a peripheral device on the multistorage bay top
Using the optional camera station PC top
Write Dvd Bay Exp Ansio
Writer & cd writer dvd hp Bay expansion
Removing cables from the multistorage bay cable tunnel
Using the Memory Card Reader
Card Slot reader
Using the memory card reader
Working with the Safely Remove Hardware utility
Slot memory card reader
Card Insert Into 4-slot reader
CompactFlash I/II
Card Insert Into 2-slot reader
Identifying Cables You May Need
Using a TV as a Monitor
Connecting to a TV Set
Viewing the PC Image on Your TV Screen
Click the Ge Force FX xxxx tab
NView tab
Ge Force tab
Disabling the TV Option
Displays tab
Displays tab disabling
NView tab disabling
Ge Force tab disabling
Disconnecting the TV
Using the HP Personal Media Drive
Connecting the Drive
Inserting the Drive
Locating the Drive and Assigning a Drive Letter
Click My Computer
Using the Drive
Disconnecting the Drive
Getting Started Guide
Working with Digital Images
Using HP Image Zone Plus
Working with Digital Images
Selection tray
Burning a label on a LightScribe media disc
Creating disc labels with HP Image Zone Plus
Click Print LightScribe label
Page
Getting Started Guide
Playing CDs and DVDs
Playing Music CDs with iTunes
Playing CDs and DVDs with Windows Media Player
Playing DVD Movies with InterVideo WinDVD
Page
Using country/region codes
Playing Video CDs VCD with InterVideo WinDVD
Playing Video CDs VCD with Windows Media Player
Getting Started Guide
Creating Audio and Data Discs
Erasing Rewritable Discs Before Recording
Working with Audio CDs
Verifying audio disc recorded without errors
Audio CD tips
Creating audio CDs
Creating jukebox discs
Verifying data disc recorded without errors
Working with Data DVDs and CDs
Data disc tips
Creating data discs
Copying a DVD or CD
Archiving Files on a CD or DVD
Working with Image Files
Burning from an image file
Disc Labeling with LightScribe
Creating an image file
LightScribe requirements
Burning a LightScribe label with Sonic Express Labeler
Burning a LightScribe label after burning with iTunes
Using adhesive disc labels
Compatibility Information
Disc Features and Compatibility Table
DVD-R
Double
Layer
Double-Layer Combo
Optical Drive Quick Reference Table
Optical drive can
Software Quick Reference Table
With this program You can
With this program You can
Creating Video Discs and Movies
Before You Begin Capturing Video
Sonic MyDVD Video Projects
Creating a Video Project
Click Add Files
Adding files to a video project
Capturing video to a video project
Adding slide shows to a video project
Adding submenus to a video project
Editing the style of a video project
Editing movie files
Click Edit Style
To This Menu
Burning a video project to disc
Creating a Video Project with Direct-to-Disc Wizard
Video Quality and Disc Size
DVD Recording Time
Estimated Time per Disc Size Video Quality Audio Format
Getting Started Guide
Creating Movies Using muvee autoProducer
Basic Steps to Make a Movie
Locating the muvee autoProducer
Using muvee autoProducer
Getting started
Button Allows you to See Title
Credits
Make muvee
Save
Capturing video from a DV camcorder
Click the Get Video from Camera button
Adding videos
Adding pictures
Adding music
Changing the settings
Selecting the style
Adding an opening title and closing credits
Making the movie
Saving the movie project
Computer Playback Mail DV camcorder
VCD video CD
Upgrading muvee autoProducer
Recording the movie project to disc
Getting Started Guide
Getting Help
Finding Onscreen Guides
Finding Guides on the Web
Choose All Programs Choose Documentation
Getting messages
Using the Onscreen Help and Support Center
Using Updates from HP
Using PC Help & Tools
Turning off messages
Reactivating messages
Choose All Programs Choose PC Help & Tools
Getting Started Guide
Symbols
Index
Audio discs 59 data discs 62 closed-session
FireWire 20, 23, 24, 25, 87 Fit to music
Getting Started Guide
Installing 5 software programs iTunes
Part Number Getting Started Guide