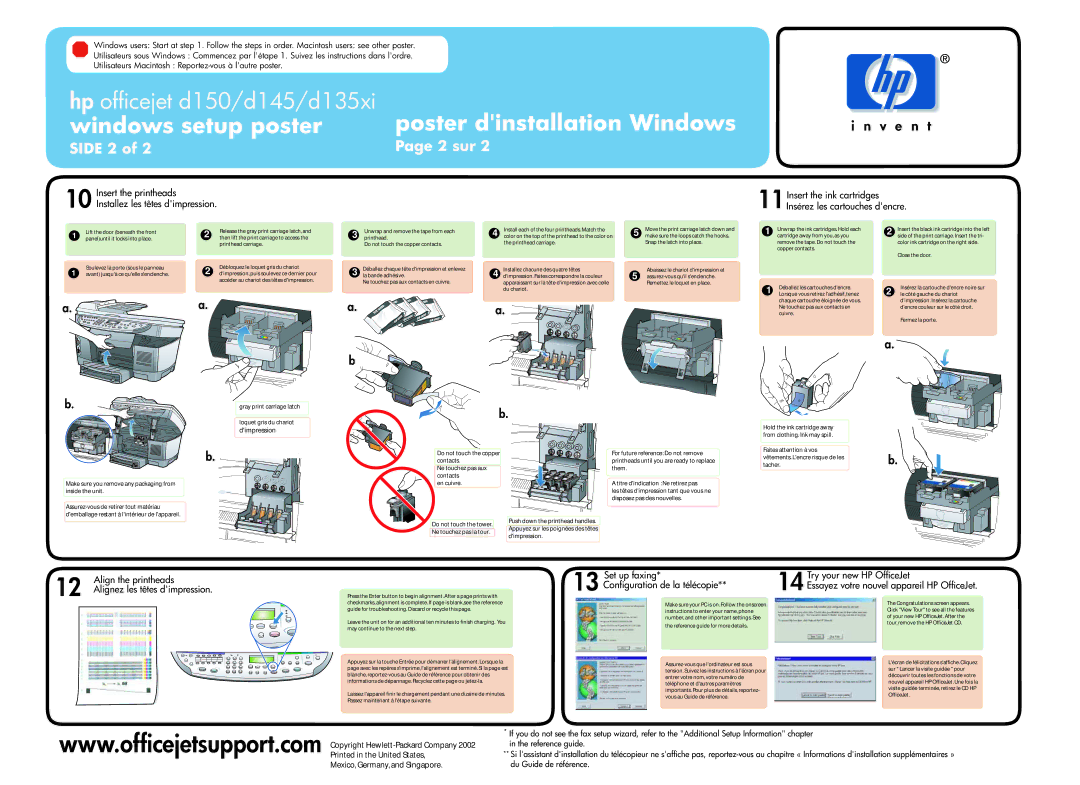
Windows users: Start at step 1. Follow the steps in order. Macintosh users: see other poster.
Utilisateurs sous Windows : Commencez par l'étape 1. Suivez les instructions dans l'ordre.
Utilisateurs Macintosh :
hp officejet d150/d145/d135xi | poster d'installation Windows |
windows setup poster | |
SIDE 2 of 2 | Page 2 sur 2 |
Insert the printheads |
10 Installez les têtes d'impression. |
11Insert the ink cartridges Insérez les cartouches d'encre.
Lift the door (beneath the front | 2 | Release the gray print carriage latch, and | |
panel)until it locks into place. | then lift the print carriage to access the | ||
| |||
|
| printhead carriage. | |
Soulevez la porte (sous le panneau | 2 | Débloquez le loquet gris du chariot | |
avant) jusqu'à ce qu'elle s'enclenche. | d'impression, puis soulevez ce dernier pour | ||
|
| accéder au chariot des têtes d'impression. |
3 | Unwrap and remove the tape from each | 4 | Install each of the four printheads. Match the | 5 | Move the print carriage latch down and | |
color on the top of the printhead to the color on | make sure the loops catch the hooks. | |||||
printhead. | ||||||
| Do not touch the copper contacts. |
| the printhead carriage. |
| Snap the latch into place. | |
|
|
|
|
| ||
3 | Déballez chaque tête d'impression et enlevez | 4 | Installez chacune des quatre têtes | 5 | Abaissez le chariot d'impression et | |
la bande adhésive. | d'impression. Faites correspondre la couleur | |||||
| Ne touchez pas aux contacts en cuivre. |
| apparaissant sur la tête d'impression avec celle |
| Remettez le loquet en place. |
du chariot.
1 | Unwrap the ink cartridges. Hold each | |
cartridge away from you, as you | ||
| ||
| remove the tape. Do not touch the | |
| copper contacts. |
11 | Déballez les cartouches d'encre. |
Lorsque vous retirez l'adhésif, tenez |
2 | Insert the black ink cartridge into the left | |
side of the print carriage. Insert the tri- | ||
| ||
| color ink cartridge on the right side. | |
| Close the door. |
Insérez la cartouche d'encre noire sur
2 le côté gauche du chariot
a. |
|
|
|
|
|
|
|
|
|
|
|
|
|
|
|
| a. |
|
|
|
|
|
|
|
|
|
|
|
|
|
|
|
| ||
|
|
|
|
|
|
|
|
|
|
|
|
|
|
|
| ||
|
|
|
|
|
|
|
|
|
|
|
|
|
|
|
| ||
|
|
|
|
|
|
|
|
|
|
|
|
|
|
|
|
|
|
|
|
|
|
|
|
|
|
|
|
|
|
|
|
|
|
|
|
|
|
|
|
|
|
|
|
|
|
|
|
|
|
|
|
|
|
|
|
|
|
|
|
|
|
|
|
|
|
|
|
|
|
|
|
|
|
|
|
|
|
|
|
|
|
|
|
|
|
|
|
|
|
|
|
|
|
|
|
|
|
|
|
|
|
|
|
|
|
|
|
|
|
|
|
|
|
|
|
|
|
|
|
|
|
|
|
|
|
|
|
|
|
|
|
|
|
|
|
|
|
|
|
|
|
|
|
a. ![]()
![]() a.
a.
chaque cartouche éloignée de vous. |
Ne touchez pas aux contacts en |
cuivre. |
d'impression. Insérez la cartouche d'encre couleur sur le côté droit.
Fermez la porte.
gray print carriage latch
loquet gris du chariot
d'impression
b.
Make sure you remove any packaging from inside the unit.
b.
b.
Do not touch the copper contacts.
Ne touchez pas aux contacts
en cuivre.
Do not touch the tower.
Ne touchez pas la tour.
For future reference: Do not remove printheads until you are ready to replace them.
A titre d'indication : Ne retirez pas
les têtes d'impression tant que vous ne disposez pas des nouvelles.
Push down the printhead handles. Appuyez sur les poignées des têtes d'impression.
a.
Hold the ink cartridge away from clothing. Ink may spill.
Faites attention à vos
vêtements. L'encre risque de lesb. tacher.
12 | Align the printheads |
Alignez les têtes d'impression. |
Set up faxing* | Try your new HP OfficeJet |
13 Configuration de la télécopie** | 14 Essayez votre nouvel appareil HP OfficeJet. |
Press the Enter button to begin alignment. After a page prints with checkmarks, alignment is complete. If page is blank,see the reference guide for troubleshooting. Discard or recycle this page.
Leave the unit on for an additional ten minutes to finish charging. You may continue to the next step.
Appuyez sur la touche Entrée pour démarrer l'alignement. Lorsque la page avec les repères s'imprime, l'alignement est terminé. Si la page est blanche,
Laissez l'appareil finir le chargement pendant une dizaine de minutes. Passez maintenant à l'étape suivante.
Make sure your PC is on. Follow the onscreen instructions to enter your name, phone number, and other important settings. See
the reference guide for more details.
The Congratulations screen appears. Click "View Tour" to see all the features of your new HP OfficeJet. After the tour, remove the HP OfficeJet CD.
L'écran de félicitations s'affiche. Cliquez sur " Lancer la visite guidée " pour découvrir toutes les fonctions de votre nouvel appareil HP OfficeJet. Une fois la visite guidée terminée, retirez le CD HP OfficeJet.
www.officejetsupport.com Copyright
Mexico, Germany, and Singapore.
*If you do not see the fax setup wizard, refer to the "Additional Setup Information" chapter in the reference guide.
**Si l'assistant d'installation du télécopieur ne s'affiche pas,