7


2

3

4

1

2

3


EN

FR

ES

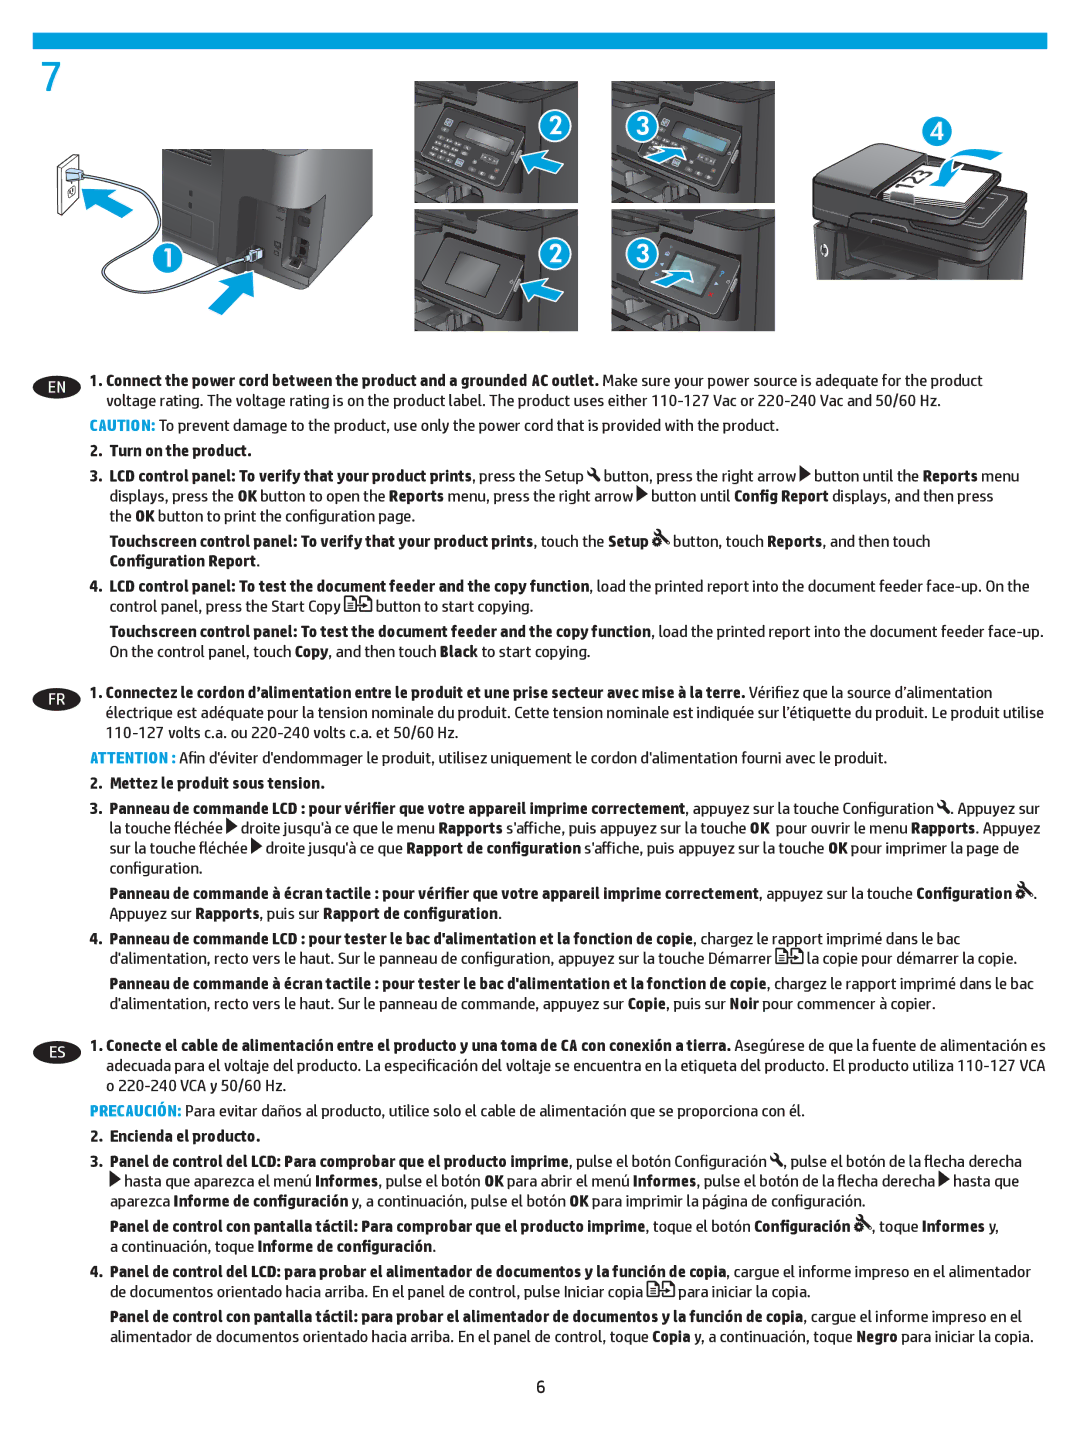
1.Connect the power cord between the product and a grounded AC outlet. Make sure your power source is adequate for the product voltage rating. The voltage rating is on the product label. The product uses either 110-127 Vac or 220-240 Vac and 50/60 Hz.

CAUTION: To prevent damage to the product, use only the power cord that is provided with the product.

2.Turn on the product.

3.LCD control panel: To verify that your product prints, press the Setup button, press the right arrow button until the Reports menu displays, press the OK button to open the Reports menu, press the right arrow button until Config Report displays, and then press the OK button to print the configuration page.

Touchscreen control panel: To verify that your product prints, touch the Setup button, touch Reports, and then touch

Configuration Report.

4.LCD control panel: To test the document feeder and the copy function, load the printed report into the document feeder face-up. On the

control panel, press the Start Copy button to start copying.

Touchscreen control panel: To test the document feeder and the copy function, load the printed report into the document feeder face-up. On the control panel, touch Copy, and then touch Black to start copying.

1.Connectez le cordon d’alimentation entre le produit et une prise secteur avec mise à la terre. Vérifiez que la source d’alimentation

électrique est adéquate pour la tension nominale du produit. Cette tension nominale est indiquée sur l’étiquette du produit. Le produit utilise

110-127 volts c.a. ou 220-240 volts c.a. et 50/60 Hz.

ATTENTION : Afin d'éviter d'endommager le produit, utilisez uniquement le cordon d'alimentation fourni avec le produit.

2.Mettez le produit sous tension.

3.Panneau de commande LCD : pour vérifier que votre appareil imprime correctement, appuyez sur la touche Configuration . Appuyez sur la touche fléchée droite jusqu'à ce que le menu Rapports s'affiche, puis appuyez sur la touche OK pour ouvrir le menu Rapports. Appuyez sur la touche fléchée droite jusqu'à ce que Rapport de configuration s'affiche, puis appuyez sur la touche OK pour imprimer la page de configuration.

Panneau de commande à écran tactile : pour vérifier que votre appareil imprime correctement, appuyez sur la touche Configuration . Appuyez sur Rapports, puis sur Rapport de configuration.

4.Panneau de commande LCD : pour tester le bac d'alimentation et la fonction de copie, chargez le rapport imprimé dans le bac

d'alimentation, recto vers le haut. Sur le panneau de configuration, appuyez sur la touche Démarrer la copie pour démarrer la copie.

Panneau de commande à écran tactile : pour tester le bac d'alimentation et la fonction de copie, chargez le rapport imprimé dans le bac d'alimentation, recto vers le haut. Sur le panneau de commande, appuyez sur Copie, puis sur Noir pour commencer à copier.

1.Conecte el cable de alimentación entre el producto y una toma de CA con conexión a tierra. Asegúrese de que la fuente de alimentación es adecuada para el voltaje del producto. La especificación del voltaje se encuentra en la etiqueta del producto. El producto utiliza 110-127 VCA o 220-240 VCA y 50/60 Hz.

PRECAUCIÓN: Para evitar daños al producto, utilice solo el cable de alimentación que se proporciona con él.

2.Encienda el producto.

3.Panel de control del LCD: Para comprobar que el producto imprime, pulse el botón Configuración , pulse el botón de la flecha derecha

hasta que aparezca el menú Informes, pulse el botón OK para abrir el menú Informes, pulse el botón de la flecha derecha hasta que aparezca Informe de configuración y, a continuación, pulse el botón OK para imprimir la página de configuración.

Panel de control con pantalla táctil: Para comprobar que el producto imprime, toque el botón Configuración , toque Informes y, a continuación, toque Informe de configuración.

4.Panel de control del LCD: para probar el alimentador de documentos y la función de copia, cargue el informe impreso en el alimentador

de documentos orientado hacia arriba. En el panel de control, pulse Iniciar copia para iniciar la copia.

Panel de control con pantalla táctil: para probar el alimentador de documentos y la función de copia, cargue el informe impreso en el alimentador de documentos orientado hacia arriba. En el panel de control, toque Copia y, a continuación, toque Negro para iniciar la copia.

6

Page 6
Image 6
HP MFP M225dn manual Turn on the product, Encienda el producto

MFP M225dn specifications

The HP MFP M225dn and MFP M225dw are compact multifunction printers designed for small to medium-sized businesses looking for efficient printing, copying, and scanning solutions. These models stand out for their robust features and reliable performance, making them ideal for enhancing productivity in any office environment.

A notable feature of the MFP M225dn and MFP M225dw is their print speed, capable of delivering up to 26 pages per minute. This swift performance saves valuable time, especially in busy office settings. Both models come with automatic duplex printing, enabling users to print on both sides of the paper without the need to manually flip the page. This not only reduces paper usage but also contributes to sustainable printing practices.

The MFP M225dn is equipped with a built-in network port, allowing users to connect the printer directly to a wired network. In contrast, the MFP M225dw offers additional flexibility with built-in wireless capabilities, making it easy to print from various devices, including smartphones and tablets. This wireless technology is complemented by features such as Wi-Fi Direct, which allows for seamless printing without the need for a network.

Both models incorporate HP's JetIntelligence technology, which ensures that they produce high-quality prints with sharp text and vivid graphics. This technology also enhances efficiency, allowing these printers to handle higher volumes while using less energy. The HP MFP M225dn and MFP M225dw utilize high-capacity toner cartridges, leading to a lower cost per page, making these printers an economical choice for businesses.

The user-friendly control panel on both printers features a color LCD display, streamlining navigation through various functions such as copying and scanning. With a flatbed scanner and an automatic document feeder, users can easily digitize documents quickly, enhancing workflows and organization.

In summary, the HP MFP M225dn and MFP M225dw are designed to meet the demands of busy work environments. Their combination of speed, reliability, and versatile connectivity options, alongside advanced printing technologies, makes them valuable assets for any office aiming to improve its productivity.