4

Moving the subwoofer

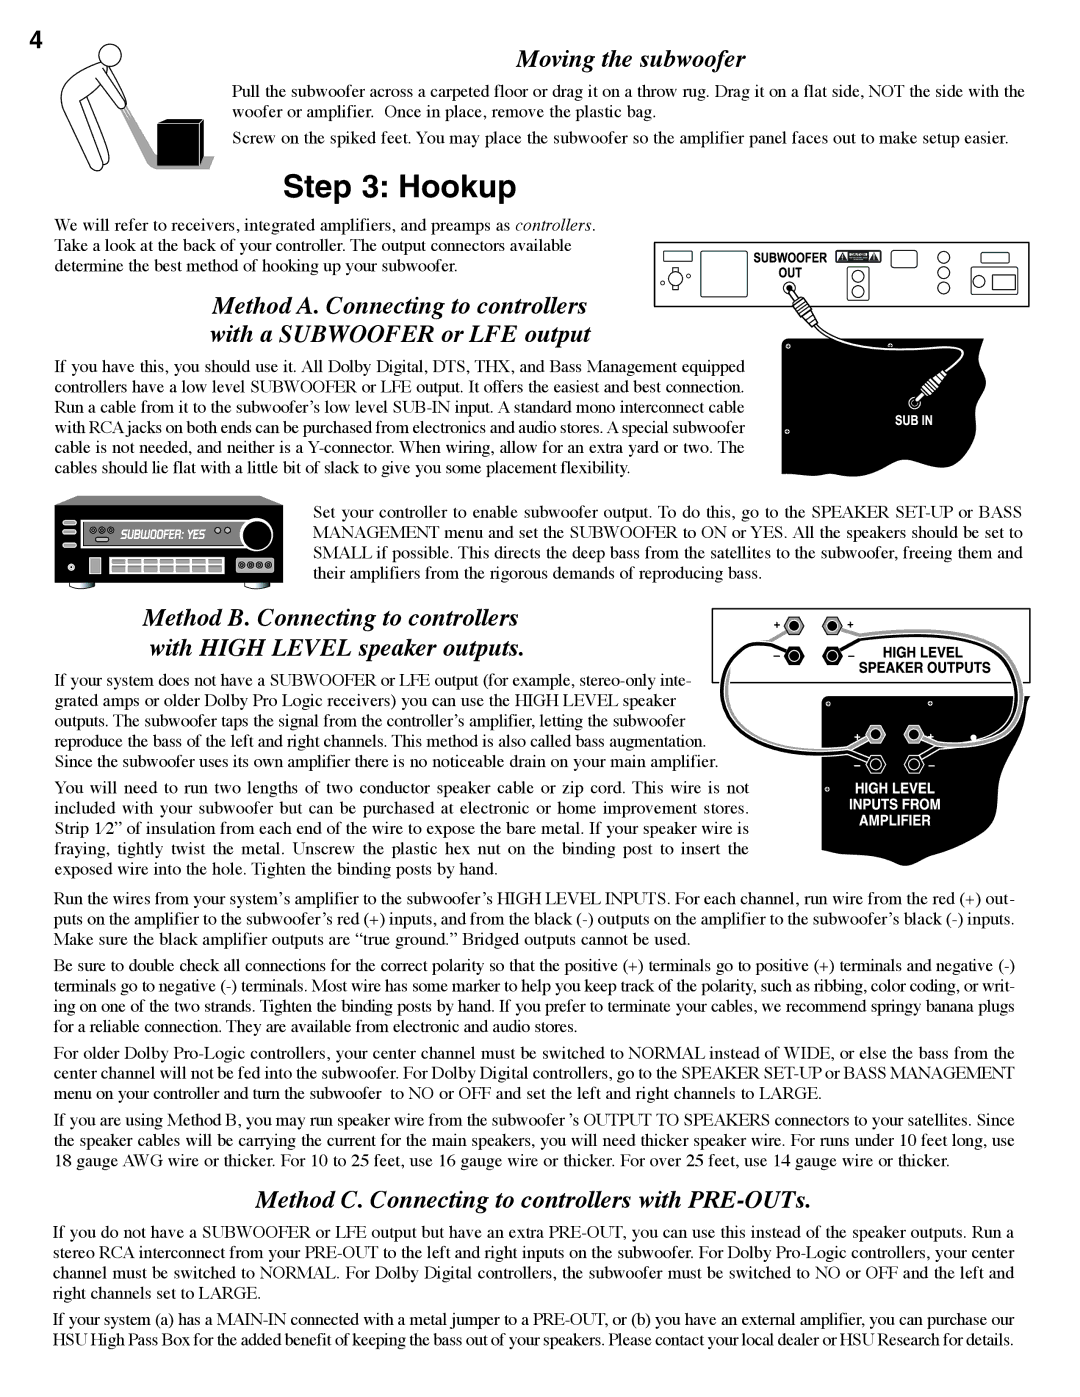
Pull the subwoofer across a carpeted floor or drag it on a throw rug. Drag it on a flat side, NOT the side with the woofer or amplifier. Once in place, remove the plastic bag.

Screw on the spiked feet. You may place the subwoofer so the amplifier panel faces out to make setup easier.

Step 3: Hookup

We will refer to receivers, integrated amplifiers, and preamps as controllers. Take a look at the back of your controller. The output connectors available determine the best method of hooking up your subwoofer.

Method A. Connecting to controllers with a SUBWOOFER or LFE output

If you have this, you should use it. All Dolby Digital, DTS, THX, and Bass Management equipped controllers have a low level SUBWOOFER or LFE output. It offers the easiest and best connection. Run a cable from it to the subwoofer’s low level SUB-IN input. A standard mono interconnect cable with RCA jacks on both ends can be purchased from electronics and audio stores. A special subwoofer cable is not needed, and neither is a Y-connector. When wiring, allow for an extra yard or two. The cables should lie flat with a little bit of slack to give you some placement flexibility.

Set your controller to enable subwoofer output. To do this, go to the SPEAKER SET-UP or BASS MANAGEMENT menu and set the SUBWOOFER to ON or YES. All the speakers should be set to SMALL if possible. This directs the deep bass from the satellites to the subwoofer, freeing them and their amplifiers from the rigorous demands of reproducing bass.

Method B. Connecting to controllers with HIGH LEVEL speaker outputs.

If your system does not have a SUBWOOFER or LFE output (for example, stereo-only inte-

grated amps or older Dolby Pro Logic receivers) you can use the HIGH LEVEL speaker outputs. The subwoofer taps the signal from the controller’s amplifier, letting the subwoofer

reproduce the bass of the left and right channels. This method is also called bass augmentation. Since the subwoofer uses its own amplifier there is no noticeable drain on your main amplifier.

You will need to run two lengths of two conductor speaker cable or zip cord. This wire is not included with your subwoofer but can be purchased at electronic or home improvement stores. Strip 1⁄2” of insulation from each end of the wire to expose the bare metal. If your speaker wire is fraying, tightly twist the metal. Unscrew the plastic hex nut on the binding post to insert the

exposed wire into the hole. Tighten the binding posts by hand.

Run the wires from your system’s amplifier to the subwoofer’s HIGH LEVEL INPUTS. For each channel, run wire from the red (+) out- puts on the amplifier to the subwoofer’s red (+) inputs, and from the black (-) outputs on the amplifier to the subwoofer’s black (-) inputs. Make sure the black amplifier outputs are “true ground.” Bridged outputs cannot be used.

Be sure to double check all connections for the correct polarity so that the positive (+) terminals go to positive (+) terminals and negative (-) terminals go to negative (-) terminals. Most wire has some marker to help you keep track of the polarity, such as ribbing, color coding, or writ- ing on one of the two strands. Tighten the binding posts by hand. If you prefer to terminate your cables, we recommend springy banana plugs for a reliable connection. They are available from electronic and audio stores.

For older Dolby Pro-Logic controllers, your center channel must be switched to NORMAL instead of WIDE, or else the bass from the center channel will not be fed into the subwoofer. For Dolby Digital controllers, go to the SPEAKER SET-UP or BASS MANAGEMENT menu on your controller and turn the subwoofer to NO or OFF and set the left and right channels to LARGE.

If you are using Method B, you may run speaker wire from the subwoofer ’s OUTPUT TO SPEAKERS connectors to your satellites. Since the speaker cables will be carrying the current for the main speakers, you will need thicker speaker wire. For runs under 10 feet long, use 18 gauge AWG wire or thicker. For 10 to 25 feet, use 16 gauge wire or thicker. For over 25 feet, use 14 gauge wire or thicker.

Method C. Connecting to controllers with PRE-OUTs.

If you do not have a SUBWOOFER or LFE output but have an extra PRE-OUT, you can use this instead of the speaker outputs. Run a stereo RCA interconnect from your PRE-OUT to the left and right inputs on the subwoofer. For Dolby Pro-Logic controllers, your center channel must be switched to NORMAL. For Dolby Digital controllers, the subwoofer must be switched to NO or OFF and the left and right channels set to LARGE.

If your system (a) has a MAIN-IN connected with a metal jumper to a PRE-OUT, or (b) you have an external amplifier, you can purchase our HSU High Pass Box for the added benefit of keeping the bass out of your speakers. Please contact your local dealer or HSU Research for details.

Page 4
Image 4
Hsu Research VTF-2 manual Hookup, Moving the subwoofer, Method C. Connecting to controllers with PRE-OUTs

VTF-2 specifications

The Hsu Research VTF-2 is a high-performance subwoofer that represents the pinnacle of audio engineering excellence in home theater and music playback. Known for its deep bass response and exceptional sound quality, the VTF-2 is designed to deliver an immersive audio experience that can transform any room into a captivating listening environment.

One of the standout features of the VTF-2 is its dual-driver design, which employs a 12-inch polypropylene cone woofer and a pair of high-excursion drivers. This configuration allows the subwoofer to produce powerful low frequencies while maintaining accuracy, ensuring that even the most subtle audio nuances are clearly articulated. The VTF-2 is capable of achieving a frequency response range as low as 20 Hz, making it well-suited for both music and film applications.

The VTF-2 incorporates advanced technologies that contribute to its outstanding performance. One such technology is the variable tuning feature, which allows users to switch between two different tuning options: a sealed and a ported configuration. This versatility enables users to tailor the subwoofer's output to match their specific room acoustics and personal preferences, providing flexibility in setup options.

Additionally, the VTF-2 is built with a robust cabinet construction, utilizing high-quality MDF (medium-density fiberboard) to minimize resonance and enhance sound clarity. The sleek, modern design of the cabinet is both attractive and functional, featuring a front-firing port to optimize placement in various environments without compromising audio quality.

Another notable characteristic of the VTF-2 is its powerful internal amplifier. Designed with efficiency in mind, this amplifier delivers 350 watts of continuous power and peaks up to 700 watts, providing ample headroom for dynamic audio playback. The integration of high-grade components ensures reliability and longevity, making the VTF-2 a worthwhile investment for serious audiophiles.

In summary, the Hsu Research VTF-2 subwoofer combines innovative technologies, such as dual drivers, variable tuning, and a powerful amplifier, within a sturdy and attractive cabinet. These features collectively enable it to produce unparalleled bass performance and precise audio reproduction. Whether used in a home theater or a dedicated music listening room, the VTF-2 is engineered to exceed expectations and create an engaging listening experience.