
42406-01 specifications
The Hunter Fan 42406-01 is a striking ceiling fan that perfectly combines style, functionality, and innovation, making it a popular choice for homes and businesses alike. This model, known for its sleek design and powerful performance, seamlessly integrates with various interior decors, enhancing the aesthetic appeal of any room.One of its main features is its contemporary design with a minimalist approach. The smooth lines and premium finish give it a modern touch, while the neutral color palette allows it to blend effortlessly with existing furnishings. Whether it's placed in a living room, bedroom, or office space, the Hunter Fan 42406-01 serves both as a decorative piece and a practical fixture.
Equipped with a powerful motor, the 42406-01 offers impressive airflow while operating quietly. This makes it ideal for spaces where noise could be a concern, such as bedrooms or study areas. The fan boasts multiple speed settings, allowing users to customize air circulation based on their preference for comfort and climate control.
Another standout feature is its Energy Star certification, which reflects its commitment to energy efficiency. The fan is designed to consume less electricity while maintaining optimal performance, making it a sustainable choice for eco-conscious consumers. This not only contributes to lower utility bills but also minimizes the environmental footprint.
The Hunter Fan 42406-01 also comes with integrated LED lighting, providing effective illumination without the need for additional light fixtures. The energy-efficient bulbs emit a warm glow, enhancing the ambiance of any room, while the adjustable brightness allows for versatile lighting options.
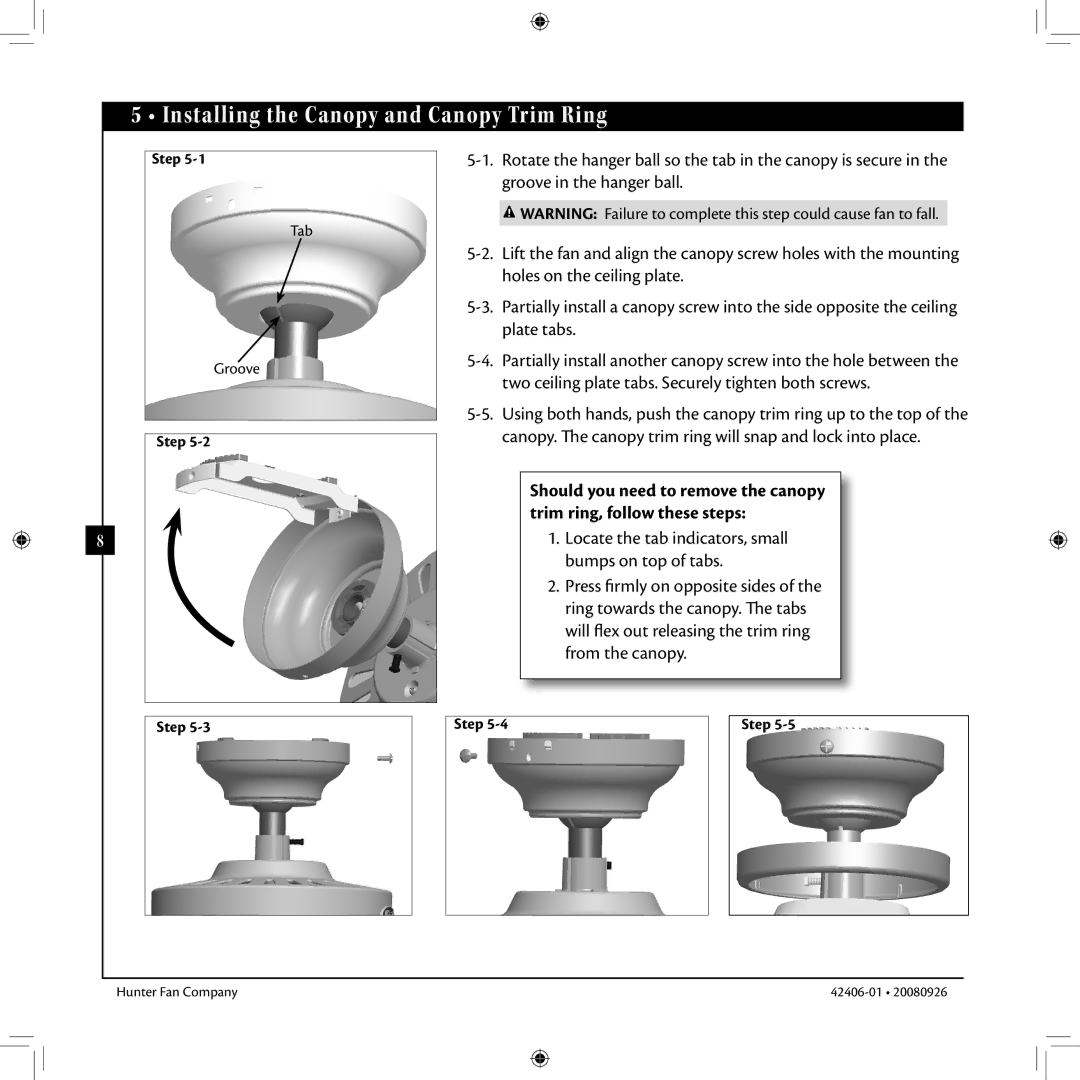
Installation is streamlined with a user-friendly design, which includes a comprehensive manual and all necessary mounting hardware. The fan is also compatible with Hunter's Smart Home technology, allowing users to control it remotely via a smartphone app or integrate it with existing smart home systems for voice activation.
In summary, the Hunter Fan 42406-01 stands out due to its blend of modern aesthetics, powerful performance, energy efficiency, and smart technology compatibility. It is an excellent investment for anyone looking to elevate their home environment while ensuring optimal comfort and convenience. Whether for personal use or as a part of a larger design project, this ceiling fan is designed to impress.