English

This appliance is for household use only.

1.Place the fan on a dry, safe, flat surface where it cannot fall or be pulled by the cord.

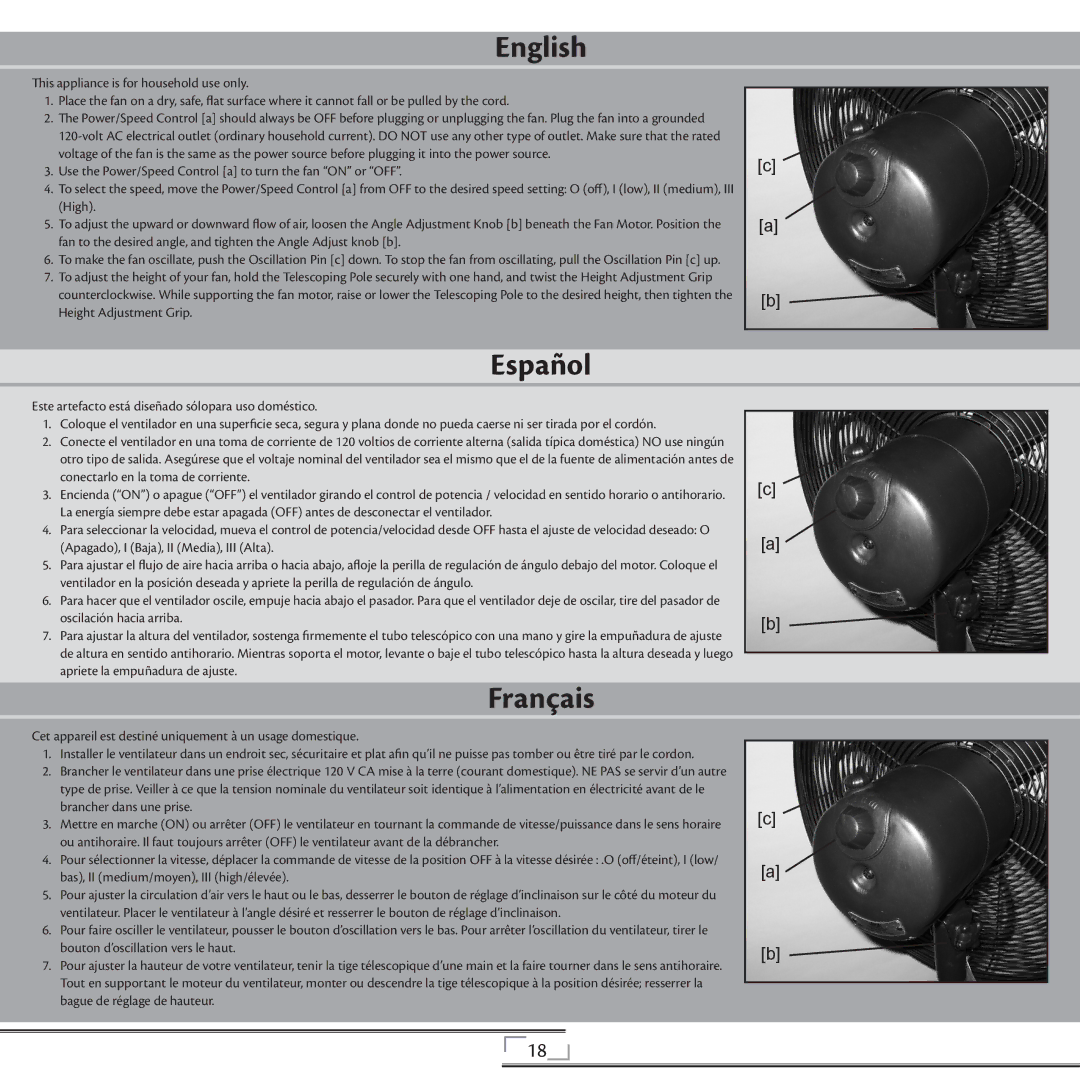
2.The Power/Speed Control [a] should always be OFF before plugging or unplugging the fan. Plug the fan into a grounded

120-volt AC electrical outlet (ordinary household current). DO NOT use any other type of outlet. Make sure that the rated voltage of the fan is the same as the power source before plugging it into the power source.

3.Use the Power/Speed Control [a] to turn the fan “ON” or “OFF”.

4.To select the speed, move the Power/Speed Control [a] from OFF to the desired speed setting: O (off), I (low), II (medium), III (High).

5.To adjust the upward or downward flow of air, loosen the Angle Adjustment Knob [b] beneath the Fan Motor. Position the fan to the desired angle, and tighten the Angle Adjust knob [b].

6.To make the fan oscillate, push the Oscillation Pin [c] down. To stop the fan from oscillating, pull the Oscillation Pin [c] up.

7.To adjust the height of your fan, hold the Telescoping Pole securely with one hand, and twist the Height Adjustment Grip counterclockwise. While supporting the fan motor, raise or lower the Telescoping Pole to the desired height, then tighten the Height Adjustment Grip.

[c]

[a]

[b]

Español

Este artefacto está diseñado sólopara uso doméstico.

1.Coloque el ventilador en una superficie seca, segura y plana donde no pueda caerse ni ser tirada por el cordón.

2.Conecte el ventilador en una toma de corriente de 120 voltios de corriente alterna (salida típica doméstica) NO use ningún otro tipo de salida. Asegúrese que el voltaje nominal del ventilador sea el mismo que el de la fuente de alimentación antes de conectarlo en la toma de corriente.

3.Encienda (“ON”) o apague (“OFF”) el ventilador girando el control de potencia / velocidad en sentido horario o antihorario. La energía siempre debe estar apagada (OFF) antes de desconectar el ventilador.

4.Para seleccionar la velocidad, mueva el control de potencia/velocidad desde OFF hasta el ajuste de velocidad deseado: O

(Apagado), I (Baja), II (Media), III (Alta).

5.Para ajustar el flujo de aire hacia arriba o hacia abajo, afloje la perilla de regulación de ángulo debajo del motor. Coloque el ventilador en la posición deseada y apriete la perilla de regulación de ángulo.

6.Para hacer que el ventilador oscile, empuje hacia abajo el pasador. Para que el ventilador deje de oscilar, tire del pasador de oscilación hacia arriba.

7.Para ajustar la altura del ventilador, sostenga firmemente el tubo telescópico con una mano y gire la empuñadura de ajuste de altura en sentido antihorario. Mientras soporta el motor, levante o baje el tubo telescópico hasta la altura deseada y luego apriete la empuñadura de ajuste.

Français

Cet appareil est destiné uniquement à un usage domestique.

1.Installer le ventilateur dans un endroit sec, sécuritaire et plat afin qu’il ne puisse pas tomber ou être tiré par le cordon.

2.Brancher le ventilateur dans une prise électrique 120 V CA mise à la terre (courant domestique). NE PAS se servir d’un autre type de prise. Veiller à ce que la tension nominale du ventilateur soit identique à l’alimentation en électricité avant de le brancher dans une prise.

3.Mettre en marche (ON) ou arrêter (OFF) le ventilateur en tournant la commande de vitesse/puissance dans le sens horaire ou antihoraire. Il faut toujours arrêter (OFF) le ventilateur avant de la débrancher.

4.Pour sélectionner la vitesse, déplacer la commande de vitesse de la position OFF à la vitesse désirée : .O (off/éteint), I (low/ bas), II (medium/moyen), III (high/élevée).

5.Pour ajuster la circulation d’air vers le haut ou le bas, desserrer le bouton de réglage d’inclinaison sur le côté du moteur du ventilateur. Placer le ventilateur à l’angle désiré et resserrer le bouton de réglage d’inclinaison.

6.Pour faire osciller le ventilateur, pousser le bouton d’oscillation vers le bas. Pour arrêter l’oscillation du ventilateur, tirer le bouton d’oscillation vers le haut.

7.Pour ajuster la hauteur de votre ventilateur, tenir la tige télescopique d’une main et la faire tourner dans le sens antihoraire.

Tout en supportant le moteur du ventilateur, monter ou descendre la tige télescopique à la position désirée; resserrer la bague de réglage de hauteur.

[c]

[a]

[b]

[c]

[a]

[b]

18

Page 18
Image 18
Hunter Fan 42729, 90171, 20081008 installation manual Este artefacto está diseñado sólopara uso doméstico

20081008, 90171, 42729 specifications

The Hunter Fan 42729, 90171, and 20081008 models are a testament to modern ceiling fan innovation, combining aesthetic appeal with energy efficiency and advanced technology. Designed for both functionality and style, these fans are perfect for various home environments, offering a perfect blend of performance and elegance.

One standout feature of these Hunter fan models is their sleek design, which can complement any interior decor. Whether you have a contemporary or classic style, these fans come in various finishes, including polished metals and wood tones, making them versatile enough to fit seamlessly into any room.

Energy efficiency is a significant highlight of these fans. Equipped with powerful yet energy-efficient motors, they deliver excellent airflow while consuming minimal electricity. This not only helps in reducing energy bills but also contributes to a more sustainable home environment. The WhisperWind motor technology provides a quiet operation, making it ideal for bedrooms, living areas, or wherever tranquility is desired.

Another notable technology present in these models is the Integrated LED lighting system. This feature provides ample illumination while significantly reducing energy consumption compared to traditional bulb systems. The warm light emitted creates a cozy atmosphere, enhancing the overall ambiance of the space.

Hunter Fan models also prioritize user convenience with their intuitive controls. Many of the fans come with remote control options, allowing users to adjust the speed and lighting from the comfort of their seats. Some models are compatible with smart home technologies, enabling integration with voice-activated systems for added convenience.

Durability is another key characteristic of these fans. Constructed with high-quality materials, they can withstand the test of time, ensuring long-term performance and reliability. The blades are designed for optimal airflow and can often be reversed to enhance air circulation in both summer and winter months.

In summary, the Hunter Fan 42729, 90171, and 20081008 models exemplify the perfect fusion of style, efficiency, and modern technology. With their attractive designs, energy-saving features, and user-friendly controls, these ceiling fans are the ideal solution for anyone looking to enhance their home's comfort and aesthetic. Whether you're cooling down on a hot summer day or distributing warm air during winter, these Hunter fans deliver reliable performance year-round.