1 • Getting Ready

2 • Installing the Hanger Bracket

4Installing Multiple Fans?

If you are installing more than one fan, keep the fan blades and blade irons (if applicable) in sets, as they were shipped.

To install a ceiling fan, be sure you can do the following:

Locate the ceiling joist or other suitable support in ceiling.

Drill holes for and install wood screws.

Identify and connect electrical wires.

Lift 40 pounds.

If you need help installing the fan, your Hunter fan dealer can direct you to a licensed installer or electrician.

Gathering the Tools

You will need the following tools for installing the fan:

Electric drill with 9/64” bit

Standard screwdriver (magnetic tip recommended)

Phillips-head screwdriver (magnetic tip recommended)

Wrench or pliers

Ladder (height dependent upon installation site)

Checking Your Fan Parts

Carefully unpack your fan to avoid damage to the fan parts. Refer to the included Parts Guide. Check for any shipping damage to the motor or fan blades. If any parts are missing or damaged, contact your Hunter dealer or call Hunter Technical Support Department at 888-830-1326.

Preparing the Fan Site

Before you begin installing the fan, follow all the instructions in the pullout sheet called “Preparing the Fan Site.” Proper ceiling fan location and attachment to the building structure are essential for safety, reliable operation, maximum efficiency, and energy savings.

CAUTION: To avoid possible electrical shock, before installing your fan, disconnect the power by turning off the circuit breakers to the outlet box and associated wall switch location. If you cannot lock the circuit breakers in the off position, securely fasten a prominent warning device, such as a tag, to the service panel.

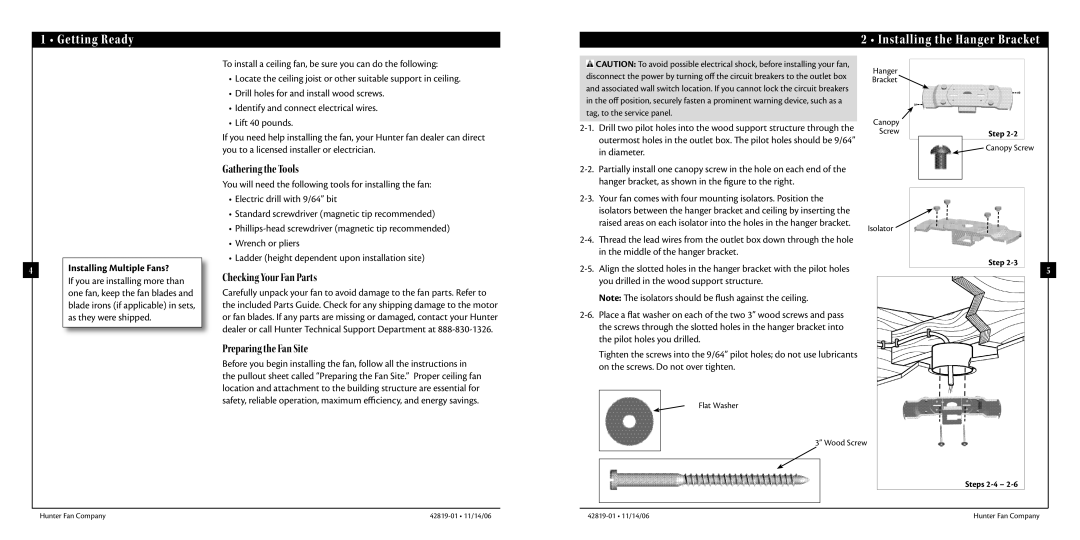
2-1. Drill two pilot holes into the wood support structure through the outermost holes in the outlet box. The pilot holes should be 9/64” in diameter.

2-2. Partially install one canopy screw in the hole on each end of the hanger bracket, as shown in the figure to the right.

2-3. Your fan comes with four mounting isolators. Position the isolators between the hanger bracket and ceiling by inserting the raised areas on each isolator into the holes in the hanger bracket.

2-4. Thread the lead wires from the outlet box down through the hole in the middle of the hanger bracket.

2-5. Align the slotted holes in the hanger bracket with the pilot holes you drilled in the wood support structure.

Note: The isolators should be flush against the ceiling.

2-6. Place a flat washer on each of the two 3” wood screws and pass the screws through the slotted holes in the hanger bracket into the pilot holes you drilled.

Tighten the screws into the 9/64” pilot holes; do not use lubricants on the screws. Do not over tighten.

Flat Washer

Hanger

Bracket

Canopy

Screw


Step 2-2


Canopy Screw


Isolator

Step 2-3

5

3” Wood Screw

Steps 2-42-6

Hunter Fan Company

42819-01 • 11/14/06

42819-01 • 11/14/06

Hunter Fan Company

Page 3
Image 3
Hunter Fan 42819-01 warranty Getting Ready Installing the Hanger Bracket, Gathering the Tools, Checking Your Fan Parts

42819-01 specifications

The Hunter Fan 42819-01 is a stylish and functional ceiling fan that seamlessly combines modern design with advanced technology. Designed for both indoor and outdoor spaces, this fan is a perfect addition to various settings, whether it is in a living room, porch, or patio.

One of the main features of the Hunter Fan 42819-01 is its powerful, quiet motor, which ensures efficient airflow while maintaining a serene environment. The fan operates with three-speed settings, allowing users to customize the level of comfort to their liking. This versatility makes it suitable for different climates, whether it's to cool down during hot summer days or circulate warm air during the colder months.

The fan boasts a sleek, contemporary design with a polished finish that complements a variety of interior styles. This aesthetic appeal makes it not just a functional appliance but also a stylish centerpiece in any room. The fan blades are designed with a unique shape, providing optimal airflow while minimizing noise, allowing for a peaceful atmosphere.

Additionally, the Hunter Fan 42819-01 is equipped with LED lighting. This integrated feature not only enhances brightness but also contributes to energy efficiency, reducing electricity costs over time. The LED light can offer various color temperatures, allowing users to customize their lighting experience and create the perfect ambiance.

Another highlight of this ceiling fan is its easy installation process. The fan comes with all necessary hardware and a detailed instruction manual, making it convenient for homeowners to set up without the need for professional assistance. The fan is also designed for easy maintenance, as the blades can be easily cleaned to ensure optimal performance.

The Hunter Fan 42819-01 is also compatible with smart home technology, allowing users to integrate it into their existing smart systems. This feature enables remote access and control through smartphones or voice-activated assistants, enhancing user convenience and modern living.

In summary, the Hunter Fan 42819-01 combines aesthetics, advanced technology, and energy efficiency in a single unit. Its powerful, quiet motor, adjustable speed settings, integrated LED lighting, and compatibility with smart home systems make it an ideal choice for those looking to enhance their living space.