ASSEMBLY

Assembling the J-handle

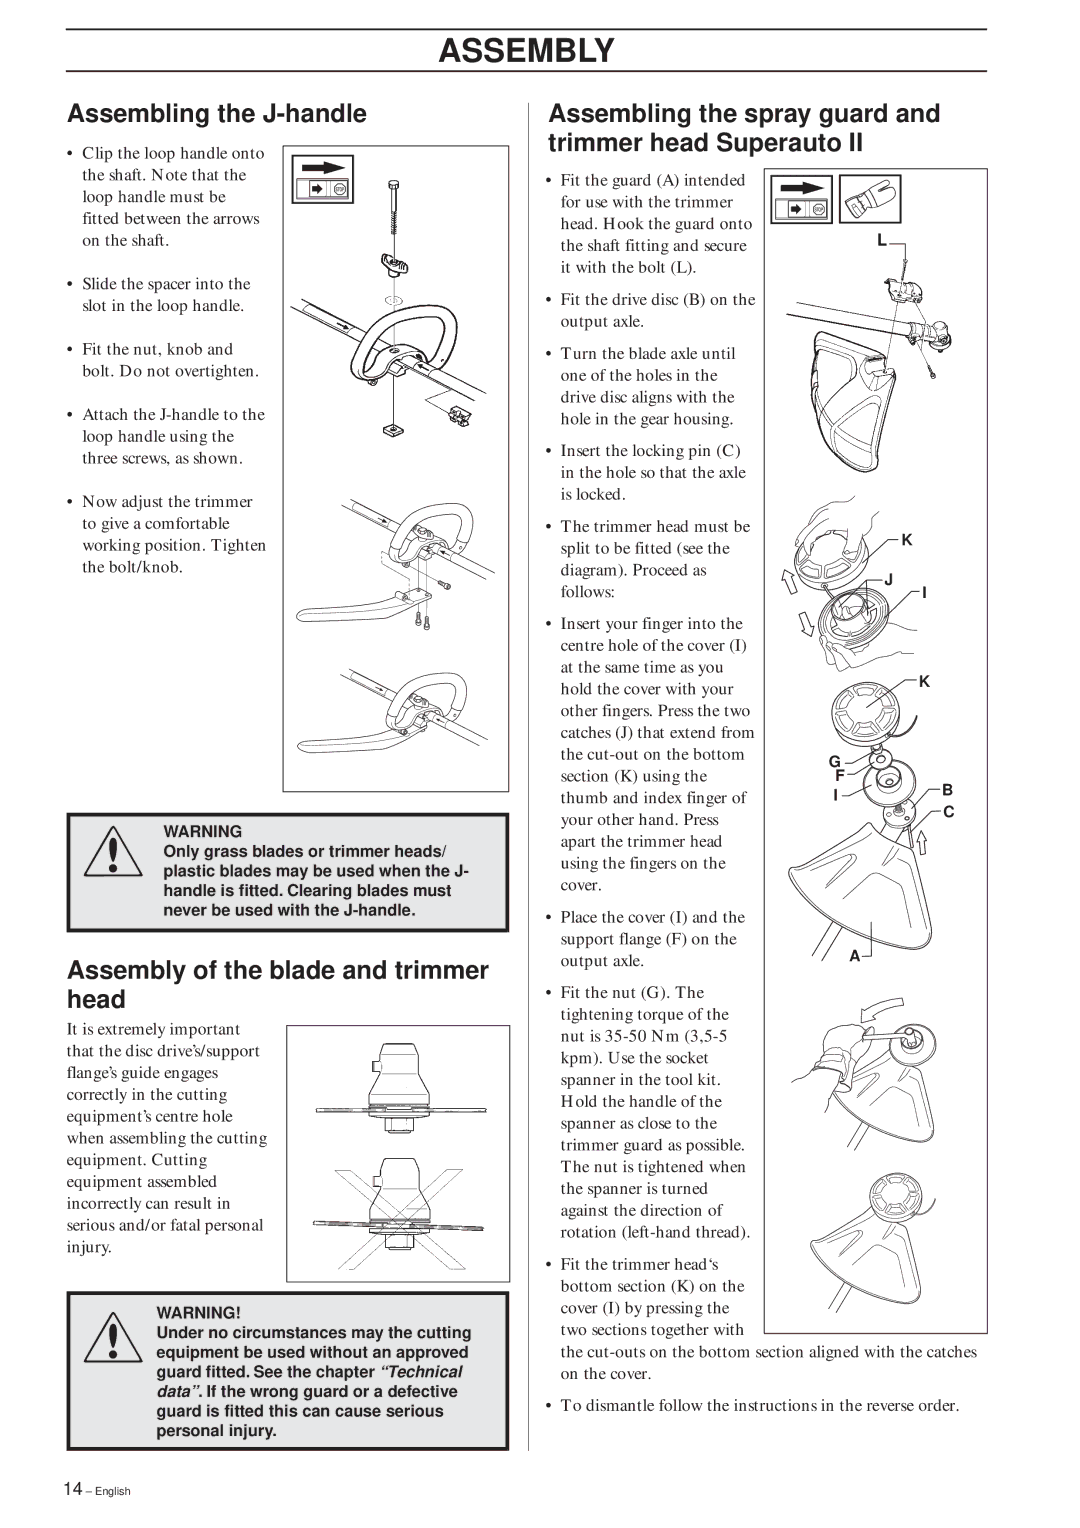
• Clip the loop handle onto the shaft. Note that the loop handle must be fitted between the arrows on the shaft.

Slide the spacer into the slot in the loop handle.

Fit the nut, knob and bolt. Do not overtighten.

Attach the J-handle to the loop handle using the three screws, as shown.

Now adjust the trimmer

to give a comfortable working position. Tighten the bolt/knob.

!WARNING

Only grass blades or trimmer heads/ plastic blades may be used when the J- handle is fitted. Clearing blades must never be used with the J-handle.

Assembly of the blade and trimmer head

It is extremely important that the disc drive’s/support flange’s guide engages correctly in the cutting equipment’s centre hole when assembling the cutting equipment. Cutting equipment assembled incorrectly can result in serious and/or fatal personal injury.

!WARNING!

Under no circumstances may the cutting equipment be used without an approved guard fitted. See the chapter “Technical data”. If the wrong guard or a defective guard is fitted this can cause serious personal injury.

Assembling the spray guard and trimmer head Superauto II

Fit the guard (A) intended

for use with the trimmer head. Hook the guard onto the shaft fitting and secure it with the bolt (L).

Fit the drive disc (B) on the output axle.

Turn the blade axle until one of the holes in the drive disc aligns with the hole in the gear housing.

Insert the locking pin (C) in the hole so that the axle is locked.

The trimmer head must be


split to be fitted (see the


K


diagram). Proceed as


J


follows:


I

Insert your finger into the


centre hole of the cover (I)


at the same time as you


K


hold the cover with your


other fingers. Press the two


catches (J) that extend from


the cut-out on the bottom

G


section (K) using the

F

B


thumb and index finger of

I


C


your other hand. Press


apart the trimmer head


using the fingers on the


cover.


Place the cover (I) and the


support flange (F) on the


A


output axle.


Fit the nut (G). The

tightening torque of the nut is 35-50 Nm (3,5-5 kpm). Use the socket spanner in the tool kit. Hold the handle of the spanner as close to the trimmer guard as possible. The nut is tightened when the spanner is turned against the direction of rotation (left-hand thread).

Fit the trimmer head‘s bottom section (K) on the cover (I) by pressing the two sections together with

the cut-outs on the bottom section aligned with the catches on the cover.

To dismantle follow the instructions in the reverse order.

14 – English

Page 14
Image 14
Husqvarna 325RJX-Series manual Assembling the J-handle, Assembly of the blade and trimmer head

325RJX-Series specifications

The Husqvarna 325RJX-Series is designed for professionals and homeowners looking for a reliable and efficient tool for cutting grass, trimming hedges, and maintaining lawns. This series stands out due to its combination of power, maneuverability, and innovative features that cater to a variety of landscaping needs.

One of the primary characteristics of the 325RJX-Series is its robust engine, which delivers impressive performance while maintaining fuel efficiency. The series is equipped with a powerful 25cc two-stroke engine that ensures a reliable power supply, enabling users to tackle tough tasks without compromising on speed or effectiveness. The engine also utilizes Husqvarna’s advanced air injection technology, which helps to minimize air filtration clogging and extend the life of the engine.

The lightweight design of the 325RJX-Series further enhances its usability, making it easier for users to handle and transport. The ergonomic handle provides a comfortable grip, which is particularly beneficial during long periods of operation. Additionally, the balanced design reduces user fatigue, allowing for extended use without discomfort.

Another notable feature is the innovative Auto Return Stop Switch, which simplifies the starting process. After powering down the machine, the switch automatically resets to the "on" position, ensuring quick and effortless restarts when it's time to get back to work. This feature is especially useful for professional landscapers who need to maximize efficiency throughout the day.

The 325RJX-Series also boasts detachable and interchangeable cutting heads, allowing users to switch between a trimmer head and a blade with ease. This versatility makes it suitable for a variety of tasks, from trimming grass around flower beds to cutting through thick brush.

Additionally, this series incorporates vibration dampening technology, which minimizes fatigue by reducing the amount of vibration experienced by the user. This focus on user comfort and operational efficiency has made the 325RJX-Series popular among both professionals and home users.

In summary, the Husqvarna 325RJX-Series is a powerful, lightweight, and versatile trimming solution. With its advanced engine technology, ergonomic design, and innovative features, it is a top choice for anyone seeking to maintain their outdoor spaces effectively and efficiently. Whether for professional use or home landscaping, the 325RJX-Series delivers reliability and performance that users can depend on.