ASSEMBLY

1 REAR MOUNTING BRACKET and

SUPPORT TUBE

(See Figs. 1A, 1B & 1C)

Use Hardware - - GROUP "A"

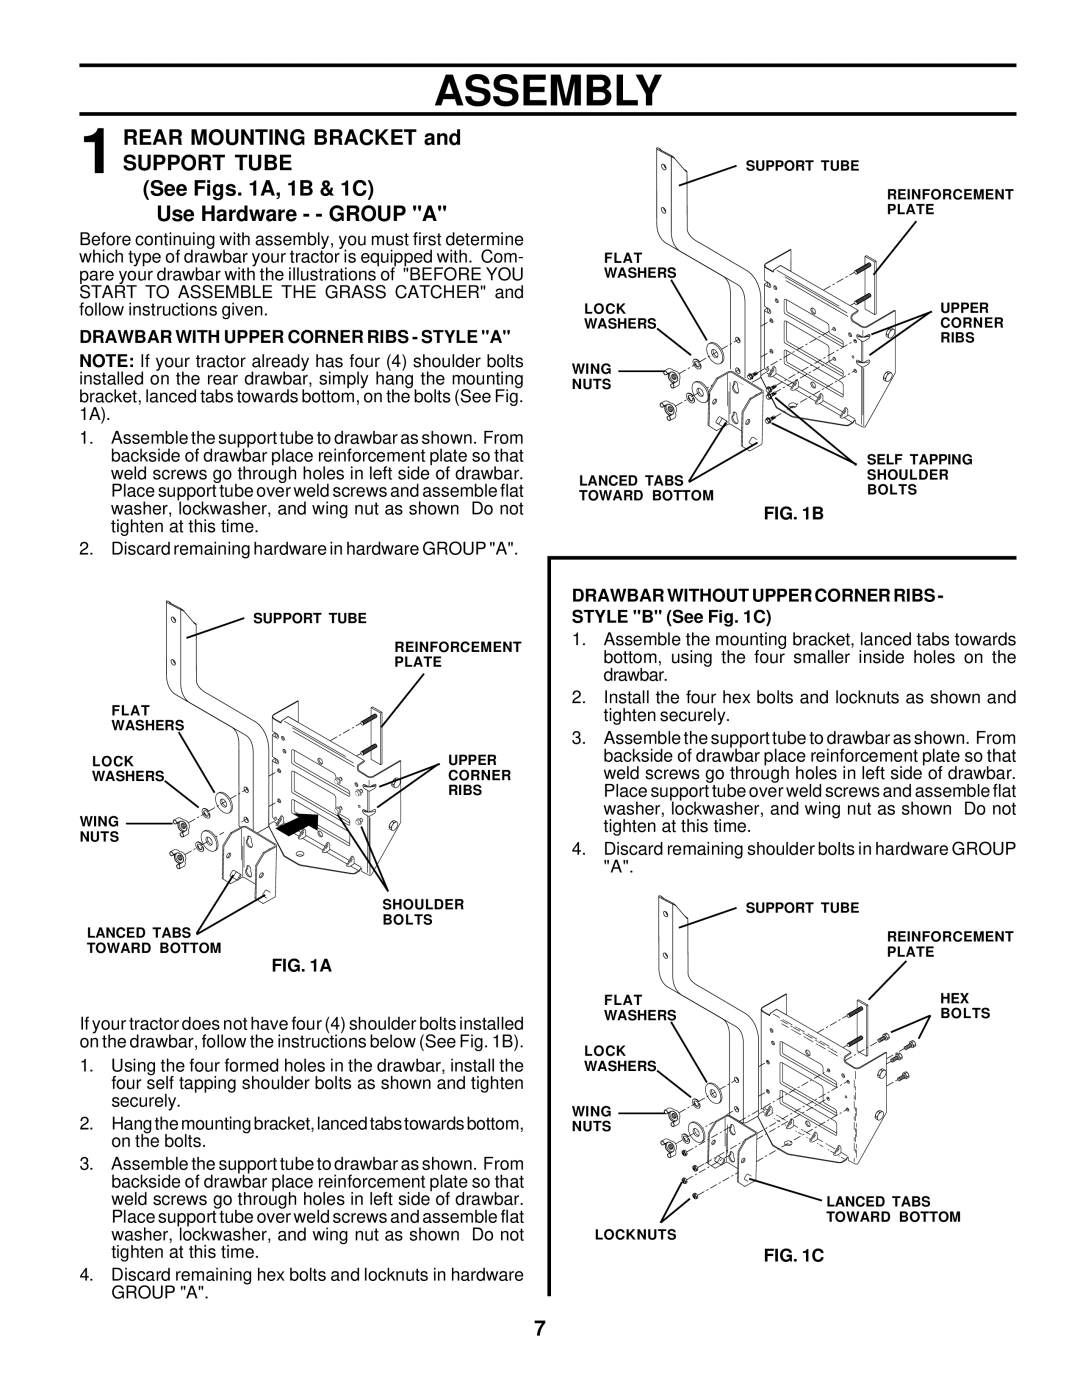
Before continuing with assembly, you must first determine which type of drawbar your tractor is equipped with. Com- pare your drawbar with the illustrations of "BEFORE YOU START TO ASSEMBLE THE GRASS CATCHER" and follow instructions given.

DRAWBAR WITH UPPER CORNER RIBS - STYLE "A"

NOTE: If your tractor already has four (4) shoulder bolts installed on the rear drawbar, simply hang the mounting bracket, lanced tabs towards bottom, on the bolts (See Fig. 1A).

1.Assemble the support tube to drawbar as shown. From backside of drawbar place reinforcement plate so that weld screws go through holes in left side of drawbar. Place support tube over weld screws and assemble flat washer, lockwasher, and wing nut as shown Do not tighten at this time.

2.Discard remaining hardware in hardware GROUP "A".


SUPPORT TUBE


REINFORCEMENT


PLATE

FLAT


WASHERS


LOCK

UPPER

WASHERS

CORNER


RIBS

WING

NUTS

SHOULDER

BOLTS

LANCED TABS TOWARD BOTTOM

FIG. 1A

If your tractor does not have four (4) shoulder bolts installed on the drawbar, follow the instructions below (See Fig. 1B).

1.Using the four formed holes in the drawbar, install the four self tapping shoulder bolts as shown and tighten securely.

2.Hang the mounting bracket, lanced tabs towards bottom, on the bolts.

3.Assemble the support tube to drawbar as shown. From backside of drawbar place reinforcement plate so that weld screws go through holes in left side of drawbar. Place support tube over weld screws and assemble flat washer, lockwasher, and wing nut as shown Do not tighten at this time.

4.Discard remaining hex bolts and locknuts in hardware GROUP "A".


SUPPORT TUBE


REINFORCEMENT


PLATE

FLAT


WASHERS


LOCK

UPPER

WASHERS

CORNER


RIBS

WING


NUTS


SELF TAPPING

LANCED TABS

SHOULDER

BOLTS

TOWARD BOTTOM


FIG. 1B

DRAWBAR WITHOUT UPPER CORNER RIBS - STYLE "B" (See Fig. 1C)

1.Assemble the mounting bracket, lanced tabs towards bottom, using the four smaller inside holes on the drawbar.

2.Install the four hex bolts and locknuts as shown and tighten securely.

3.Assemble the support tube to drawbar as shown. From backside of drawbar place reinforcement plate so that weld screws go through holes in left side of drawbar. Place support tube over weld screws and assemble flat washer, lockwasher, and wing nut as shown Do not tighten at this time.

4.Discard remaining shoulder bolts in hardware GROUP "A".

SUPPORT TUBE

REINFORCEMENT

PLATE

FLAT

HEX

WASHERS

BOLTS

LOCK

WASHERS

WING

NUTS

LANCED TABS TOWARD BOTTOM

LOCKNUTS

FIG. 1C

7

Page 7
Image 7
Husqvarna C342B owner manual Rear Mounting Bracket, Support Tube, See Figs A, 1B & 1C Use Hardware - Group a

C342B specifications

The Husqvarna C342B is a robust and efficient battery-powered brush cutter, designed to cater to the needs of both professional landscapers and homeowners. With its impressive performance and innovative features, this tool allows users to tackle a variety of trimming and clearing tasks with ease, freeing them from the limitations of traditional gas-powered equipment.

One of the standout characteristics of the C342B is its powerful brushless motor. This technology not only delivers high torque for demanding applications but also ensures an extended runtime and minimal maintenance needs compared to conventional gas engines. With no emissions produced during operation, the device is also environmentally friendly, making it ideal for residential areas and noise-sensitive environments.

The C342B features a lightweight and ergonomic design, ensuring user comfort during extended periods of use. The adjustable handle allows for a customizable grip, which is essential for achieving optimal control and reducing fatigue. Moreover, the bike handle configuration offers stability and ease of maneuvering, thus enhancing the overall user experience.

An important aspect of the C342B is its compatibility with Husqvarna's efficient battery system. The device can be powered by either the high-capacity 36V battery or a range of compatible batteries, allowing users to select the battery that best suits their needs. This modularity not only extends the runtime but also provides flexibility with other Husqvarna tools, creating a versatile landscaping toolkit.

The C342B is equipped with an efficient cutting system, including a 2-line trimmer head that is compatible with different line diameters for various cutting applications. This means users can easily switch to thicker lines when tackling overgrown areas or use finer lines for more delicate trimming tasks. The tool's smart design also allows for quick line replacement, minimizing downtime and improving efficiency.

Safety features are integrated throughout the C342B, with a protective guard ensuring user safety from debris and a quick-stop function that allows the motor to shut off immediately when releasing the trigger. This attention to safety makes the C342B an ideal choice for both novices and seasoned professionals alike.

In summary, the Husqvarna C342B stands out as a versatile, efficient, and environmentally friendly brush cutter. Its blend of cutting-edge technology, user-centric design, and powerful performance ensures it meets the demands of various landscaping tasks while prioritizing comfort and safety. Whether trimming grass, clearing brush, or maintaining garden edges, the C342B proves to be a reliable tool for achieving exceptional results.