3

Eng NOTE!

Check that the flex is correctly connected to the safety switch

(3) on the seat holder.

HINWEIS!

Prüfen, daß das Kabel richtig an dem Sicherheitsschalter (3) auf dem Halter des Sitzes angeschlossen ist.

FREMARQUE!

Vérifier que le cordon est correctement branché à l’interrupteur e sécurité (3) sur le support du siège.

Esp NOTA!

Controlar que el cable está correctamente acoplado al interruptor de seguridad (3) en el soporte del asiento.

NOTA

Controllare che il cavo sia ben collegato all’interruttore disicurezza (3) sul supporto del sedile.

NL N.B.!

Controleer of de snoer correct is aangesloten op deveiligheidsschakelaar (3), op de houder van de zitting.

1

2


4

6

3

5

7

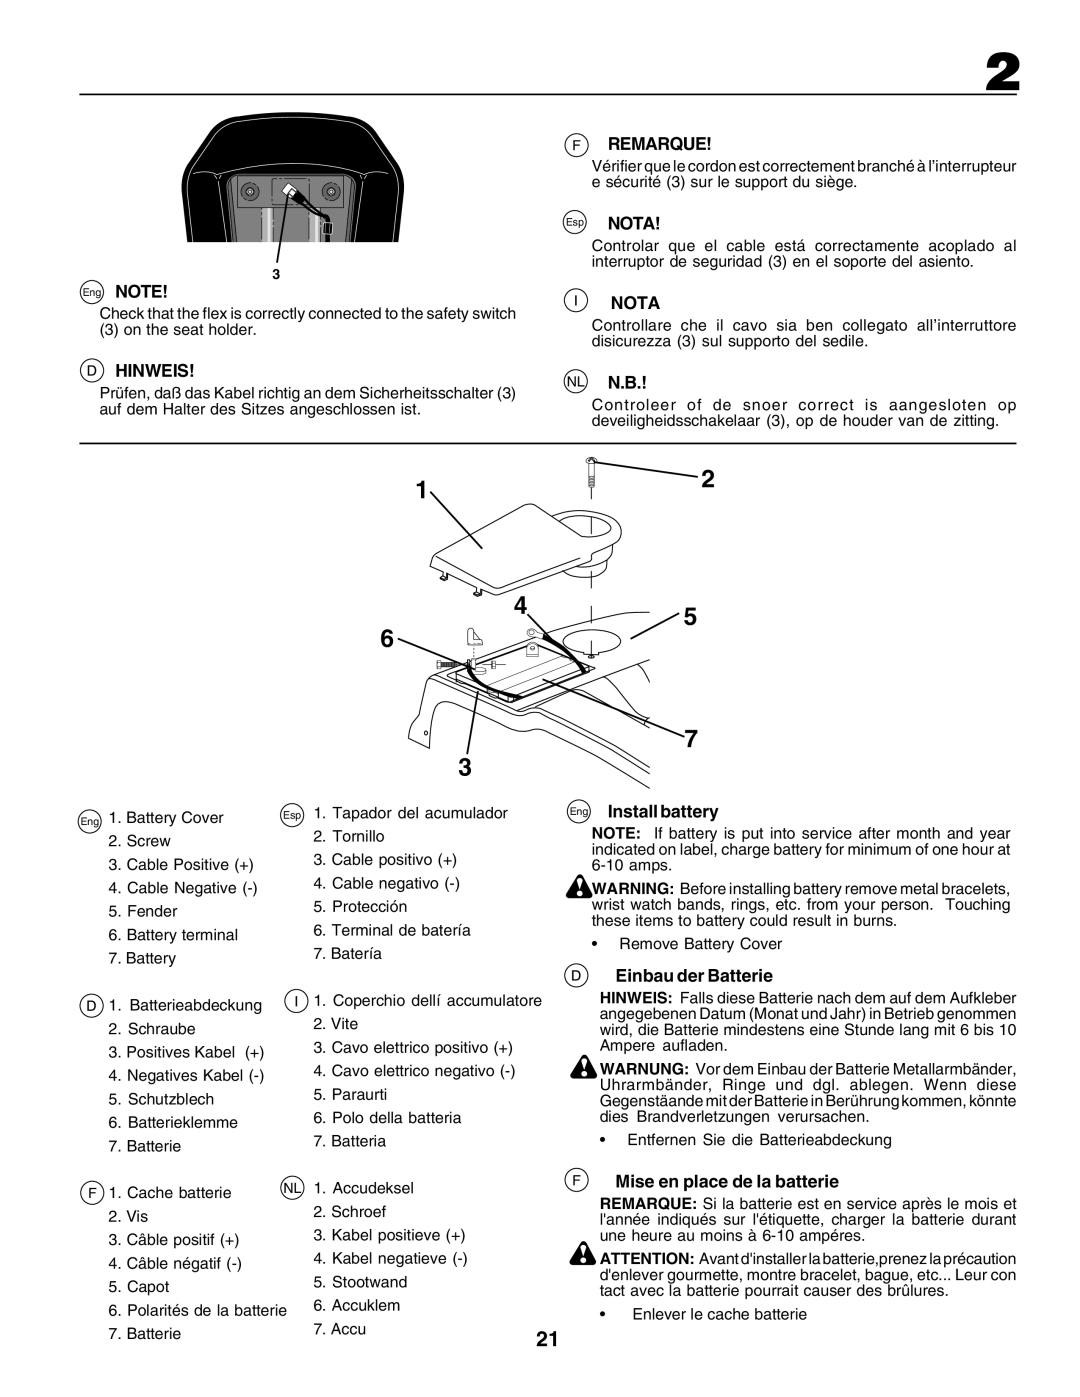
Eng 1. Battery Cover

2.Screw

3.Cable Positive (+)

4.Cable Negative (-)

5.Fender

6.Battery terminal

7.Battery

1. Batterieabdeckung

2.Schraube

3.Positives Kabel (+)

4.Negatives Kabel (-)

5.Schutzblech

6.Batterieklemme

7.Batterie

Esp 1. Tapador del acumulador

2.Tornillo

3.Cable positivo (+)

4.Cable negativo (-)

5.Protección

6.Terminal de batería

7.Batería

1. Coperchio dellí accumulatore

2.Vite

3.Cavo elettrico positivo (+)

4.Cavo elettrico negativo (-)

5.Paraurti

6.Polo della batteria

7.Batteria

Eng Install battery

NOTE: If battery is put into service after month and year indicated on label, charge battery for minimum of one hour at 6-10 amps.

WARNING: Before installing battery remove metal bracelets, wrist watch bands, rings, etc. from your person. Touching these items to battery could result in burns.

Remove Battery Cover

Einbau der Batterie

HINWEIS: Falls diese Batterie nach dem auf dem Aufkleber angegebenen Datum (Monat und Jahr) in Betrieb genommen wird, die Batterie mindestens eine Stunde lang mit 6 bis 10 Ampere aufladen.

WARNUNG: Vor dem Einbau der Batterie Metallarmbänder, Uhrarmbänder, Ringe und dgl. ablegen. Wenn diese Gegenstäande mit der Batterie in Berührung kommen, könnte dies Brandverletzungen verursachen.

Entfernen Sie die Batterieabdeckung

F 1. Cache batterie

NL

2.Vis

3.Câble positif (+)

4.Câble négatif (-)

5.Capot

6.Polarités de la batterie

7.Batterie

1.Accudeksel

2.Schroef

3.Kabel positieve (+)

4.Kabel negatieve (-)

5.Stootwand

6.Accuklem

7.Accu

FMise en place de la batterie

REMARQUE: Si la batterie est en service après le mois et l'année indiqués sur l'étiquette, charger la batterie durant une heure au moins à 6-10 ampéres.

ATTENTION: Avant d'installer la batterie,prenez la précaution d'enlever gourmette, montre bracelet, bague, etc... Leur con tact avec la batterie pourrait causer des brûlures.

Enlever le cache batterie

21

Page 21
Image 21
Husqvarna CTH155 instruction manual Hinweis, Remarque, Nota

CTH155 specifications

The Husqvarna CTH155 is a powerful and versatile riding mower designed to deliver exceptional performance and comfort in lawn care. This innovative machine comes equipped with several features aimed at enhancing user experience and ensuring a clean, efficient cut.

At the heart of the CTH155 is a robust engine that provides ample power for tackling tough grass conditions. The reliable engine is complemented by a smooth hydrostatic transmission, which allows for precise speed control and effortless maneuverability. This feature enables users to easily navigate around obstacles, making it ideal for yards with intricate landscaping.

The cutting deck of the Husqvarna CTH155 is designed for optimal performance. Featuring a 38-inch deck, it is equipped with three high-performance blades that ensure a clean and even cut, resulting in a healthier lawn. The adjustable cutting height provides the flexibility to choose the best setting for different grass types and environmental conditions, allowing for a tailor-made mowing experience.

One of the standout technologies featured in the CTH155 is the reverse mowing feature, which ensures that users can effectively mow in reverse without compromising safety. This is particularly useful for trimming grass in tight areas where forward mowing is not possible. The mower also boasts a tight turning radius, further enhancing its maneuverability.

Comfort is a key consideration in the design of the CTH155. It features an ergonomically designed seat that is both comfortable and adjustable, allowing users to find the perfect driving position. The user-friendly control panel provides easy access to the mower’s functions, ensuring a hassle-free operation.

Additionally, the Husqvarna CTH155 is equipped with large rear wheels, which enhance stability and traction, enabling it to handle various terrains with ease. The durable construction of this mower ensures that it can withstand the rigors of regular use while maintaining peak performance.

Overall, the Husqvarna CTH155 represents a blend of efficiency, comfort, and modern technology, making it a reliable choice for homeowners looking to maintain their lawns effortlessly. Whether it's tackling thick grass or navigating around obstacles, the CTH155 is engineered to meet the demands of lawn care enthusiasts.