2

1


2


4

1.

Front bagger tube

3


2

2.

Lower bagger tube

0259


3.

1/4 x 50,8mm Carriage


Bolts


4.

1/4 Lock nut


5

3

2

7 6

8

02593

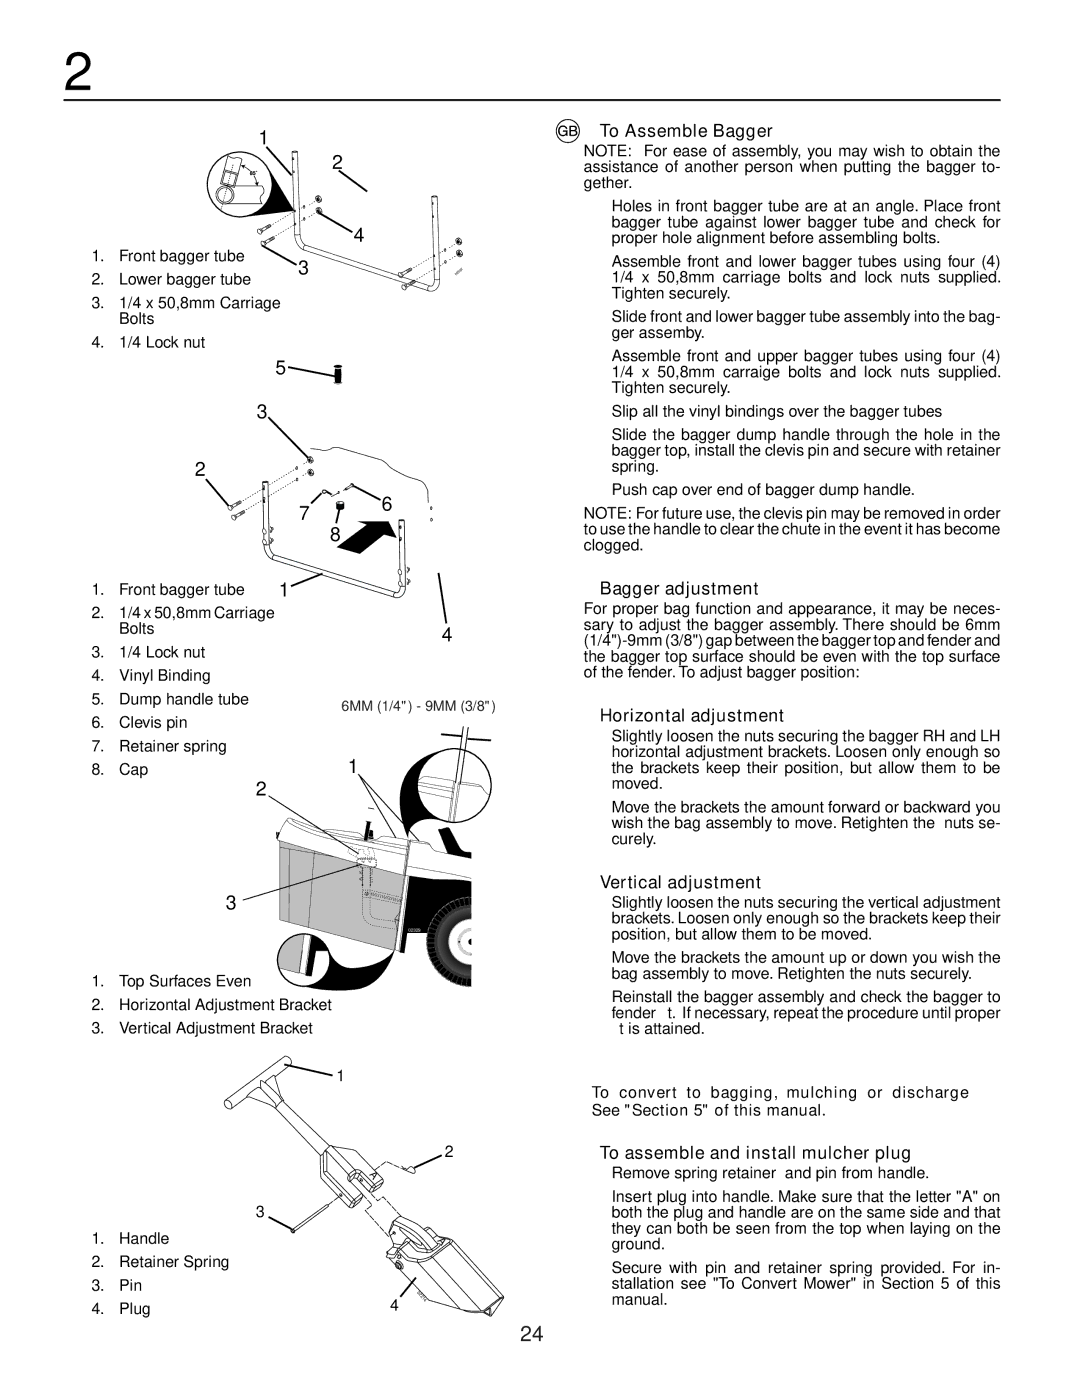
To Assemble Bagger

NOTE: For ease of assembly, you may wish to obtain the assistance of another person when putting the bagger to- gether.

Holes in front bagger tube are at an angle. Place front bagger tube against lower bagger tube and check for proper hole alignment before assembling bolts.

Assemble front and lower bagger tubes using four (4) 1/4 x 50,8mm carriage bolts and lock nuts supplied. Tighten securely.

Slide front and lower bagger tube assembly into the bag- ger assemby.

Assemble front and upper bagger tubes using four (4) 1/4 x 50,8mm carraige bolts and lock nuts supplied. Tighten securely.

Slip all the vinyl bindings over the bagger tubes

Slide the bagger dump handle through the hole in the bagger top, install the clevis pin and secure with retainer spring.

Push cap over end of bagger dump handle.

NOTE: For future use, the clevis pin may be removed in order to use the handle to clear the chute in the event it has become clogged.

1. Front bagger tube

1

2.1/4 x 50,8mm Carriage Bolts

3.1/4 Lock nut

4.Vinyl Binding

5.Dump handle tube

6.Clevis pin

7.Retainer spring

8.Cap

2

3

4

6MM (1/4") - 9MM (3/8")

1

02329

Bagger adjustment

For proper bag function and appearance, it may be neces- sary to adjust the bagger assembly. There should be 6mm (1/4")-9mm (3/8") gap between the bagger top and fender and the bagger top surface should be even with the top surface of the fender. To adjust bagger position:

Horizontal adjustment

Slightly loosen the nuts securing the bagger RH and LH horizontal adjustment brackets. Loosen only enough so the brackets keep their position, but allow them to be moved.

Move the brackets the amount forward or backward you wish the bag assembly to move. Retighten the nuts se- curely.

Vertical adjustment

Slightly loosen the nuts securing the vertical adjustment


brackets. Loosen only enough so the brackets keep their


position, but allow them to be moved.

Move the brackets the amount up or down you wish the

1. Top Surfaces Even

2.Horizontal Adjustment Bracket

3.Vertical Adjustment Bracket

1

2


A


3


1.

Handle


A


2.

Retainer Spring


3.

Pin


02

4.

Plug

4

214


bag assembly to move. Retighten the nuts securely.

• Reinstall the bagger assembly and check the bagger to

fender fi t. If necessary, repeat the procedure until proper

fi t is attained.

To convert to bagging, mulching or discharge See "Section 5" of this manual.

To assemble and install mulcher plug

Remove spring retainer and pin from handle.

Insert plug into handle. Make sure that the letter "A" on both the plug and handle are on the same side and that they can both be seen from the top when laying on the ground.

Secure with pin and retainer spring provided. For in- stallation see "To Convert Mower" in Section 5 of this manual.

24

Page 24
Image 24
Husqvarna CTH171, CTH172, CTH191 To Assemble Bagger, Bagger adjustment, Horizontal adjustment, Vertical adjustment

CTH171, CTH172, CTH191 specifications

Husqvarna, a leading name in outdoor power equipment, offers a range of high-performance lawn tractors, including models CTH191, CTH172, and CTH171. Each model is designed for efficiency and ease of use, catering to homeowners seeking a reliable solution for lawn care.

The Husqvarna CTH191 stands out with its powerful 19 HP engine, providing robust performance for tackling various terrains. This model features a 42-inch cutting deck, allowing for wide mowing coverage and reducing the number of passes needed for larger lawns. With its automatic transmission, the CTH191 ensures smooth operation, enabling users to focus on their mowing task without worrying about shifting gears. Additionally, the innovative cutting height adjustment lever allows for effortless customization of grass lengths, accommodating different mowing preferences.

Next in line is the Husqvarna CTH172, which is ideal for homeowners looking for a balance between power and maneuverability. Equipped with a 17 HP engine, it offers adequate performance for medium-sized lawns. The 42-inch cutting deck provides efficient cutting while maintaining compactness, making it easier to navigate around obstacles. One of the key features of the CTH172 is its ergonomic steering wheel and adjustable seat, enhancing comfort during extended mowing sessions. The easy-access controls are designed for user convenience, allowing quick adjustments while on the go.

Finally, the Husqvarna CTH171 is designed for those who prioritize budget-friendly options without compromising on essential features. It comes with a 17 HP engine and a 38-inch cutting deck, making it a practical choice for smaller yards. The compact design not only makes it easy to store but also simplifies maneuvering in tight spaces. The CTH171 also includes an efficient cutting system, providing a clean and even cut every time. Its straightforward controls ensure that it is user-friendly, catering to novice operators and seasoned lawn care enthusiasts alike.

All three models incorporate Husqvarna's commitment to quality and innovation, featuring durable construction and reliability. With advanced technologies such as an efficient air flow system for optimal grass clipping collection and enhanced driver comfort through vibration dampening, these lawn tractors demonstrate Husqvarna's dedication to performance and user satisfaction. Whether you choose the CTH191, CTH172, or CTH171, you can count on a high-quality lawn tractor to maintain your yard beautifully and effortlessly.