ASSEMBLY

Your new tractor has been assembled at the factory with exception of those parts left unassembled for shipping purposes. To ensure safe and proper operation of your tractor all parts and hardware you assemble must be tightened securely. Use the correct tools as necessary to insure proper tightness.

TOOLS REQUIRED FOR ASSEMBLY

A socket wrench set will make assembly easier. Standard wrench sizes are listed.

(2)

7/16" wrenches

Utility knife

(1)

3/4" wrenches

Tire pressure gauge

(1)

3/4" socket w/drive ratchet

Pliers

When right or left hand is mentioned in this manual, it means when you are in the operating position (seated behind the steering wheel).

TO REMOVE TRACTOR FROM CAR- TON

UNPACK CARTON

Remove all accessible loose parts and parts cartons from carton.

Cut along dashed lines on all four panels of carton. Remove end panels and lay side panels flat.

Check for any additional loose parts or cartons and remove.

BEFORE REMOVING TRACTOR FROM SKID

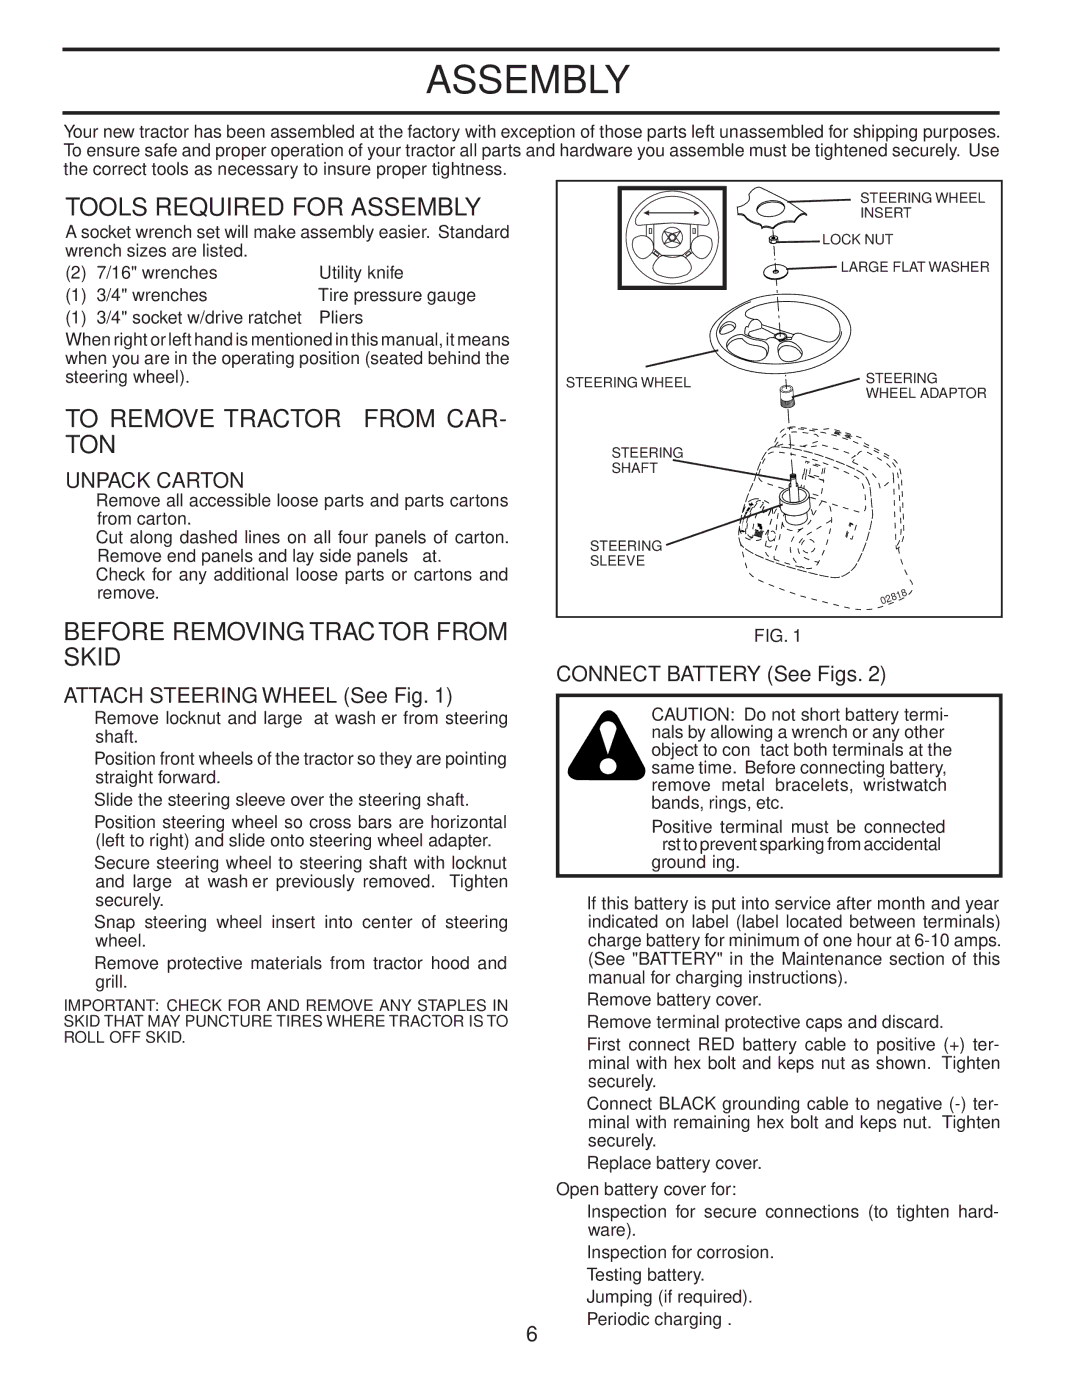
ATTACH STEERING WHEEL (See Fig. 1)

Remove locknut and large fl at washer from steering shaft.

Position front wheels of the tractor so they are pointing straight forward.

Slide the steering sleeve over the steering shaft.

Position steering wheel so cross bars are horizontal (left to right) and slide onto steering wheel adapter.

Secure steering wheel to steering shaft with locknut and large fl at washer previously removed. Tighten securely.

Snap steering wheel insert into center of steering wheel.

Remove protective materials from tractor hood and grill.

IMPORTANT: CHECK FOR AND REMOVE ANY STAPLES IN SKID THAT MAY PUNCTURE TIRES WHERE TRACTOR IS TO ROLL OFF SKID.

STEERING WHEEL

INSERT

LOCK NUT

LARGE FLAT WASHER

STEERING WHEEL

STEERING

WHEEL ADAPTOR


STEERING

SHAFT

STEERING

SLEEVE


8


1


8


2


0


FIG. 1

CONNECT BATTERY (See Figs. 2)

CAUTION: Do not short battery termi- nals by allowing a wrench or any other object to contact both terminals at the same time. Before connecting battery, remove metal bracelets, wristwatch bands, rings, etc.

Positive terminal must be connected first to prevent sparking from accidental grounding.

If this battery is put into service after month and year indicated on label (label located between terminals) charge battery for minimum of one hour at 6-10 amps. (See "BATTERY" in the Maintenance section of this manual for charging instructions).

Remove battery cover.

Remove terminal protective caps and discard.

First connect RED battery cable to positive (+) ter- minal with hex bolt and keps nut as shown. Tighten securely.

Connect BLACK grounding cable to negative (-) ter- minal with remaining hex bolt and keps nut. Tighten securely.

Replace battery cover.

Open battery cover for:

Inspection for secure connections (to tighten hard- ware).

Inspection for corrosion.

Testing battery.

Jumping (if required).

Periodic charging .

6

Page 6
Image 6
Husqvarna CTH2542 XP Tools Required for Assembly, To Remove Tractor from CAR- TON, Before Removing Tractor from Skid

CTH2542 XP specifications

The Husqvarna CTH2542 XP is a robust riding lawn mower designed to cater to the needs of homeowners with mid-sized lawns. This machine is engineered for precision, efficiency, and exceptional comfort, making lawn care a seamless task.

One of the standout features of the CTH2542 XP is its powerful 24-horsepower Kohler engine. This reliable engine delivers ample power to tackle tough grass and uneven terrain. Paired with hydrostatic transmission, the mower offers smooth acceleration and easy control, making it simple to navigate various yard conditions.

Equipped with a 42-inch cutting deck, the CTH2542 XP allows for efficient mowing across medium to large lawns. The deck is made from high-quality materials, ensuring durability and longevity. Its cutting height can be easily adjusted between different positions, allowing users to customize their lawn’s appearance as per their preference.

The mower is designed with user comfort in mind. It features an ergonomic seat with armrests, providing support during extended mowing sessions. The easy-to-reach controls facilitate effortless maneuvering, reducing fatigue while working. Moreover, the compact design of the CTH2542 XP allows it to fit through tight spaces, making it versatile for various yard layouts.

In terms of technology, the CTH2542 XP includes a variety of innovative features. The air induction mowing technology optimizes airflow within the deck, ensuring an even cut and eliminating clumping. Additionally, the mower is compatible with a range of accessories, allowing users to tailor their equipment for mulching, bagging, and other functions.

Another notable characteristic of the CTH2542 XP is its robust build quality. Constructed with a heavy-duty frame and components, it can withstand the rigors of lawn care, ensuring it remains a reliable companion for years.

Finally, Husqvarna’s commitment to environmental sustainability is reflected in the design of the CTH2542 XP. The machine is engineered for fuel efficiency, minimizing emissions while delivering excellent performance, making it a responsible choice for eco-conscious consumers.

In conclusion, the Husqvarna CTH2542 XP stands out due to its powerful engine, user-friendly features, and innovative technology. It is designed for homeowners who seek a balance between performance and ease of use, making lawn maintenance a more enjoyable endeavor. Whether mowing a large lawn or navigating tight spaces, the CTH2542 XP proves to be a versatile and reliable tool for maintaining a beautiful yard.