6

Adjusting the cutting height

Adjusting the Cutting Height

Never use more than 2 cutting height spacers.

Spacers can only be fitted between the blade and

the fan and never between blade and the bolt (R).

1.Ensure the Operator Presence Control is released, when the engine has stopped rotating - disconnect the spark plug lead.

2.Close the fuel tap (L). Turn your lawnmower on its side.

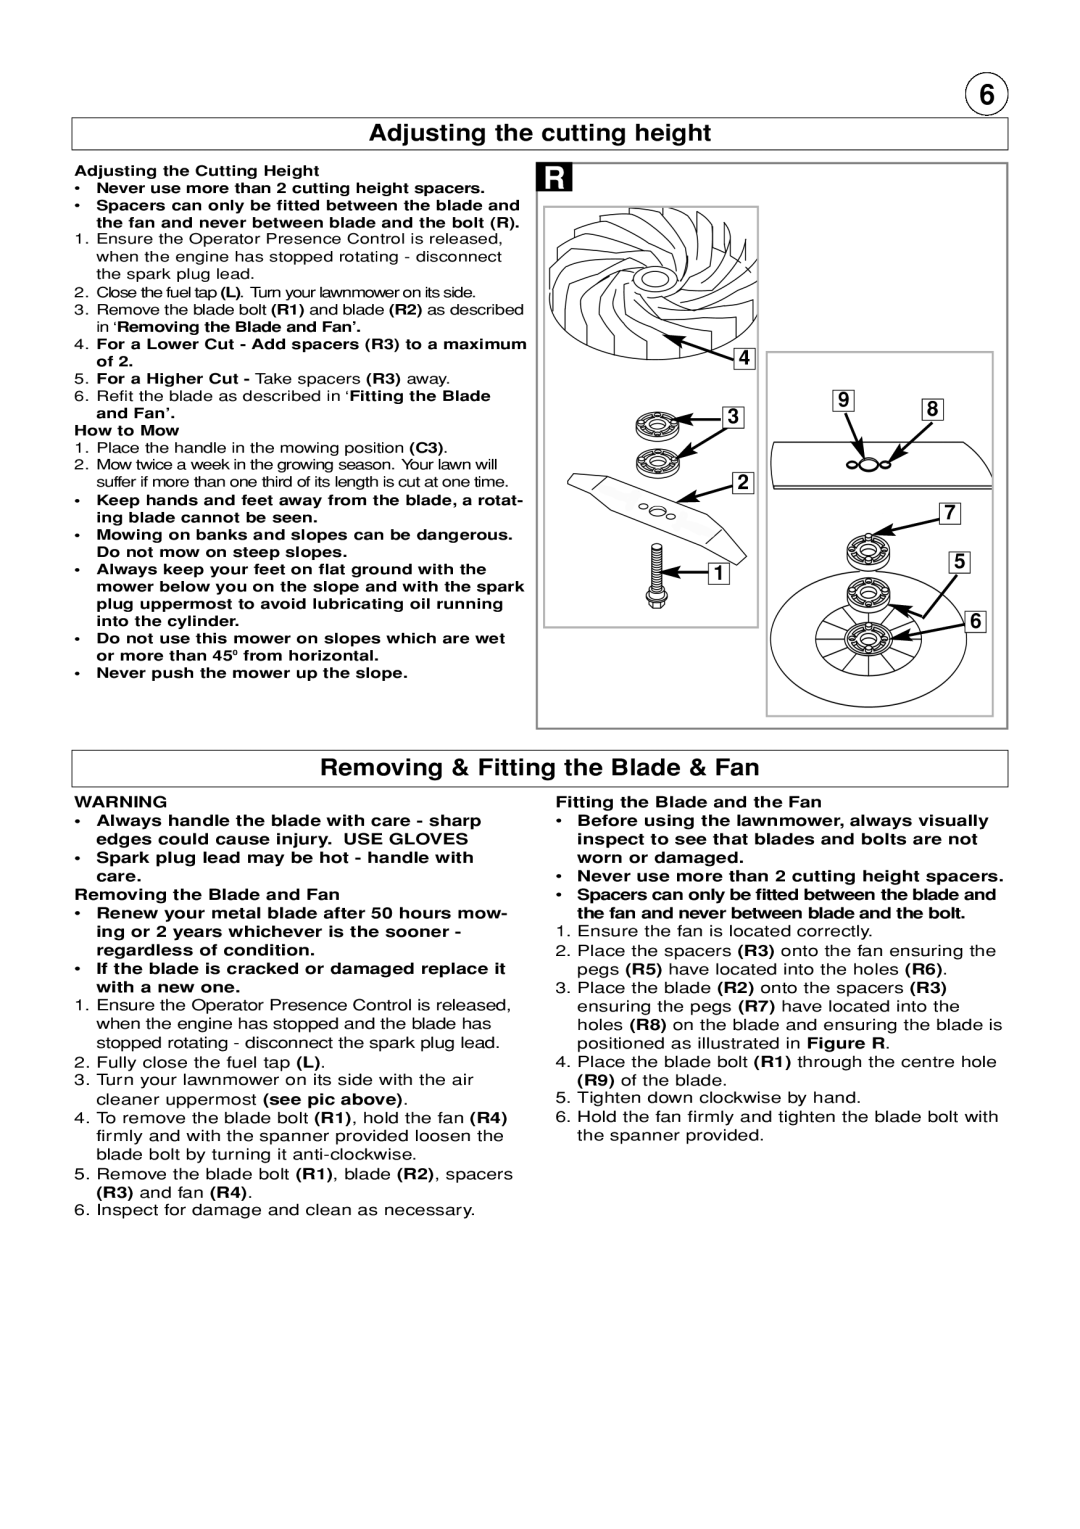
3.Remove the blade bolt (R1) and blade (R2) as described in ‘Removing the Blade and Fan’.

4.For a Lower Cut - Add spacers (R3) to a maximum of 2.

5.For a Higher Cut - Take spacers (R3) away.

6.Refit the blade as described in ‘Fitting the Blade and Fan’.

How to Mow

1.Place the handle in the mowing position (C3).

2.Mow twice a week in the growing season. Your lawn will suffer if more than one third of its length is cut at one time.

Keep hands and feet away from the blade, a rotat- ing blade cannot be seen.

Mowing on banks and slopes can be dangerous. Do not mow on steep slopes.

Always keep your feet on flat ground with the mower below you on the slope and with the spark plug uppermost to avoid lubricating oil running into the cylinder.

Do not use this mower on slopes which are wet or more than 450 from horizontal.

Never push the mower up the slope.

R


4


3

9

8


2


7

1


5


6

Removing & Fitting the Blade & Fan

WARNING

Always handle the blade with care - sharp edges could cause injury. USE GLOVES

Spark plug lead may be hot - handle with care.

Removing the Blade and Fan

Renew your metal blade after 50 hours mow- ing or 2 years whichever is the sooner - regardless of condition.

If the blade is cracked or damaged replace it

with a new one.

1.Ensure the Operator Presence Control is released, when the engine has stopped and the blade has stopped rotating - disconnect the spark plug lead.

2.Fully close the fuel tap (L).

3.Turn your lawnmower on its side with the air cleaner uppermost (see pic above).

4.To remove the blade bolt (R1), hold the fan (R4) firmly and with the spanner provided loosen the blade bolt by turning it anti-clockwise.

5.Remove the blade bolt (R1), blade (R2), spacers (R3) and fan (R4).

6.Inspect for damage and clean as necessary.

Fitting the Blade and the Fan

Before using the lawnmower, always visually inspect to see that blades and bolts are not worn or damaged.

Never use more than 2 cutting height spacers.

Spacers can only be fitted between the blade and

the fan and never between blade and the bolt.

1.Ensure the fan is located correctly.

2.Place the spacers (R3) onto the fan ensuring the pegs (R5) have located into the holes (R6).

3.Place the blade (R2) onto the spacers (R3) ensuring the pegs (R7) have located into the holes (R8) on the blade and ensuring the blade is positioned as illustrated in Figure R.

4.Place the blade bolt (R1) through the centre hole (R9) of the blade.

5.Tighten down clockwise by hand.

6.Hold the fan firmly and tighten the blade bolt with the spanner provided.

Page 7
Image 7
Husqvarna GX560 manual Adjusting the cutting height, Removing & Fitting the Blade & Fan, How to Mow

GX560 specifications

The Husqvarna GX560 is a robust and versatile gasoline-powered generator, designed to meet the demands of both residential users and contractors. As one of the standout models in the Husqvarna generator lineup, it combines performance, efficiency, and user-friendly features.

One of the main features of the GX560 is its powerful engine. It is equipped with a reliable 4-stroke engine, which provides consistent power output and longevity. The generator produces a maximum output of 5600 watts, making it suitable for powering essential appliances during outages, or for use at construction sites requiring heavy-duty equipment. This capacity allows users to run multiple devices simultaneously without risk of overload.

The GX560 is also designed with portability in mind. It features a sturdy frame with integrated wheels and a handle, enabling easy transportation between job sites or for home use. This feature is particularly beneficial for contractors who often need to move their equipment. Despite its power, the generator is relatively lightweight for its class, making it manageable for one person.

One of the standout technologies in the GX560 is its Digital Voltage Regulator (DVR). This technology ensures stable voltage output, protecting sensitive electronics and prolonging their lifespan. The generator maintains a steady voltage, making it safe to use with computers and other delicate devices. Additionally, the generator is equipped with a low oil shutdown feature, which automatically turns off the engine when oil levels are critically low, preventing potential damage.

Noise reduction is another key characteristic of the Husqvarna GX560. Engineered with sound-dampening technologies, this generator operates at a lower noise level compared to many competitors, making it a great choice for residential areas where noise regulations may apply.

The control panel of the GX560 is user-friendly, featuring multiple AC and DC outlets for versatility. The intuitive layout allows users to easily monitor output and control settings, providing convenience during operation.

Overall, the Husqvarna GX560 is an impressive generator that delivers on performance, portability, and user safety. Whether you require a reliable backup during power outages or a dependable power source for construction tasks, the GX560 stands out as a top contender in the portable generator market. Its combination of innovative technology, practical features, and durability makes it a valuable investment for both home and professional use.