Connecting the cables

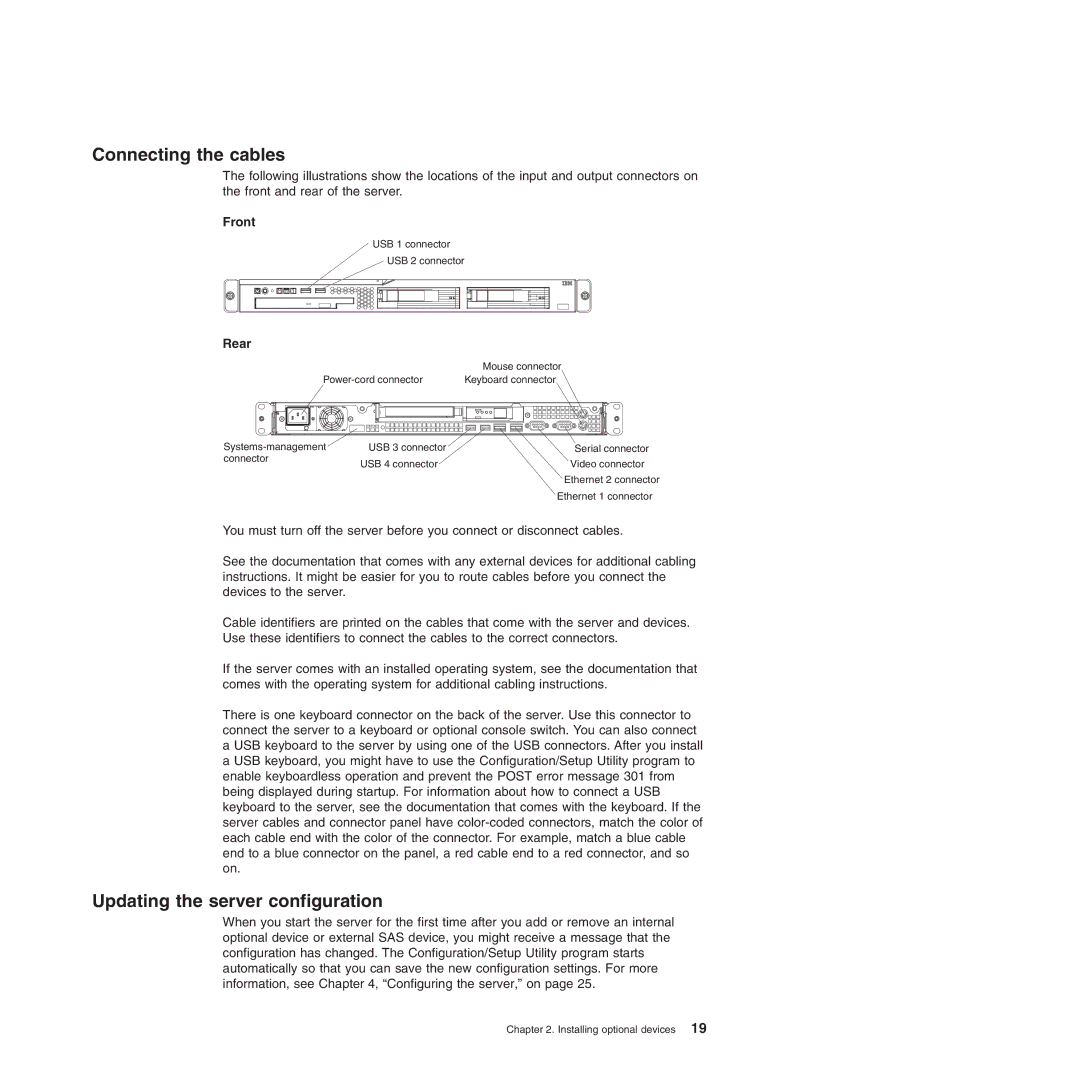
The following illustrations show the locations of the input and output connectors on the front and rear of the server.

Front

USB 1 connector

USB 2 connector

Rear


Mouse connector


Power-cord connector


Keyboard connector


Systems-management

USB 3 connector

Serial connector

connector

USB 4 connector

Video connector


Ethernet 2 connector


Ethernet 1 connector

You must turn off the server before you connect or disconnect cables.

See the documentation that comes with any external devices for additional cabling instructions. It might be easier for you to route cables before you connect the devices to the server.

Cable identifiers are printed on the cables that come with the server and devices. Use these identifiers to connect the cables to the correct connectors.

If the server comes with an installed operating system, see the documentation that comes with the operating system for additional cabling instructions.

There is one keyboard connector on the back of the server. Use this connector to connect the server to a keyboard or optional console switch. You can also connect a USB keyboard to the server by using one of the USB connectors. After you install a USB keyboard, you might have to use the Configuration/Setup Utility program to enable keyboardless operation and prevent the POST error message 301 from being displayed during startup. For information about how to connect a USB keyboard to the server, see the documentation that comes with the keyboard. If the server cables and connector panel have color-coded connectors, match the color of each cable end with the color of the connector. For example, match a blue cable end to a blue connector on the panel, a red cable end to a red connector, and so on.

Updating the server configuration

When you start the server for the first time after you add or remove an internal optional device or external SAS device, you might receive a message that the configuration has changed. The Configuration/Setup Utility program starts automatically so that you can save the new configuration settings. For more information, see Chapter 4, “Configuring the server,” on page 25.

Chapter 2. Installing optional devices 19

Page 33
Image 33
IBM 4364, 4365 manual Connecting the cables, Updating the server configuration

4364, 4365 specifications

The IBM 4365 and 4364 are significant models in IBM’s lineup of mainframe computers, designed primarily for large organizations requiring robust processing capabilities. These models emerged during the late 1980s and early 1990s, serving to enhance the performance and versatility of business computing environments.

The IBM 4365, launched in 1985, is known for its sophisticated architecture and large processing power, capable of managing substantial transaction volumes. It features the advanced Multiple Virtual Storage (MVS) operating system, which allows for efficient processing and management of numerous tasks simultaneously. The MVS system contributes to high reliability and availability, factors paramount for businesses that rely on uninterrupted service.

One of the standout characteristics of the IBM 4365 is its ability to scale. Users could configure the system with multiple processors, allowing it to handle increasing workloads effectively. This scalability is made possible through its use of IBM's proprietary technology, which optimizes resource allocation to improve efficiency. The system could support an impressive number of users, making it ideal for large enterprises.

In contrast, the IBM 4364, released slightly later, is a more modest version aimed at smaller organizations but still renowned for its reliable performance. It too operates the MVS operating system, but its configurations are tailored for less intensive processing needs. It is designed with cost-effectiveness in mind, making it suitable for businesses that require robust computing without the extensive capabilities of larger systems.

Both models benefit from IBM's robust security features, ensuring data protection and compliance with industry standards. Additionally, they offer significant storage options, utilizing IBM's innovative storage technologies to retain vast amounts of data efficiently.

Among the key technologies that defined these mainframes were the use of advanced input/output capabilities and compatibility with a broad range of peripheral devices. This integration allowed organizations to enhance productivity while maintaining seamless operations across various applications.

Overall, the IBM 4365 and 4364 exemplify the evolution of mainframe technology during their era, offering remarkable processing power, superior reliability, and scalability while paving the way for future innovations in enterprise computing. Their legacy remains influential in shaping the landscape of business technology today, as organizations continue to rely on mainframe processing for critical operations.