FCC Information
This device complies with Part 15 of the FCC Rules. Operation is subject to the following two conditions: (1) This device may not cause harmful interference, and (2) this device must accept any interference received, including interference that may cause undesired operation.
Warning: Changes or modifications to this unit not expressly approved by the party responsible for compliance could void the user’s authority to operate the equipment.
NOTE: This equipment has been tested and found to comply with the limits for a Class B digital device, pursuant to Part 15 of the FCC Rules. These limits are designed to provide reasonable protection against harmful interference
Quick Start
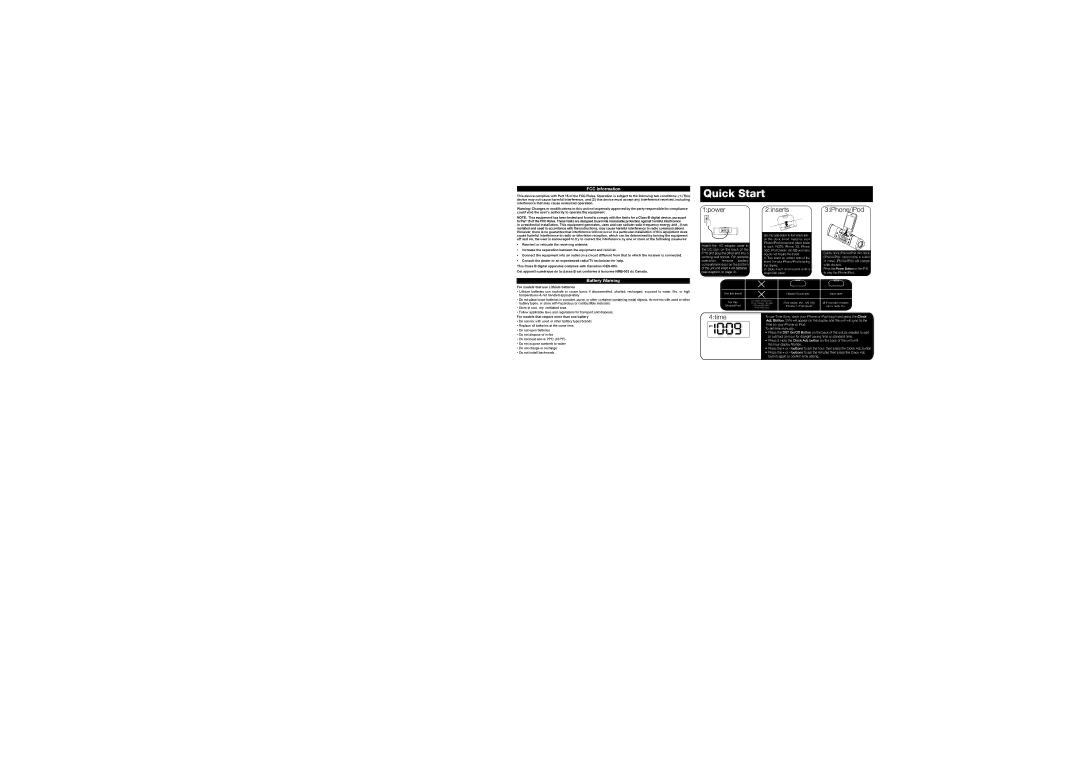
1:power2:inserts3:iPhone/iPod
in a residential installation. This equipment generates, uses and can radiate radio frequency energy and , if not installed and used in accordance with the instructions, may cause harmful interference to radio communications. However, there is no guarantee that interference will not occur in a particular installation. If this equipment does cause harmful interference to radio or television reception, which can be determined by turning the equipment off and on, the user is encouraged to try to correct the interference by one or more of the following measures:
•Reorient or relocate the receiving antenna.
•Increase the separation between the equipment and receiver.
•Connect the equipment into an outlet on a circuit different from that to which the receiver is connected.
•Consult the dealer or an experienced radio/TV technician for help.
This Class B digital apparatus complies with Canadian
Cet appareil numérique de la classe B est conforme à la norme
Battery Warning
For models that use Lithium batteries
Attach the AC adaptor cable to the DC jack on the back of the iP16 and plug the other end into a working wall socket. For portable operation, remove battery compartment door on the bottom of the unit and insert 4 AA batteries (see diagram on page 4).
See the table below to find which side of the dock insert matches your iPhone/iPod model and place insert in dock. NOTE: iPhone 3G, iPhone 3GS, iPod Classic 160 GB and nano 6G do not require the insert.
1)Turn insert so correct side of the insert for your iPhone/iPod is facing the display.
2)Slide insert downwards until it snaps into place
Gently dock iPhone/iPod into dock (iPhone/iPod must not be in a skin or case). iPhone/iPod will charge while docked.
Press the Power Button on the iP16 to play the iPhone/iPod.
•Lithium batteries can explode or cause burns if disassembled, shorted, recharged, exposed to water, fire, or high temperatures & not handled appropriately
•Do not place loose batteries in a pocket, purse, or other container containing metal objects, do not mix with used or other battery types, or store with hazardous or combustible materials.
•Store in cool, dry, ventilated area.
•Follow applicable laws and regulations for transport and disposal.
For models that require more than one battery
•Do not mix with used or other battery types/brands
•Replace all batteries at the same time
•Do not open batteries
•Do not dispose of in fire
•Do not heat above 75ºC (167ºF)
•Do not expose contents to water
•Do not charge or recharge
•Do not install backwards
Use this insert |
| Classic/Touch side | Nano side |
For this | no insert needed for | iPod classic (80, 120 GB) | all iPod nano models |
iPod Classic 160 GB | |||
iPhone/iPod | iPhone 3G/3GS | iPhone 4, iPod touch | up to nano 5G |
| iPod nano 6G |
|
|
4:time | To use Time Sync, dock your iPhone or iPod touch and press the Clock | ||
| |||
| Adj. Button. SYN will appear on the display and the unit will sync to the | ||
| time on your iPhone or iPod. |
| |
| To set time manually, |
| |
•Press the DST On/Off Button on the back of the unit as needed to add or subtract an hour for daylight saving time or standard time.
•Press & Hold the Clock Adj. button on the back of the unit until
the hour display flashes.
•Press the + or - buttons to set the hour, then press the Clock Adj. button
•Press the + or - buttons to set the minutes then press the Clock Adj. button again to confirm time setting.