Theelectronic programmer

GB


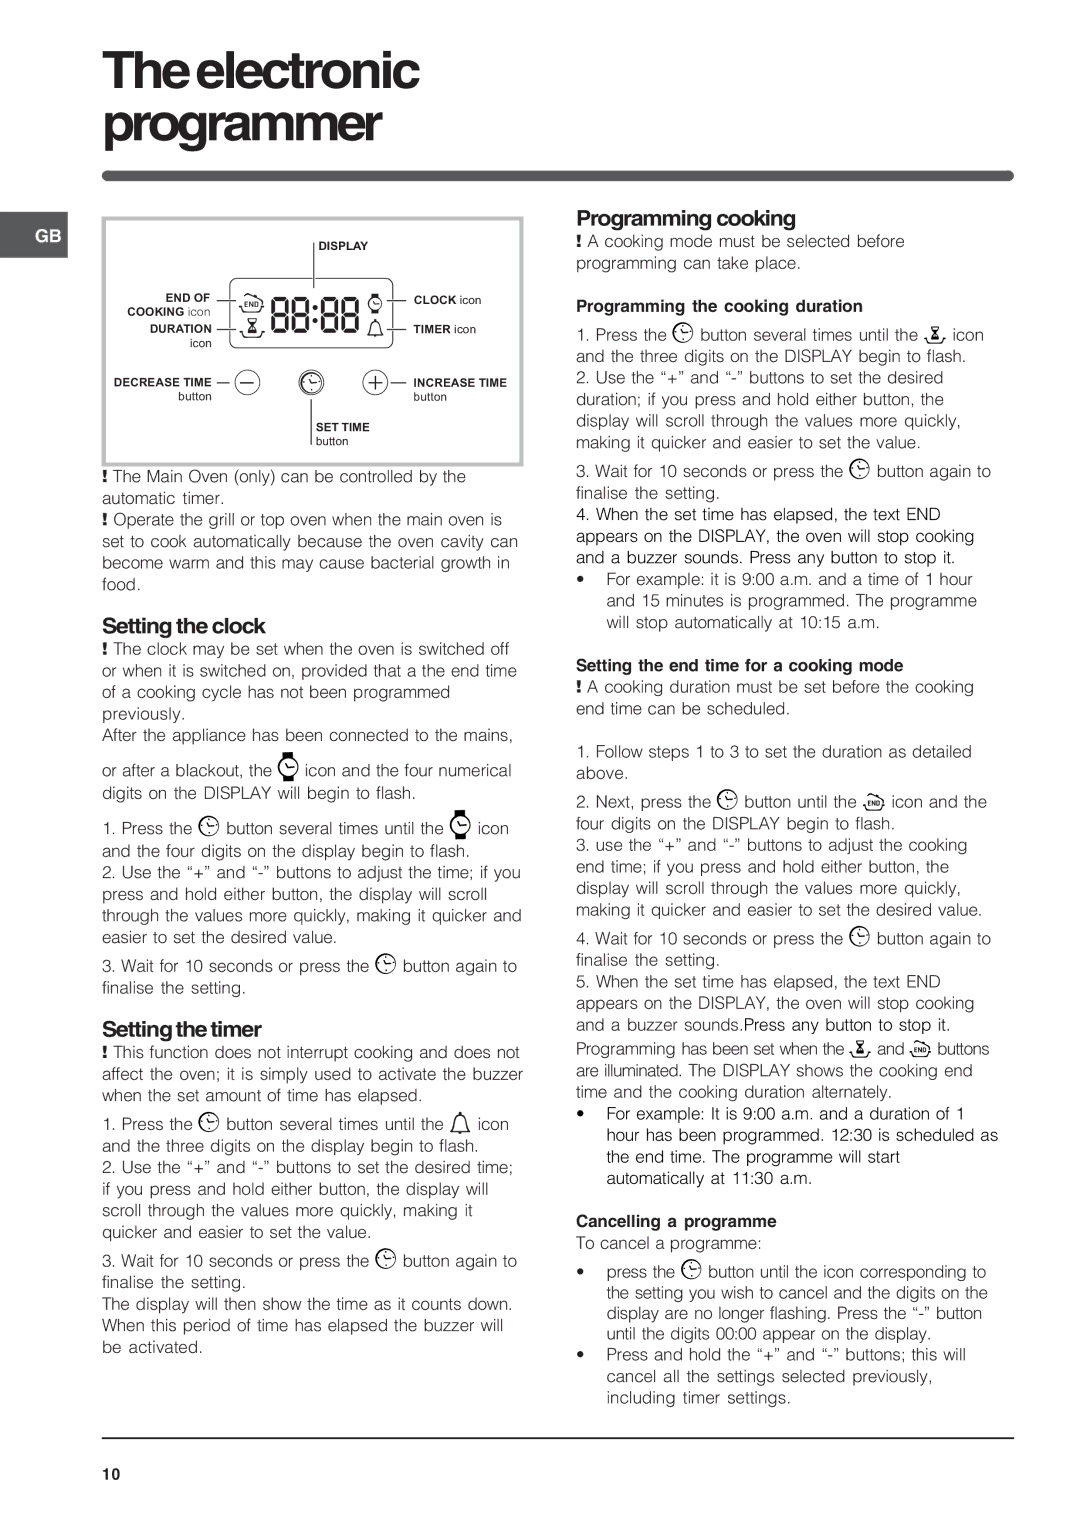
DISPLAY


END OF


•• ••


CLOCK icon


COOKING icon


DURATION


TIMER icon


icon


DECREASE TIME


INCREASE TIME


button


button

SET TIME

button

￿The Main Oven (only) can be controlled by the automatic timer.

￿Operate the grill or top oven when the main oven is set to cook automatically because the oven cavity can become warm and this may cause bacterial growth in food.

Setting the clock

￿The clock may be set when the oven is switched off or when it is switched on, provided that a the end time of a cooking cycle has not been programmed previously.

After the appliance has been connected to the mains,

or after a blackout, the icon and the four numerical digits on the DISPLAY will begin to flash.

1.Press the button several times until the icon and the four digits on the display begin to flash.

2.Use the “+” and “-” buttons to adjust the time; if you press and hold either button, the display will scroll through the values more quickly, making it quicker and easier to set the desired value.

3.Wait for 10 seconds or press the button again to finalise the setting.

Settingthe timer

￿This function does not interrupt cooking and does not affect the oven; it is simply used to activate the buzzer when the set amount of time has elapsed.

1.Press the button several times until the icon and the three digits on the display begin to flash.

2.Use the “+” and “-” buttons to set the desired time; if you press and hold either button, the display will scroll through the values more quickly, making it quicker and easier to set the value.

3.Wait for 10 seconds or press the button again to finalise the setting.

The display will then show the time as it counts down. When this period of time has elapsed the buzzer will be activated.

Programming cooking

￿A cooking mode must be selected before programming can take place.

Programming the cooking duration

1.Press the button several times until the icon and the three digits on the DISPLAY begin to flash.

2.Use the “+” and “-” buttons to set the desired duration; if you press and hold either button, the display will scroll through the values more quickly, making it quicker and easier to set the value.

3.Wait for 10 seconds or press the button again to finalise the setting.

4.When the set time has elapsed, the text END appears on the DISPLAY, the oven will stop cooking and a buzzer sounds. Press any button to stop it.

• For example: it is 9:00 a.m. and a time of 1 hour and 15 minutes is programmed. The programme will stop automatically at 10:15 a.m.

Setting the end time for a cooking mode

￿A cooking duration must be set before the cooking end time can be scheduled.

1.Follow steps 1 to 3 to set the duration as detailed above.

2.Next, press the button until the icon and the four digits on the DISPLAY begin to flash.

3.use the “+” and “-” buttons to adjust the cooking end time; if you press and hold either button, the display will scroll through the values more quickly, making it quicker and easier to set the desired value.

4.Wait for 10 seconds or press the button again to finalise the setting.

5.When the set time has elapsed, the text END appears on the DISPLAY, the oven will stop cooking and a buzzer sounds.Press any button to stop it.

Programming has been set when the and buttons are illuminated. The DISPLAY shows the cooking end time and the cooking duration alternately.

• For example: It is 9:00 a.m. and a duration of 1 hour has been programmed. 12:30 is scheduled as the end time. The programme will start automatically at 11:30 a.m.

Cancelling a programme

To cancel a programme:

press the button until the icon corresponding to the setting you wish to cancel and the digits on the display are no longer flashing. Press the “-” button until the digits 00:00 appear on the display.

Press and hold the “+” and “-” buttons; this will cancel all the settings selected previously, including timer settings.

10

Page 10
Image 10
Indesit FIDM20IX/1, FID20BK/1, FID20WH/1 Theelectronic programmer, Setting the clock, Settingthe timer, Programming cooking

FID201X/1, FIDM20IX/1, FID20WH/1, FID20BK/1 specifications

Indesit has long been a trusted name in home appliances, and the Indesit FID20BK/1, FID20WH/1, FIDM20IX/1, and FID201X/1 bring a variety of features and technologies designed for modern kitchens. These built-in dishwashers provide effective cleaning solutions while ensuring energy efficiency and convenience for users.

One of the standout features of these models is their A+ energy rating, which reflects a commitment to energy conservation without compromising on performance. This helps consumers save on their utility bills while also being more environmentally friendly. The dishwashers are designed to handle a wide range of dishware, including pots, pans, and delicate glassware, making them versatile options for any household.

The large capacity of these models allows for up to 13 place settings, making them ideal for families or those who frequently entertain guests. The adjustable upper basket enables the user to customize the interior space according to their needs, accommodating larger items with ease. Furthermore, the removable cutlery basket provides flexibility and improves access.

Equipped with various wash cycles, including Eco, Intensive, and Rapid, these dishwashers cater to different cleaning requirements. The Eco cycle, in particular, is designed for energy efficiency, while the Intensive cycle tackles heavily soiled dishes. The Rapid cycle is perfect for when time is of the essence, delivering clean dishes in a fraction of the time.

Another notable technology employed in these models is the “Half Load” function, which allows users to run the dishwasher when it's not full, saving water and energy. Additionally, the delay timer lets users set a wash to start at a more convenient time, enhancing flexibility.

The Indesit FID series also features a user-friendly interface, making operation straightforward. The clear indicator lights provide users with information about the dishwasher's status, while the durable construction ensures longevity and reliability.

With a sleek design offered in various finishes such as black, white, stainless steel, and silver, these dishwashers blend seamlessly into any kitchen decor. Overall, the Indesit FID20BK/1, FID20WH/1, FIDM20IX/1, and FID201X/1 models stand out with their excellent features, innovative technologies, and user-centric design, making them an ideal choice for diligent homemakers seeking efficiency and style in their dishwashing solutions.