5

INSTALLING FILTRATION SYSTEM

A


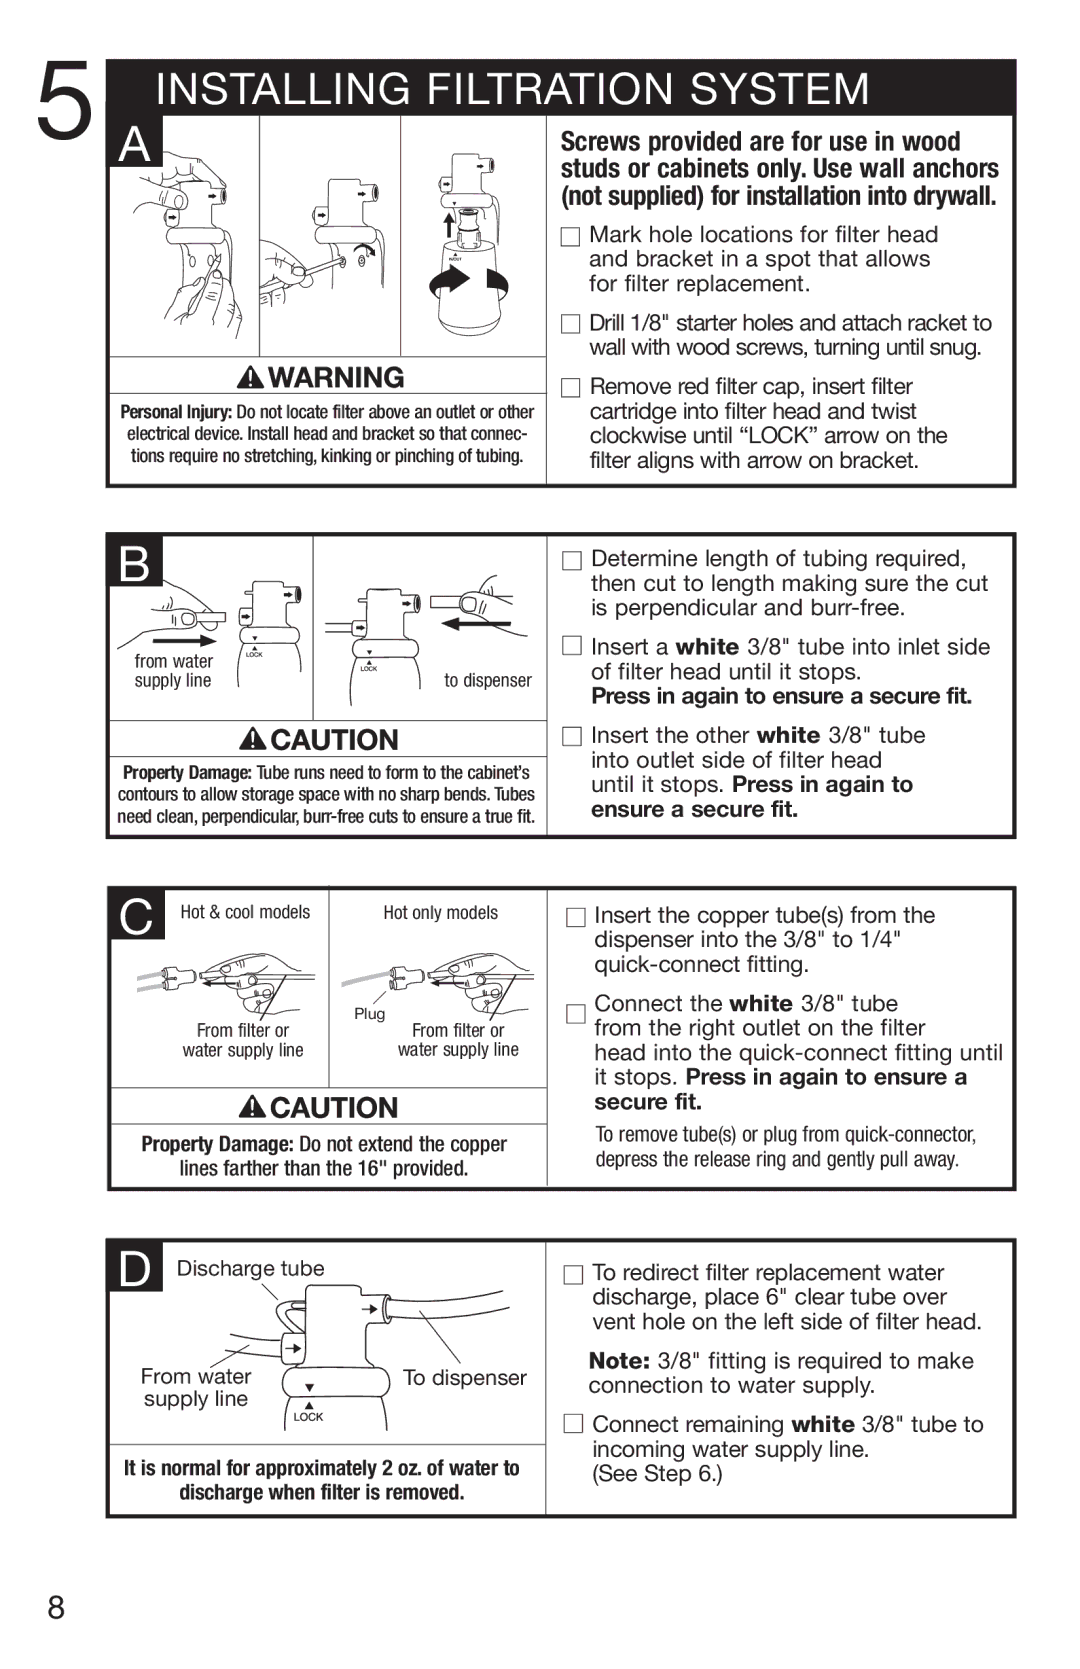
Screws provided are for use in wood


studs or cabinets only. Use wall anchors


(not supplied) for installation into drywall.


Mark hole locations for filter head


and bracket in a spot that allows


for filter replacement.


Drill 1/8" starter holes and attach racket to


wall with wood screws, turning until snug.


Remove red filter cap, insert filter


Personal Injury: Do not locate filter above an outlet or other

cartridge into filter head and twist

electrical device. Install head and bracket so that connec-

clockwise until “LOCK” arrow on the

tions require no stretching, kinking or pinching of tubing.

filter aligns with arrow on bracket.


B

from water


supply line

to dispenser

Property Damage: Tube runs need to form to the cabinet’s contours to allow storage space with no sharp bends. Tubes need clean, perpendicular, burr-free cuts to ensure a true fit.

Determine length of tubing required, then cut to length making sure the cut is perpendicular and burr-free.

Insert a white 3/8" tube into inlet side of filter head until it stops.

Press in again to ensure a secure fit.

Insert the other white 3/8" tube into outlet side of filter head until it stops. Press in again to ensure a secure fit.

C Hot & cool models

From filter or

water supply line

Hot only models

Plug

From filter or

water supply line

Insert the copper tube(s) from the dispenser into the 3/8" to 1/4" quick-connect fitting.

Connect the white 3/8" tube from the right outlet on the filter

head into the quick-connect fitting until it stops. Press in again to ensure a secure fit.

Property Damage: Do not extend the copper

lines farther than the 16" provided.

To remove tube(s) or plug from quick-connector, depress the release ring and gently pull away.

D Discharge tube

From water

To dispenser

supply line


It is normal for approximately 2 oz. of water to

discharge when filter is removed.

To redirect filter replacement water discharge, place 6" clear tube over vent hole on the left side of filter head.

Note: 3/8" fitting is required to make connection to water supply.

Connect remaining white 3/8" tube to incoming water supply line.

(See Step 6.)

8

Page 8
Image 8
InSinkErator 1100 owner manual Installing Filtration System, Screws provided are for use in wood

1100 specifications

The InSinkErator 1100 is a popular model among household garbage disposals, celebrated for its robust construction and efficient performance. Ideal for homeowners who prioritize convenience and cleanliness in their kitchens, the 1100 model excels in efficiently disposing of food waste, thus promoting a hygienic cooking environment.

One of the standout features of the InSinkErator 1100 is its powerful grinding capability. Equipped with a 0.75 HP motor, this unit can easily accommodate a wide variety of food scraps, including fibrous vegetables, bones, and even small fruit pits. This high torque ensures that everything is pulverized quickly, allowing for smooth drainage and minimal clogging. Additionally, the grinder operates quietly, thanks to its anti-vibration design, which is a significant advantage in homes with open kitchen layouts.

The InSinkErator 1100 also incorporates advanced technologies to enhance its efficiency and durability. The GrindShield technology is a notable feature, which helps to reduce wear and tear on the grinding components and prolongs the lifespan of the unit. Moreover, the permanently lubricated motor not only ensures a quieter operation but also eliminates the need for routine maintenance, making it a hassle-free choice for users.

Ease of installation is another characteristic that sets the InSinkErator 1100 apart from other models. With a straightforward design and compact size, it easily fits under most kitchen sinks. The unit comes with a comprehensive installation kit, ensuring that homeowners can set it up without professional help, saving both time and money.

In terms of safety, the 1100 model is designed with a manual reset button in case of overload, providing an extra layer of protection against potential hazards. Additionally, its stainless-steel grinding components are resistant to corrosion, ensuring reliable performance and maintenance of hygiene standards over the years.

The InSinkErator 1100 ranks as an excellent choice for those looking to invest in a durable, high-performance garbage disposal system. Its combination of strength, efficiency, and user-friendly features makes it a highly regarded option among homeowners seeking to upgrade their kitchen appliances for improved waste management.