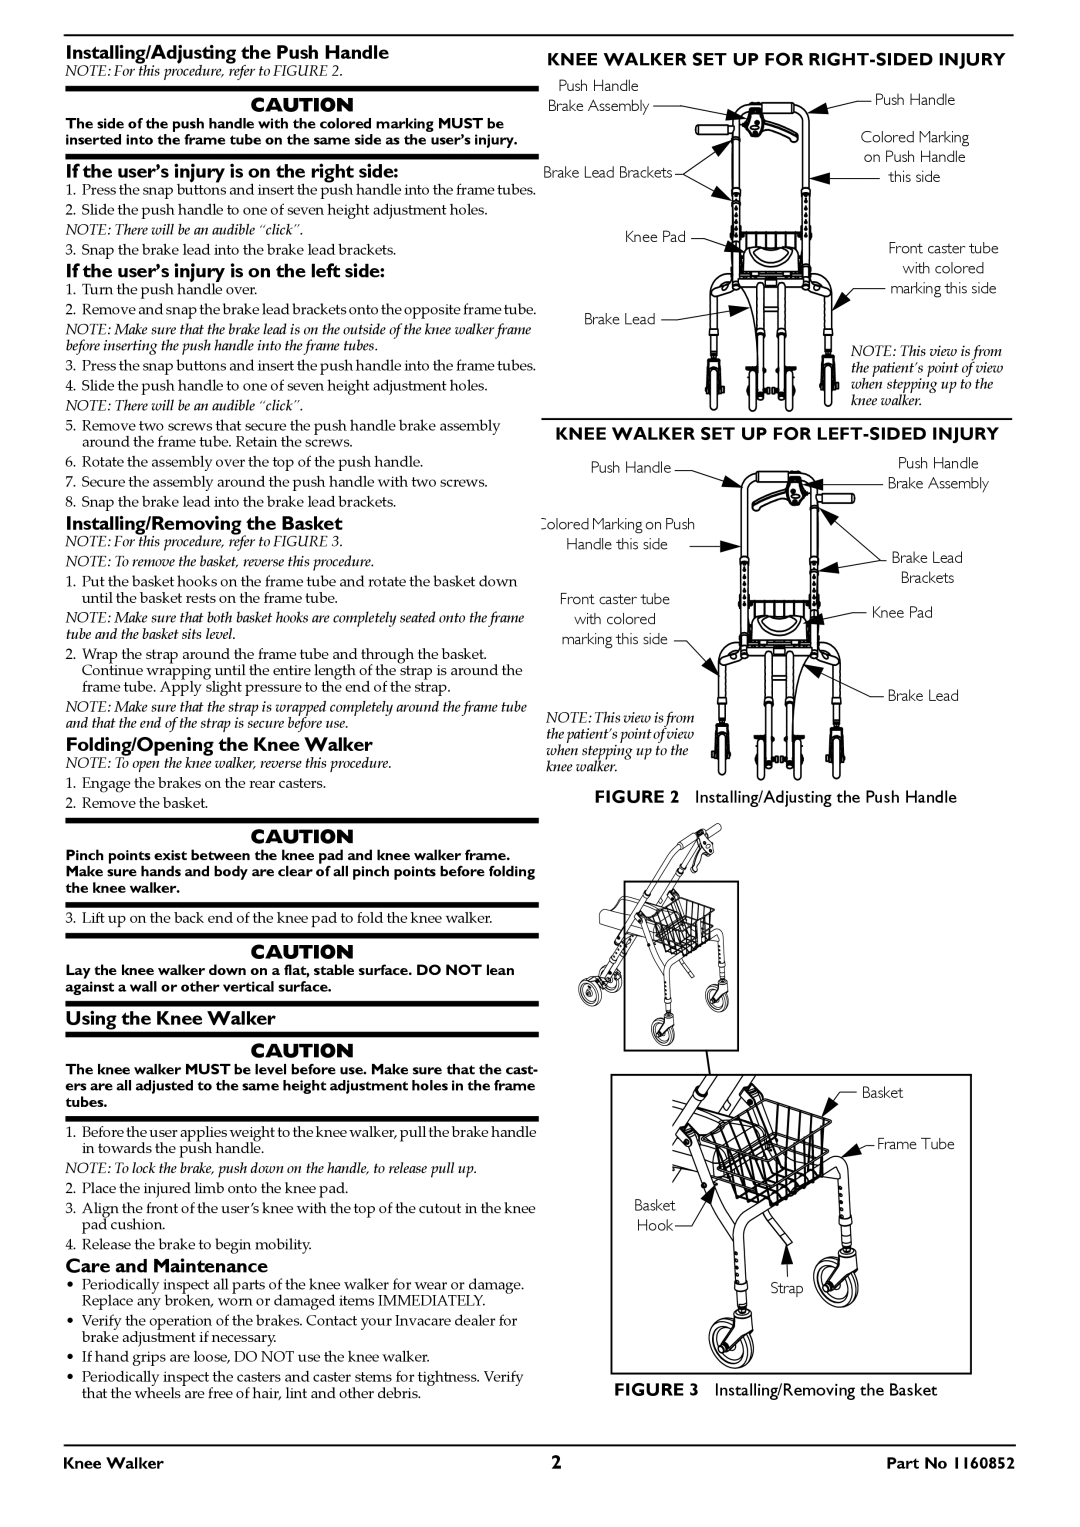
Installing/Adjusting the Push Handle
NOTE: For this procedure, refer to FIGURE 2.
CAUTION
The side of the push handle with the colored marking MUST be inserted into the frame tube on the same side as the user’s injury.
If the user’s injury is on the right side:
1.Press the snap buttons and insert the push handle into the frame tubes.
2.Slide the push handle to one of seven height adjustment holes. NOTE: There will be an audible “click”.
3.Snap the brake lead into the brake lead brackets.
If the user’s injury is on the left side:
1.Turn the push handle over.
2.Remove and snap the brake lead brackets onto the opposite frame tube.
NOTE: Make sure that the brake lead is on the outside of the knee walker frame before inserting the push handle into the frame tubes.
3.Press the snap buttons and insert the push handle into the frame tubes.
4.Slide the push handle to one of seven height adjustment holes. NOTE: There will be an audible “click”.
5.Remove two screws that secure the push handle brake assembly around the frame tube. Retain the screws.
6.Rotate the assembly over the top of the push handle.
7.Secure the assembly around the push handle with two screws.
8.Snap the brake lead into the brake lead brackets.
KNEE WALKER SET UP FOR RIGHT-SIDED INJURY
Push Handle |
|
|
| Push Handle | ||||||||||||||
Brake Assembly |
|
|
|
|
|
|
|
|
|
|
|
|
|
| ||||
|
|
|
|
|
|
|
|
|
|
|
|
|
| |||||
|
|
|
| Colored Marking | ||||||||||||||
|
|
|
|
|
|
|
|
|
|
|
|
|
| |||||
Brake Lead Brackets |
|
|
|
|
|
|
|
|
|
| on Push Handle | |||||||
|
|
|
|
|
|
|
|
| this side | |||||||||
|
|
|
|
|
|
| ||||||||||||
Knee Pad |
|
|
|
|
|
|
|
| Front caster tube | |||||||||
|
|
|
|
|
|
| ||||||||||||
|
|
|
|
|
|
|
|
|
|
|
|
|
|
|
|
|
| |
|
|
|
|
|
|
|
|
|
|
|
|
|
|
|
|
|
| with colored |
Brake Lead |
|
|
|
|
|
|
|
|
|
|
|
|
|
|
|
| marking this side | |
|
|
|
|
|
|
|
|
|
|
|
|
|
|
|
| |||
|
|
|
|
|
|
| NOTE: This view is from | |||||||||||
|
| |||||||||||||||||
|
|
|
|
|
|
|
|
|
|
|
| |||||||
|
|
|
|
|
|
|
|
|
|
|
| the patient’s point of view | ||||||
|
|
|
|
|
|
|
|
|
|
|
| when stepping up to the | ||||||
|
|
|
|
|
|
|
|
|
|
|
| knee walker. | ||||||
|
|
|
|
|
|
|
|
|
|
|
|
|
|
| ||||
KNEE WALKER SET UP FOR | ||||||||||||||||||
Push Handle |
|
|
|
|
|
|
|
|
|
|
|
|
|
| Push Handle | |||
|
|
|
|
|
|
|
|
|
|
|
|
|
|
|
|
|
| Brake Assembly |
|
|
|
|
|
|
|
|
|
|
|
|
|
|
|
|
| ||
Installing/Removing the Basket
NOTE: For this procedure, refer to FIGURE 3.
NOTE: To remove the basket, reverse this procedure.
1.Put the basket hooks on the frame tube and rotate the basket down until the basket rests on the frame tube.
NOTE: Make sure that both basket hooks are completely seated onto the frame tube and the basket sits level.
2.Wrap the strap around the frame tube and through the basket. Continue wrapping until the entire length of the strap is around the frame tube. Apply slight pressure to the end of the strap.
NOTE: Make sure that the strap is wrapped completely around the frame tube and that the end of the strap is secure before use.
Folding/Opening the Knee Walker
NOTE: To open the knee walker, reverse this procedure.
Colored Marking on Push Handle this side ![]()
![]()
Front caster tube
with colored
marking this side
NOTE: This view is from the patient’s point of view when stepping up to the knee walker.
![]() Brake Lead Brackets
Brake Lead Brackets

 Knee Pad
 Brake Lead
1.Engage the brakes on the rear casters.
2.Remove the basket.
FIGURE 2 Installing/Adjusting the Push Handle
CAUTION
Pinch points exist between the knee pad and knee walker frame. Make sure hands and body are clear of all pinch points before folding the knee walker.
3. Lift up on the back end of the knee pad to fold the knee walker.
CAUTION
Lay the knee walker down on a flat, stable surface. DO NOT lean against a wall or other vertical surface.
Using the Knee Walker
CAUTION
The knee walker MUST be level before use. Make sure that the cast- ers are all adjusted to the same height adjustment holes in the frame tubes.
1.Before the user applies weight to the knee walker, pull the brake handle in towards the push handle.
NOTE: To lock the brake, push down on the handle, to release pull up.
2.Place the injured limb onto the knee pad.
3.Align the front of the user’s knee with the top of the cutout in the knee pad cushion.
4.Release the brake to begin mobility.
Care and Maintenance
•Periodically inspect all parts of the knee walker for wear or damage. Replace any broken, worn or damaged items IMMEDIATELY.
•Verify the operation of the brakes. Contact your Invacare dealer for brake adjustment if necessary.
•If hand grips are loose, DO NOT use the knee walker.
•Periodically inspect the casters and caster stems for tightness. Verify that the wheels are free of hair, lint and other debris.
Knee Walker | 2 | Part No 1160852 |