INNER COVER
Hand clean the water repellant inner cover using a soft cloth, warm water and a mild soap solution. Rinse off and hang dry.
OUTER COVER
CAUTION
MACHINE WASH seat cover in cold water on gentle cycle using a mild detergent. DO NOT use fabric softeners or bleach. DO NOT machine dry. Air dry ONLY. DO NOT dry in sun. Otherwise damage to the cover will result.
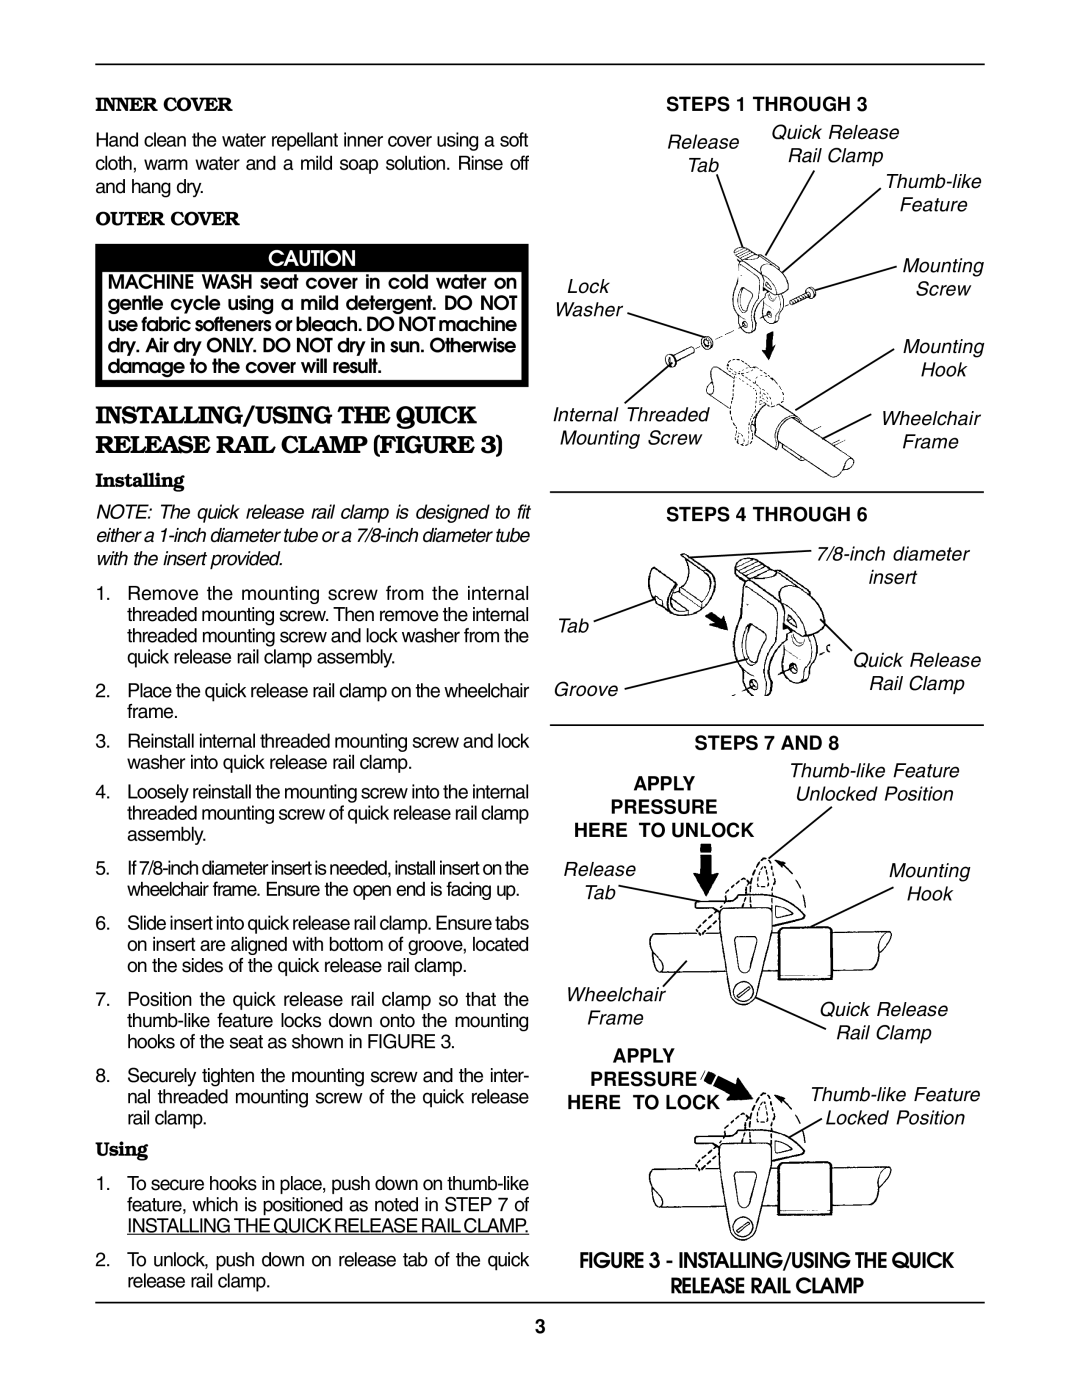
INSTALLING/USING THE QUICK RELEASE RAIL CLAMP (FIGURE 3)
Installing
NOTE: The quick release rail clamp is designed to fit either a
1. | Remove the mounting screw from the internal |
| threaded mounting screw. Then remove the internal |
| threaded mounting screw and lock washer from the |
| quick release rail clamp assembly. |
2. | Place the quick release rail clamp on the wheelchair |
| frame. |
3. | Reinstall internal threaded mounting screw and lock |
| washer into quick release rail clamp. |
4. | Loosely reinstall the mounting screw into the internal |
| threaded mounting screw of quick release rail clamp |
| assembly. |
STEPS 1 THROUGH 3
Release | Quick Release | |
Rail Clamp | ||
Tab | ||
| ||
| Feature |
Mounting
LockScrew
Washer
| Mounting |
| Hook |
Internal Threaded | Wheelchair |
Mounting Screw | Frame |
| STEPS 4 THROUGH 6 |
| |
| insert |
Tab |
|
| Quick Release |
Groove | Rail Clamp |
|
STEPS 7 AND 8
APPLYUnlocked Position
PRESSURE
HERE TO UNLOCK
5. | If |
| wheelchair frame. Ensure the open end is facing up. |
6. | Slide insert into quick release rail clamp. Ensure tabs |
| on insert are aligned with bottom of groove, located |
| on the sides of the quick release rail clamp. |
7. | Position the quick release rail clamp so that the |
| |
| hooks of the seat as shown in FIGURE 3. |
8. | Securely tighten the mounting screw and the inter- |
| nal threaded mounting screw of the quick release |
| rail clamp. |
Using
Release
Tab
Wheelchair
Frame
APPLY
PRESSURE
HERE TO LOCK
Mounting
Hook
Quick Release
Rail Clamp
Locked Position
1.To secure hooks in place, push down on
INSTALLING THE QUICK RELEASE RAIL CLAMP.
2.To unlock, push down on release tab of the quick release rail clamp.
FIGURE 3 - INSTALLING/USING THE QUICK
RELEASE RAIL CLAMP
3
