8.Start/Stop Button: This button starts and stops the turntable motor. If the button seems not to be functioning, check to make sure that the Motor Drive Belt is properly installed in the SETUP INSTRUCTIONS.
9.1/8” Stereo Line Input: Connect Tape Players, Reel to Reel, or any other audio source here. This signal is sent to the computer through the USB connection. Make sure that your phono cartridge is installed while using this input for maximum sound quality. Also make sure that your RCA jacks are either plugged into an input device or not in contact with metal.
Note: The 1/8" audio input is not routed to the turntable's RCA output jacks, only to your computer via USB.
10.33 and 45 RPM Buttons: These buttons control the RPM of the turntable platter. A red LED indicates which RPM mode has been selected.
NOTE: If the turntable is powered down while in the 45 RPM setting, it will return to 33 RPM when it is powered up.
Note: You can record your 78RPM records by recording them at 33 or 45rpm, then changing them to 78 in the Audacity software.
11.45 RPM Adapter Holder: You may place the 45 adapter here when not in use.
TONE ARM: Items 12 – 16 are all parts of the tonearm. Refer to the TONEARM SETUP section for additional details on these controls.
12.Counter Weight and Scale Ring: The Counterweight is used to balance the head shell and cartridge assembly so that the proper amount of stylus pressure is applied to the record.
13.
14.Arm Clip: This specially designed arm clip secures the tone arm while at rest or when not in use. The arm clip has been designed to remain in the up position while unlocked.
NOTE: When transporting the turntable, it is always recommended that the headshell be removed and the arm clip secured to prevent tonearm or turntable damage.
15.Tone Arm Lock Nut: This Aluminum nut is used to secure the head shell and cartridge assembly to the tone arm tube. See Cartridge Setup for more details.
16.Cartridge and Headshell: The cartridge is
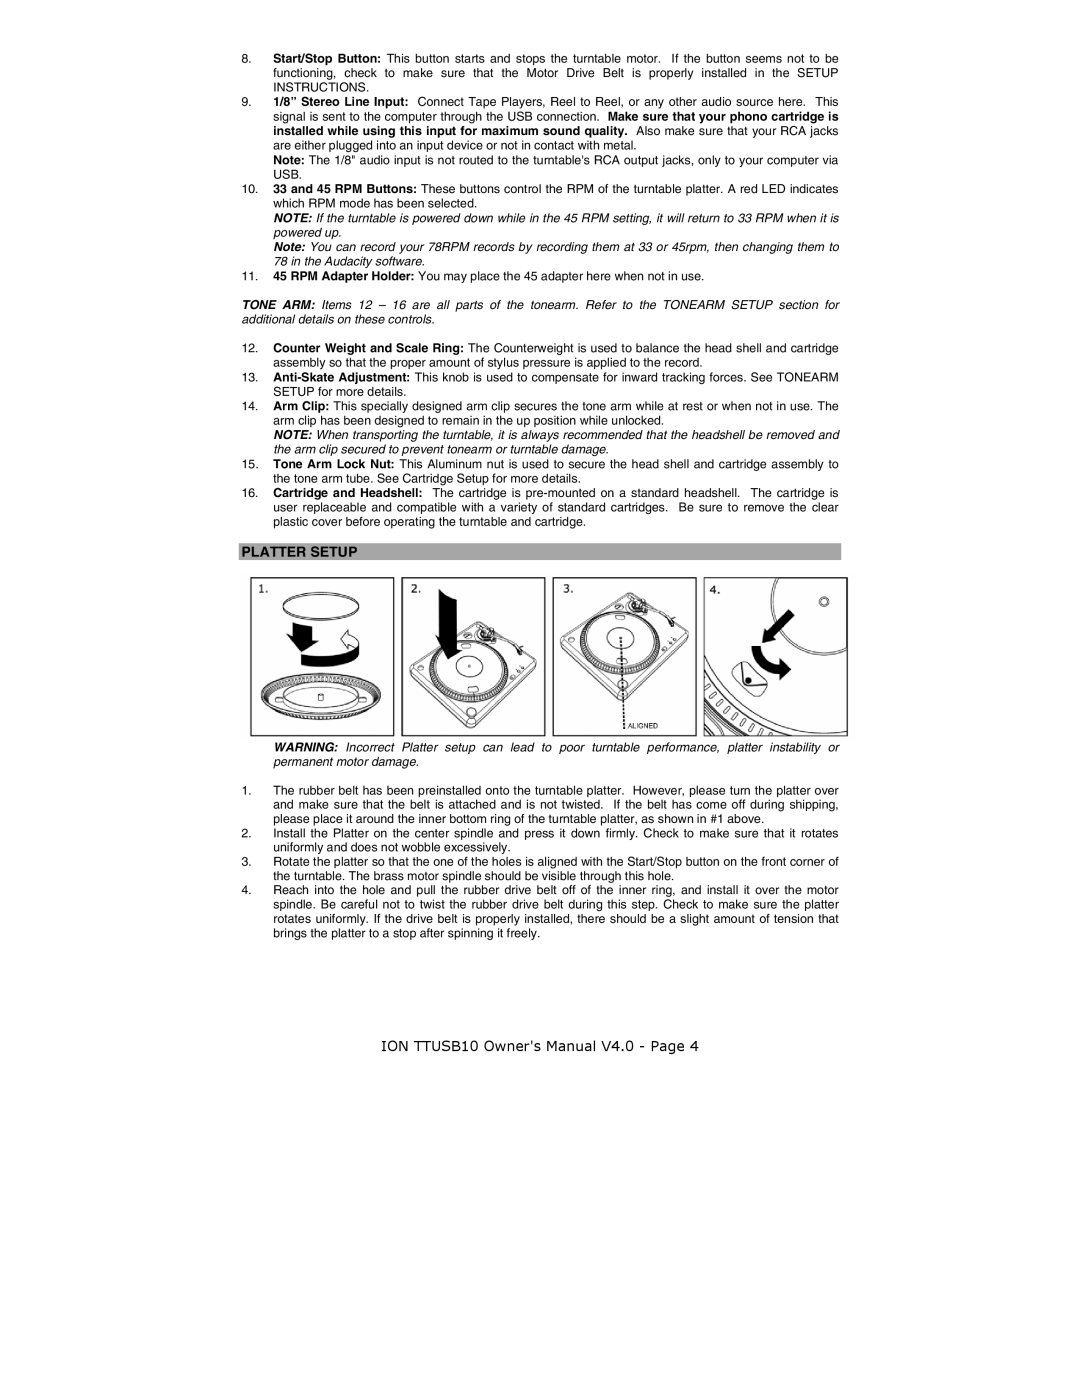
PLATTER SETUP
WARNING: Incorrect Platter setup can lead to poor turntable performance, platter instability or permanent motor damage.
1.The rubber belt has been preinstalled onto the turntable platter. However, please turn the platter over and make sure that the belt is attached and is not twisted. If the belt has come off during shipping, please place it around the inner bottom ring of the turntable platter, as shown in #1 above.
2.Install the Platter on the center spindle and press it down firmly. Check to make sure that it rotates uniformly and does not wobble excessively.
3.Rotate the platter so that the one of the holes is aligned with the Start/Stop button on the front corner of the turntable. The brass motor spindle should be visible through this hole.
4.Reach into the hole and pull the rubber drive belt off of the inner ring, and install it over the motor spindle. Be careful not to twist the rubber drive belt during this step. Check to make sure the platter rotates uniformly. If the drive belt is properly installed, there should be a slight amount of tension that brings the platter to a stop after spinning it freely.
ION TTUSB10 Owner's Manual V4.0 - Page 4