300
operating your Therapure® 300D
digital Display
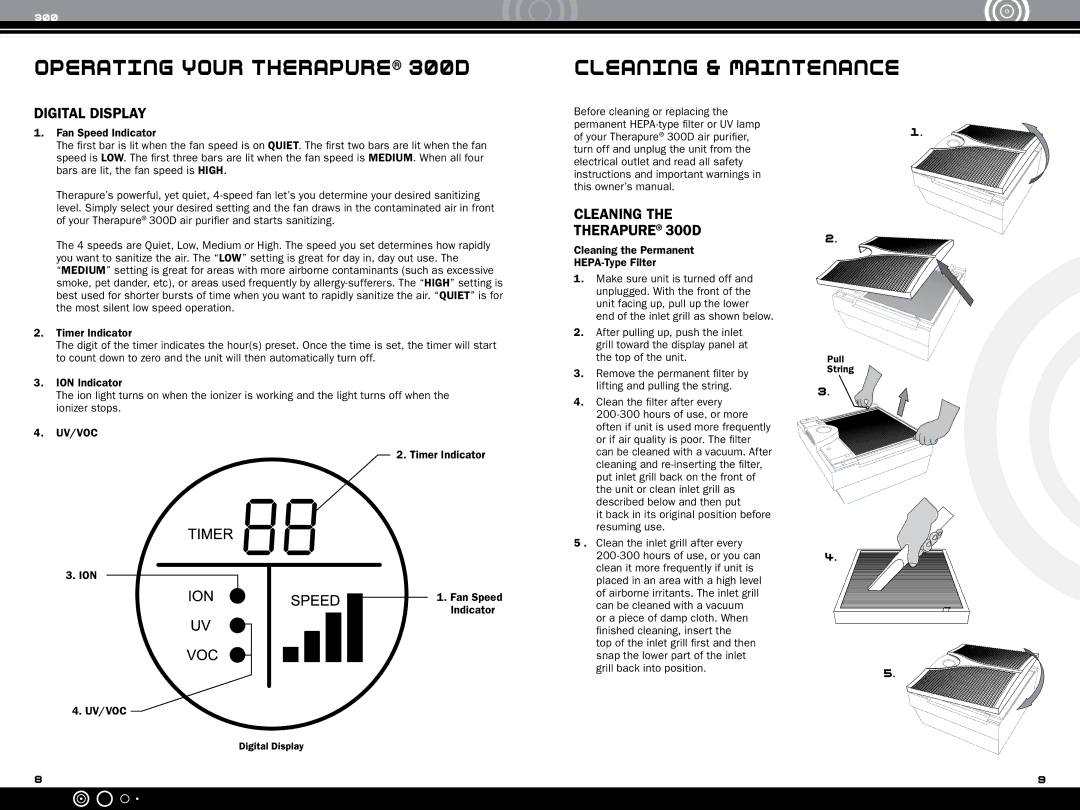
1. Fan Speed Indicator |
The first bar is lit when the fan speed is on QUIET. The first two bars are lit when the fan |
speed is LOW. The first three bars are lit when the fan speed is MEDIUM. When all four |
bars are lit, the fan speed is HIGH. |
Therapure’s powerful, yet quiet, |
cleaning & maintenance
Before cleaning or replacing the permanent
of your Therapure® 300D air purifier,1. turn off and unplug the unit from the
electrical outlet and read all safety instructions and important warnings in this owner’s manual.
| level. Simply select your desired setting and the fan draws in the contaminated air in front |
| of your Therapure® 300D air purifier and starts sanitizing. |
| The 4 speeds are Quiet, Low, Medium or High. The speed you set determines how rapidly |
| you want to sanitize the air. The “Low” setting is great for day in, day out use. The |
| “Medium” setting is great for areas with more airborne contaminants (such as excessive |
| smoke, pet dander, etc), or areas used frequently by |
| best used for shorter bursts of time when you want to rapidly sanitize the air. “Quiet” is for |
| the most silent low speed operation. |
2. | Timer Indicator |
| The digit of the timer indicates the hour(s) preset. Once the time is set, the timer will start |
| to count down to zero and the unit will then automatically turn off. |
3. | ION Indicator |
| The ion light turns on when the ionizer is working and the light turns off when the |
| ionizer stops. |
4. | UV/VOC |
| 2. Timer Indicator |
3. ION
1. Fan Speed
Indicator
4. UV/VOC
Cleaning the
Therapure® 300D
Cleaning the Permanent
1.Make sure unit is turned off and unplugged. With the front of the unit facing up, pull up the lower end of the inlet grill as shown below.
2.After pulling up, push the inlet grill toward the display panel at the top of the unit.
3.Remove the permanent filter by lifting and pulling the string.
4.Clean the filter after every
it back in its original position before resuming use.
5 . Clean the inlet grill after every
top of the inlet grill first and then snap the lower part of the inlet grill back into position.
2.
Pull
String
3. ![]()
4.
5.
8
9
