CAUTION: These installation instructions are for use by qualified service personnel only. To reduce the risk of electric shock do not perform any servicing other than that contained in the owners manual unless you are qualified to do so.
Montage in Mehrkanal-Endstufe
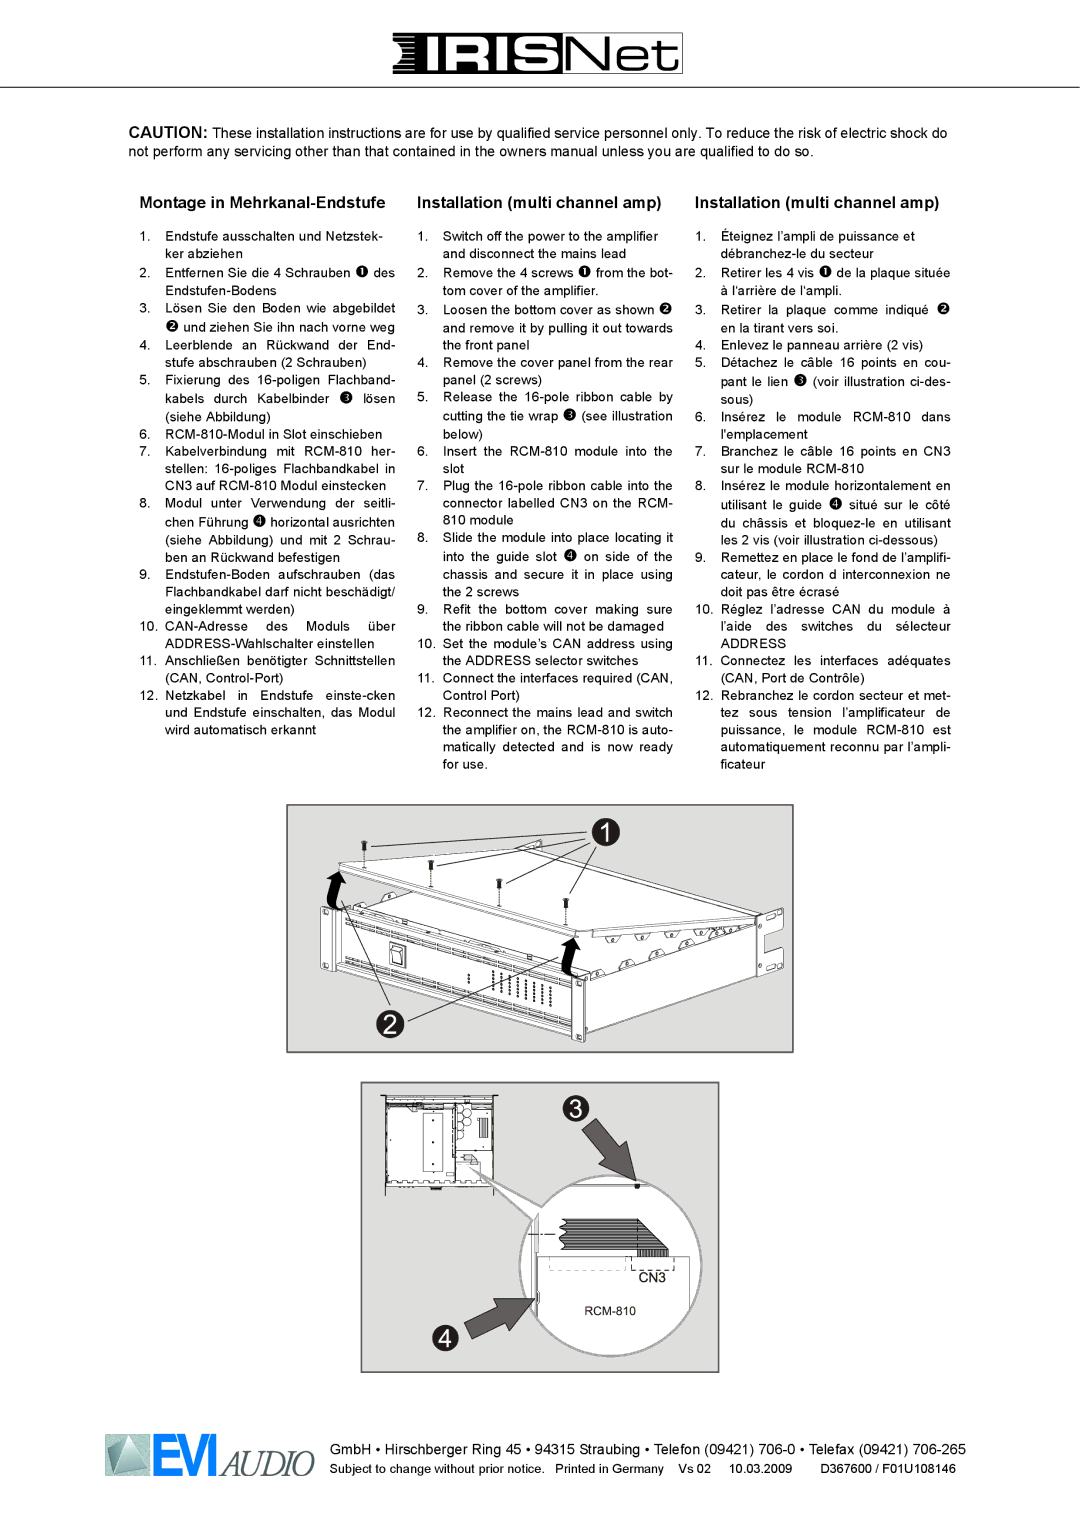
1.Endstufe ausschalten und Netzstek- ker abziehen
2.Entfernen Sie die 4 Schrauben n des
3.Lösen Sie den Boden wie abgebildet o und ziehen Sie ihn nach vorne weg
4.Leerblende an Rückwand der End- stufe abschrauben (2 Schrauben)
5.Fixierung des
6.RCM-810-Modul in Slot einschieben
7.Kabelverbindung mit
8.Modul unter Verwendung der seitli- chen Führung q horizontal ausrichten (siehe Abbildung) und mit 2 Schrau- ben an Rückwand befestigen
9.
10.
11.Anschließen benötigter Schnittstellen (CAN,
12.Netzkabel in Endstufe
Installation (multi channel amp)
1.Switch off the power to the amplifier and disconnect the mains lead
2.Remove the 4 screws n from the bot- tom cover of the amplifier.
3.Loosen the bottom cover as shown o and remove it by pulling it out towards the front panel
4.Remove the cover panel from the rear panel (2 screws)
5.Release the
6.Insert the
7.Plug the
8.Slide the module into place locating it into the guide slot q on side of the chassis and secure it in place using the 2 screws
9.Refit the bottom cover making sure the ribbon cable will not be damaged
10.Set the module’s CAN address using the ADDRESS selector switches
11.Connect the interfaces required (CAN, Control Port)
12.Reconnect the mains lead and switch the amplifier on, the
Installation (multi channel amp)
1.Éteignez l’ampli de puissance et
2.Retirer les 4 vis n de la plaque située à l‘arrière de l‘ampli.
3.Retirer la plaque comme indiqué o en la tirant vers soi.
4.Enlevez le panneau arrière (2 vis)
5.Détachez le câble 16 points en cou- pant le lien p (voir illustration
6.Insérez le module
7.Branchez le câble 16 points en CN3 sur le module
8.Insérez le module horizontalement en utilisant le guide q situé sur le côté du châssis et
9.Remettez en place le fond de l’amplifi- cateur, le cordon d interconnexion ne doit pas être écrasé
10.Réglez l’adresse CAN du module à l’aide des switches du sélecteur
ADDRESS
11.Connectez les interfaces adéquates (CAN, Port de Contrôle)
12.Rebranchez le cordon secteur et met- tez sous tension l’amplificateur de puissance, le module
GmbH • Hirschberger Ring 45 • 94315 Straubing • Telefon (09421)
Subject to change without prior notice. Printed in Germany Vs 02 10.03.2009 | D367600 / F01U108146 |