Manuals
/
Jacuzzi
/
Lawn and Garden
/
Hot Tub
Jacuzzi
Comfort Plus Bath Series Framing and Support, Typical Installations, Flush To Wall
Models:
Comfort Plus Bath Series
1
10
46
46
Download
46 pages
21.85 Kb
7
8
9
10
11
12
13
14
Specs
Install
Maintenance
Problem
Clean-UpAfter Installation
Precautions
Safety
Service Access
Vacuum Switch
Page 10
Image 10
Page 9
Page 11
Page 10
Image 10
Page 9
Page 11
Contents
INSTALLATION AND OPERATING INSTRUCTIONS
COMFORT PLUS BATH SERIES
ENGLISH
PRECAUTIONS
SHOCK, OR INJURY TO PERSONS
Safety Instructions Change
ADDENDUM
OPERATING INSTRUCTIONS
INSTALLATION INSTRUCTIONS
PRECAUTIONS
Save These Instructions for Future Use
CONTENTS
Owners Record
RECTANGULAR BATHS
SPECIFICATIONS
SPECIFICATIONS Rectangular
PLUS BATHS WITHOUT INTEGRAL SKIRT
RIMLESS OVAL BATHS
SPECIFICATIONS Oval
SPECIFICATIONS Corner
CORNER BATHS
ROUGHING-INREFERENCE OVAL AND CORNER
Corner Baths with Skirt
ROUGHING-INREFERENCE RECTANGULAR
CUTOUT- CORNER BATH
FLUSH TO WALL
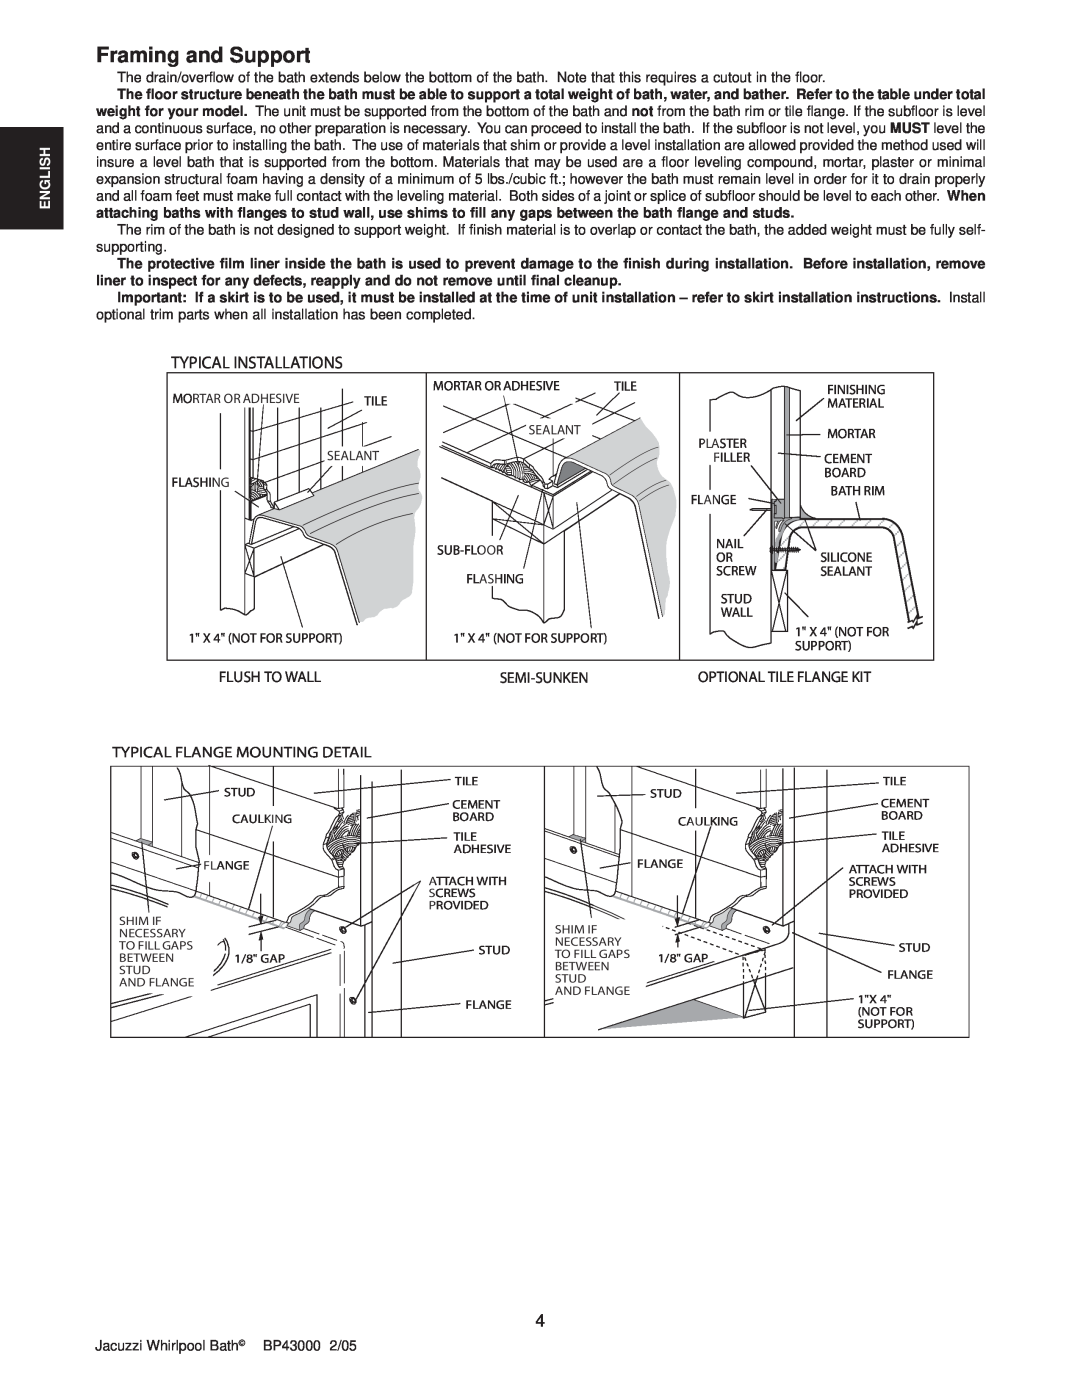
Framing and Support
TYPICAL INSTALLATIONS
SEMI-SUNKEN
INTEGRAL SKIRT MOUNTING DETAIL
Skirts
Removable Skirt Panel
U FRAME SKIRT MOUNTING DETAIL
Service Access with Skirt
Service Access
RapidHeatTM Service Access
Service Access with Integral Skirt
ELECTRICAL CONNECTION WITH RAPIDHEAT
Electrical Connections
ELECTRICAL CONNECTION FOR CORNER BATHS
Drain Information
Clean-UpAfter Installation
Plumbing and Water Supply
Plumbing
Operation
OPERATING INSTRUCTIONS
Control Panel
Comfort Plus With Light System
Vacuum Switch
Controlling Whirlpool Action
RapidHeatTM Operation
High-LimitSwitch
Suction Cover/Strainer Maintenance
MAINTENANCE INSTRUCTIONS
Cleaning the Bath
Repairs to the Surface
PROBABLE CAUSES
General Whirlpool Bath Troubleshooting Guide
PROBLEM
REMEDY
Service Support: 800
Jacuzzi Whirlpool Bath
Authorized Service
AUTHORIZED SERVICE Change
AUTHORIZED SERVICE
Jacuzzi Whirlpool Bath
Jacuzzi Whirlpool Bath Limited Warranty
Comfort Plus Bath Product
P.O. Box 702168 Dallas, TX
WARRANTY SERVICE
RESPONSIBILITIES OF OTHERS
Instalador: Deje este manual al propietario
SERIE DE TINAS COMFORT PLUS
MANUAL DE INSTALACION Y OPERACION
ESPAÑOL
INSTRUCCIONES IMPORTANTES DE SEGURIDAD
GUARDE ESTAS INSTRUCCIONES
LEA Y SIGA TODAS LAS INSTRUCCIONES
PRECAUCIONES
Las Instrucciones de la seguridad Cambian
OPERAR INSTRUCCIONES
2005 Jacuzzi Whirlpool Bath DA38000A
INSTRUCCIONES INSTRUCCIONES
PRECAUCIONES
06/05
Conserve estas instrucciones para uso futuro
TABLA DE CONTENIDO
Registro del propietario
BAÑERAS SIN FALDON INTEGRADO
ESPECIFICACIONES
BAÑERAS RECTANGULARES
BAÑERAS CON FALDON INTEGRADO
BAÑERAS DE ESQUINA
BAÑERAS DE OVALADAS
ESPECIFICACIONES Ovaladas
ESPECIFICACIONES de esquina
DIAGRAMA EN PLANTA DE TINAS DE ESQUINA
Tinas de Esquina con Faldón
DIAGRAMAS EN PLANTA DE INSTALACIONES RECTANGULAR
SOPORTE PARA TINAS DE ESQUINA
INSTALACIONES TÍPICAS
INSTALACION
Estructura y soporte
DETALLE DEL MONTAJE DE PESTAÑA TIPICO
DETALLE DEL MONTAJE CON FALDÓN EN “U”
INSTALACION FALDÓN
Entrepaño movible de falda
DETALLE DEL MONTAJE CON FALDÓN INTEGRADO
Acceso opcional de servicio de
Acceso para servicio INSTALACION
Acceso de servicio bañera con faldón
RapidHeatTM
INSTALACION
Conexiones eléctricas
Suministro de agua
Información sobre el desagüe
Plomería
Limpieza después de la instalación
ON/OFF Bombea/Motor
OPERACIÓNFUNCIONAMIENTO
Controle Entrepaño
Despliegue LED
CHORROS
Cómo controlar el sistema de hidromasaje
Nivel del Agua
CONTROLES PARA INDUCCIÓN DE AGUA
Reparaciones de la superficie
MANTENIMIENTO
Cómo limpiar la bañera
Purgar el sistema de las bañeras de hidromasaje
SOLUCIÓN
PROBLEMA
PROBABLES CAUSAS
ra. Vuelva a colocar la cobertura de
LAS ESPECIFICACIONES DEL PRODUCTO ESTAN SUJETAS A CAMBIOS SIN PREVIA NOTIFICACION
Servicios autorizados
Productos para el Baño y la Ducha
productos para el baño y la ducha
Cambio AUTORIZADO de SERVICIO
Servicios autorizados
AFC.PDF
GARANTÍA LIMITADA DE UN AÑO EN LAS TINAS
Producto de Grupo de Tinas Comfort Plus
COBERTURA DE LA GARANTÍA
LIMITACIONES DE LA GARANTÍA
TARJETA DE REGISTRO PARA LA GARANTÍA
RESPONSABILIDAD DE TERCEROS
Top
Page
Image
Contents