AWM970
Basic Operation
Power
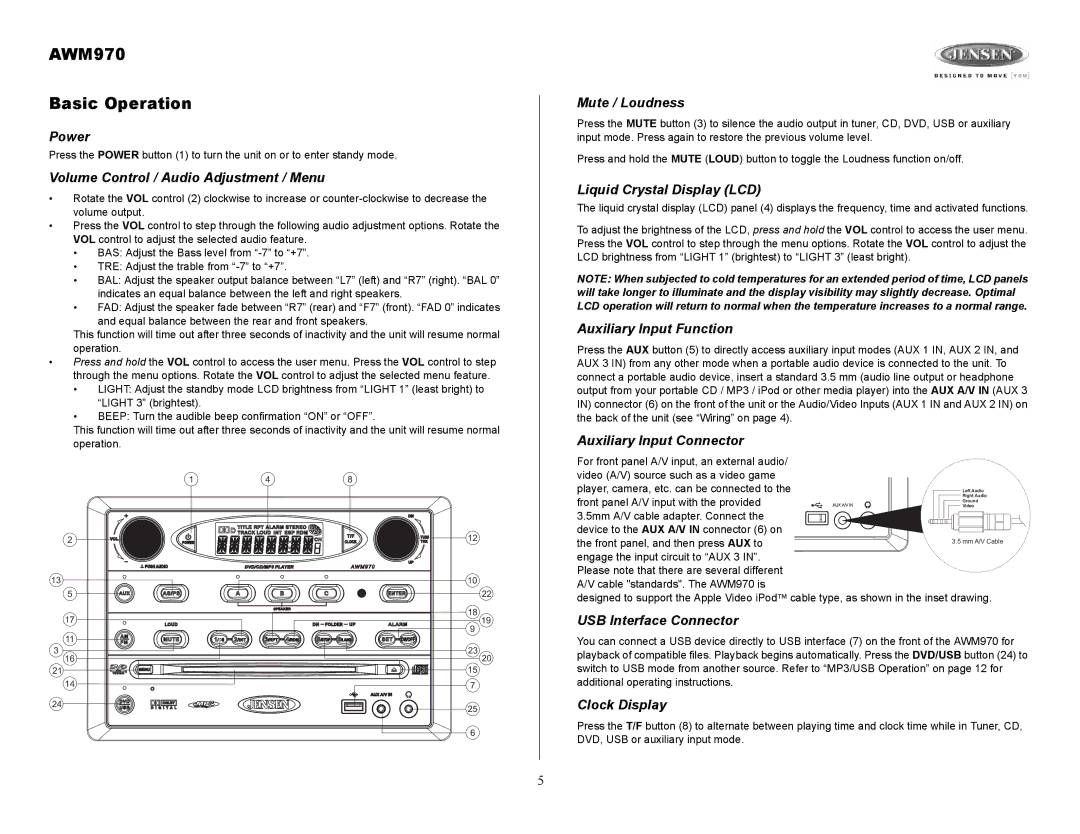
Press the POWER button (1) to turn the unit on or to enter standy mode.
Volume Control / Audio Adjustment / Menu
•Rotate the VOL control (2) clockwise to increase or
•Press the VOL control to step through the following audio adjustment options. Rotate the VOL control to adjust the selected audio feature.
•BAS: Adjust the Bass level from
•TRE: Adjust the trable from
•BAL: Adjust the speaker output balance between “L7” (left) and “R7” (right). “BAL 0” indicates an equal balance between the left and right speakers.
•FAD: Adjust the speaker fade between “R7” (rear) and “F7” (front). “FAD 0” indicates
and equal balance between the rear and front speakers.
This function will time out after three seconds of inactivity and the unit will resume normal operation.
•Press and hold the VOL control to access the user menu. Press the VOL control to step through the menu options. Rotate the VOL control to adjust the selected menu feature.
•LIGHT: Adjust the standby mode LCD brightness from “LIGHT 1” (least bright) to “LIGHT 3” (brightest).
•BEEP: Turn the audible beep confirmation “ON” or “OFF”.
This function will time out after three seconds of inactivity and the unit will resume normal operation.
Mute / Loudness
Press the MUTE button (3) to silence the audio output in tuner, CD, DVD, USB or auxiliary input mode. Press again to restore the previous volume level.
Press and hold the MUTE (LOUD) button to toggle the Loudness function on/off.
Liquid Crystal Display (LCD)
The liquid crystal display (LCD) panel (4) displays the frequency, time and activated functions.
To adjust the brightness of the LCD, press and hold the VOL control to access the user menu. Press the VOL control to step through the menu options. Rotate the VOL control to adjust the LCD brightness from “LIGHT 1” (brightest) to “LIGHT 3” (least bright).
NOTE: When subjected to cold temperatures for an extended period of time, LCD panels will take longer to illuminate and the display visibility may slightly decrease. Optimal LCD operation will return to normal when the temperature increases to a normal range.
Auxiliary Input Function
Press the AUX button (5) to directly access auxiliary input modes (AUX 1 IN, AUX 2 IN, and AUX 3 IN) from any other mode when a portable audio device is connected to the unit. To connect a portable audio device, insert a standard 3.5 mm (audio line output or headphone output from your portable CD / MP3 / iPod or other media player) into the AUX A/V IN (AUX 3 IN) connector (6) on the front of the unit or the Audio/Video Inputs (AUX 1 IN and AUX 2 IN) on the back of the unit (see “Wiring” on page 4).
Auxiliary Input Connector
1
2
13
5
17
11
3
16
21
14
24
48
12
10
22
18
19
9
23
20
15
7
25
For front panel A/V input, an external audio/ video (A/V) source such as a video game player, camera, etc. can be connected to the
front panel A/V input with the provided
3.5mm A/V cable adapter. Connect the device to the AUX A/V IN connector (6) on the front panel, and then press AUX to
engage the input circuit to “AUX 3 IN”. Please note that there are several different A/V cable "standards". The AWM970 is
designed to support the Apple Video iPodJ cable type, as shown in the inset drawing.
USB Interface Connector
You can connect a USB device directly to USB interface (7) on the front of the AWM970 for playback of compatible files. Playback begins automatically. Press the DVD/USB button (24) to switch to USB mode from another source. Refer to “MP3/USB Operation” on page 12 for additional operating instructions.
Clock Display
6
Press the T/F button (8) to alternate between playing time and clock time while in Tuner, CD, DVD, USB or auxiliary input mode.
5
