JCDWIN
BASIC OPERATION | 3. Press MODE again to cancel Aux In mode and return to previous mode. |
| Reset |
1 | 12 | 7 | 6 | 5 | 21 | 4 | 19 | 3 | 2 |
9
17
10
13
11
14 | 15 | 22 | 16 | 8 | 18 | 20 |
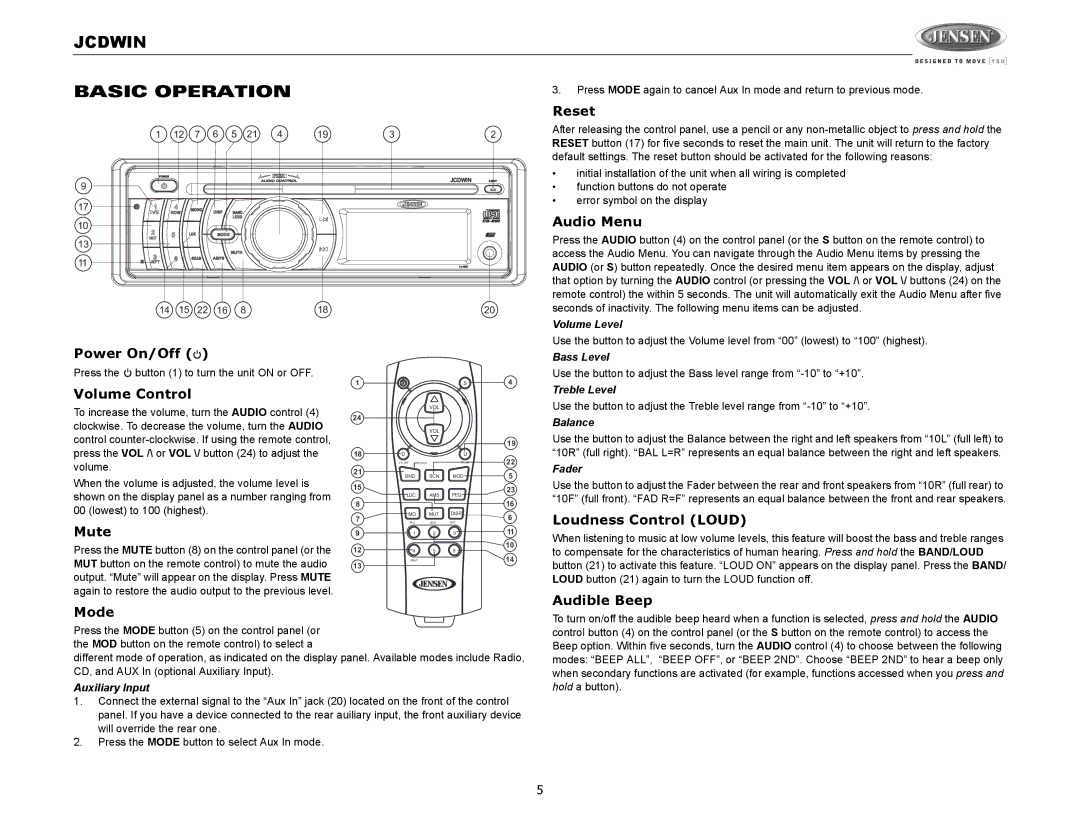
After releasing the control panel, use a pencil or any
•initial installation of the unit when all wiring is completed
•function buttons do not operate
•error symbol on the display
Audio Menu
Press the AUDIO button (4) on the control panel (or the S button on the remote control) to access the Audio Menu. You can navigate through the Audio Menu items by pressing the AUDIO (or S) button repeatedly. Once the desired menu item appears on the display, adjust that option by turning the AUDIO control (or pressing the VOL /\ or VOL \/ buttons (24) on the remote control) the within 5 seconds. The unit will automatically exit the Audio Menu after five seconds of inactivity. The following menu items can be adjusted.
Volume Level
Use the button to adjust the Volume level from “00” (lowest) to “100” (highest).
Power On/Off (![]() )
)
Press the ![]() button (1) to turn the unit ON or OFF.
button (1) to turn the unit ON or OFF.
Volume Control
To increase the volume, turn the AUDIO control (4) clockwise. To decrease the volume, turn the AUDIO control
When the volume is adjusted, the volume level is shown on the display panel as a number ranging from 00 (lowest) to 100 (highest).
Mute
Press the MUTE button (8) on the control panel (or the MUT button on the remote control) to mute the audio output. “Mute” will appear on the display. Press MUTE again to restore the audio output to the previous level.
1 |
|
| S | 4 |
|
| VOL |
|
|
24 |
|
|
|
|
|
| VOL |
|
|
|
|
|
| 19 |
18 | D |
| U |
|
| TR. DN | LOUD | TR. UP | 22 |
21 |
|
|
| 5 |
| BND | SCN | MOD | |
15 |
|
|
| 23 |
|
|
|
| |
| LOC | AMS | PEQ |
|
8 |
|
|
| 16 |
7 | MO | MUT | DISP | 6 |
|
|
| ||
| PAU | SCN | RPT |
|
9 | 1 | 2 | 3 | 11 |
12 |
|
|
| 10 |
4 | 5 | 6 |
| |
| SHUF |
|
| 14 |
13 |
|
|
|
|
Bass Level
Use the button to adjust the Bass level range from
Treble Level
Use the button to adjust the Treble level range from
Balance
Use the button to adjust the Balance between the right and left speakers from “10L” (full left) to “10R” (full right). “BAL L=R” represents an equal balance between the right and left speakers.
Fader
Use the button to adjust the Fader between the rear and front speakers from “10R” (full rear) to “10F” (full front). “FAD R=F” represents an equal balance between the front and rear speakers.
Loudness Control (LOUD)
When listening to music at low volume levels, this feature will boost the bass and treble ranges to compensate for the characteristics of human hearing. Press and hold the BAND/LOUD button (21) to activate this feature. “LOUD ON” appears on the display panel. Press the BAND/ LOUD button (21) again to turn the LOUD function off.
Audible Beep
Mode
Press the MODE button (5) on the control panel (or the MOD button on the remote control) to select a
different mode of operation, as indicated on the display panel. Available modes include Radio, CD, and AUX In (optional Auxiliary Input).
Auxiliary Input
1.Connect the external signal to the “Aux In” jack (20) located on the front of the control panel. If you have a device connected to the rear auiliary input, the front auxiliary device will override the rear one.
2.Press the MODE button to select Aux In mode.
To turn on/off the audible beep heard when a function is selected, press and hold the AUDIO control button (4) on the control panel (or the S button on the remote control) to access the Beep option. Within five seconds, turn the AUDIO control (4) to choose between the following modes: “BEEP ALL”, “BEEP OFF”, or “BEEP 2ND”. Choose “BEEP 2ND” to hear a beep only when secondary functions are activated (for example, functions accessed when you press and hold a button).
5
