Replacement of Drive Motor

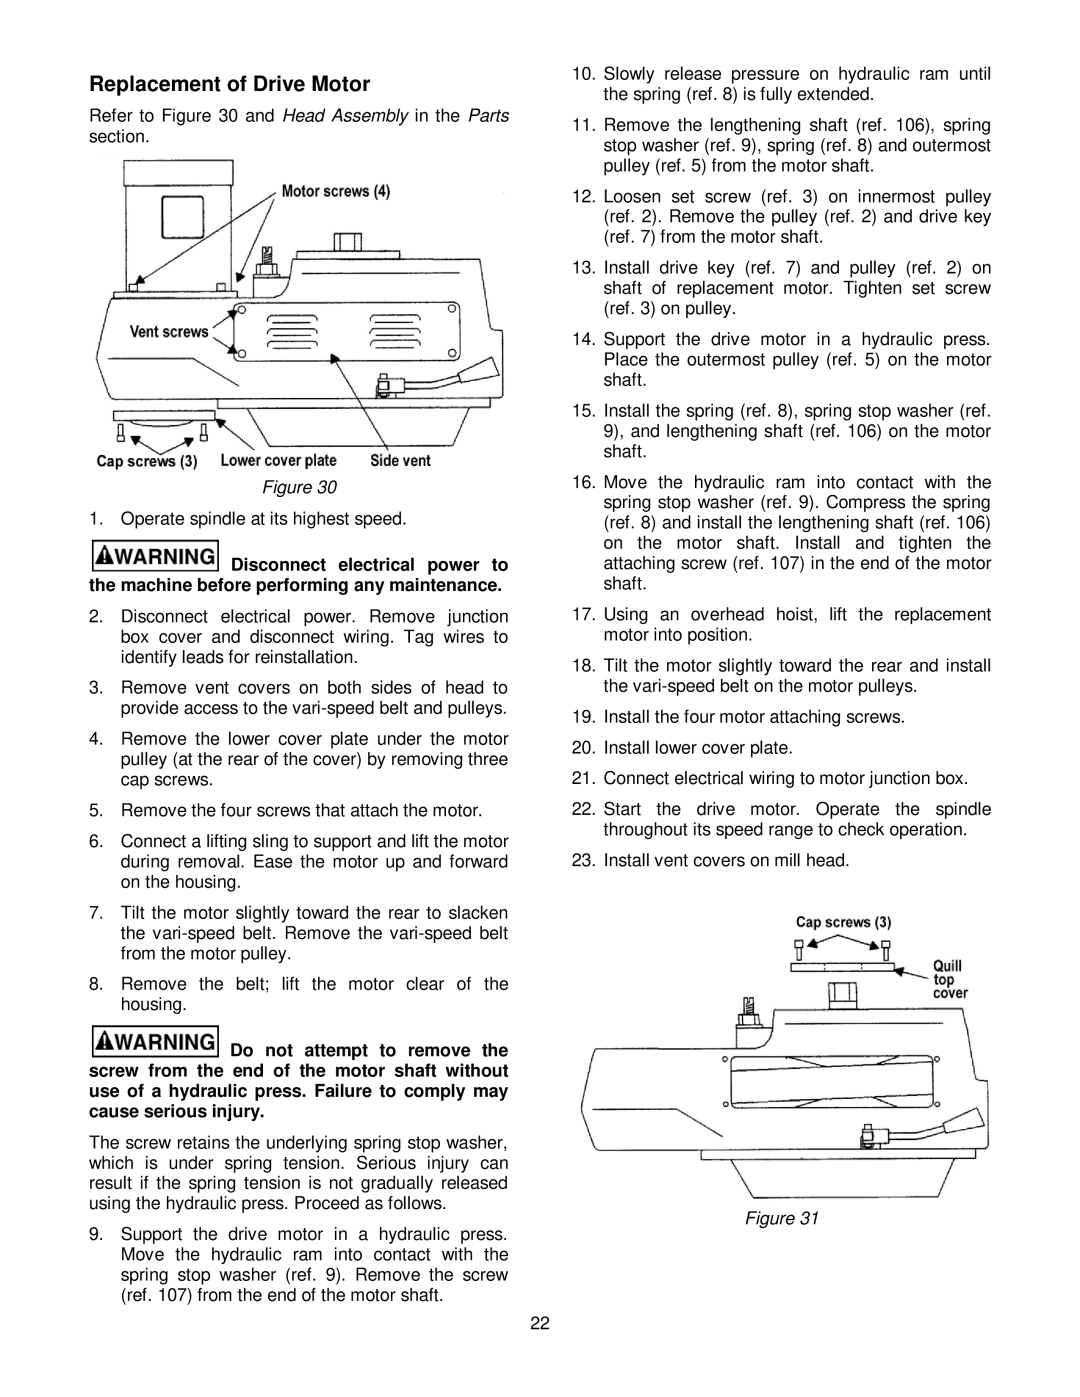
Refer to Figure 30 and Head Assembly in the Parts section.

Figure 30

1. Operate spindle at its highest speed.

Disconnect electrical power to the machine before performing any maintenance.

2.Disconnect electrical power. Remove junction box cover and disconnect wiring. Tag wires to identify leads for reinstallation.

3.Remove vent covers on both sides of head to provide access to the vari-speed belt and pulleys.

4.Remove the lower cover plate under the motor pulley (at the rear of the cover) by removing three cap screws.

5.Remove the four screws that attach the motor.

6.Connect a lifting sling to support and lift the motor during removal. Ease the motor up and forward on the housing.

7.Tilt the motor slightly toward the rear to slacken the vari-speed belt. Remove the vari-speed belt from the motor pulley.

8.Remove the belt; lift the motor clear of the housing.

Do not attempt to remove the screw from the end of the motor shaft without use of a hydraulic press. Failure to comply may cause serious injury.

The screw retains the underlying spring stop washer, which is under spring tension. Serious injury can result if the spring tension is not gradually released using the hydraulic press. Proceed as follows.

9.Support the drive motor in a hydraulic press. Move the hydraulic ram into contact with the spring stop washer (ref. 9). Remove the screw (ref. 107) from the end of the motor shaft.

10.Slowly release pressure on hydraulic ram until the spring (ref. 8) is fully extended.

11.Remove the lengthening shaft (ref. 106), spring stop washer (ref. 9), spring (ref. 8) and outermost pulley (ref. 5) from the motor shaft.

12.Loosen set screw (ref. 3) on innermost pulley (ref. 2). Remove the pulley (ref. 2) and drive key (ref. 7) from the motor shaft.

13.Install drive key (ref. 7) and pulley (ref. 2) on shaft of replacement motor. Tighten set screw (ref. 3) on pulley.

14.Support the drive motor in a hydraulic press. Place the outermost pulley (ref. 5) on the motor shaft.

15.Install the spring (ref. 8), spring stop washer (ref. 9), and lengthening shaft (ref. 106) on the motor shaft.

16.Move the hydraulic ram into contact with the spring stop washer (ref. 9). Compress the spring (ref. 8) and install the lengthening shaft (ref. 106) on the motor shaft. Install and tighten the attaching screw (ref. 107) in the end of the motor shaft.

17.Using an overhead hoist, lift the replacement motor into position.

18.Tilt the motor slightly toward the rear and install the vari-speed belt on the motor pulleys.

19.Install the four motor attaching screws.

20.Install lower cover plate.

21.Connect electrical wiring to motor junction box.

22.Start the drive motor. Operate the spindle throughout its speed range to check operation.

23.Install vent covers on mill head.

Figure 31

22

Page 22
Image 22
Jet Tools JTM-4VS operating instructions Replacement of Drive Motor

JTM-4VS specifications

The Jet Tools JTM-4VS is a highly regarded vertical mill that caters to the demands of both professional machinists and serious hobbyists. This versatile piece of machinery combines precision engineering with innovative features, making it a popular choice in workshops and fabrication shops.

One of the standout characteristics of the JTM-4VS is its powerful 1.5 HP motor that operates on either 115V or 230V power supply, providing flexibility depending on the workshop setup. The motor offers variable speed control, from 60 to 4200 RPM, allowing users to adjust speeds according to the material being machined. This capability makes it ideal for a wide range of applications, from heavy milling on steel to delicate work on softer materials like aluminum.

The JTM-4VS is equipped with a robust cast iron column and base, which contribute to its stability and durability. This construction minimizes vibrations during operation, resulting in improved precision and surface finish on machined parts. The table measures 9” x 49”, providing ample workspace for various projects, and is fitted with T-slots for easy clamping of workpieces.

Another notable feature of the JTM-4VS is its easy-to-use digital readout (DRO) system that assists users in making precise adjustments and measurements. The DRO enhances the overall efficiency of the milling process, allowing operators to focus on the task at hand rather than relying solely on manual measurements.

The machine also incorporates a high-grade, hardened and ground bedway that ensures smooth operation and long-lasting performance. This feature not only extends the longevity of the mill but also allows for precise vertical and horizontal movements.

Safety is a primary concern in any workshop, and Jet has addressed this with various safety features integrated into the JTM-4VS. The mill is designed with a protective shield and emergency stop button, ensuring operators can work confidently.

In summary, the Jet Tools JTM-4VS stands out for its combination of robust construction, versatile functionality, and user-friendly technologies. With its powerful motor, variable speed capabilities, and precision features, it is an excellent investment for anyone looking to enhance their machining capabilities in the workshop. Whether it's for industrial applications or intricate projects, the JTM-4VS delivers reliable performance and exceptional results.