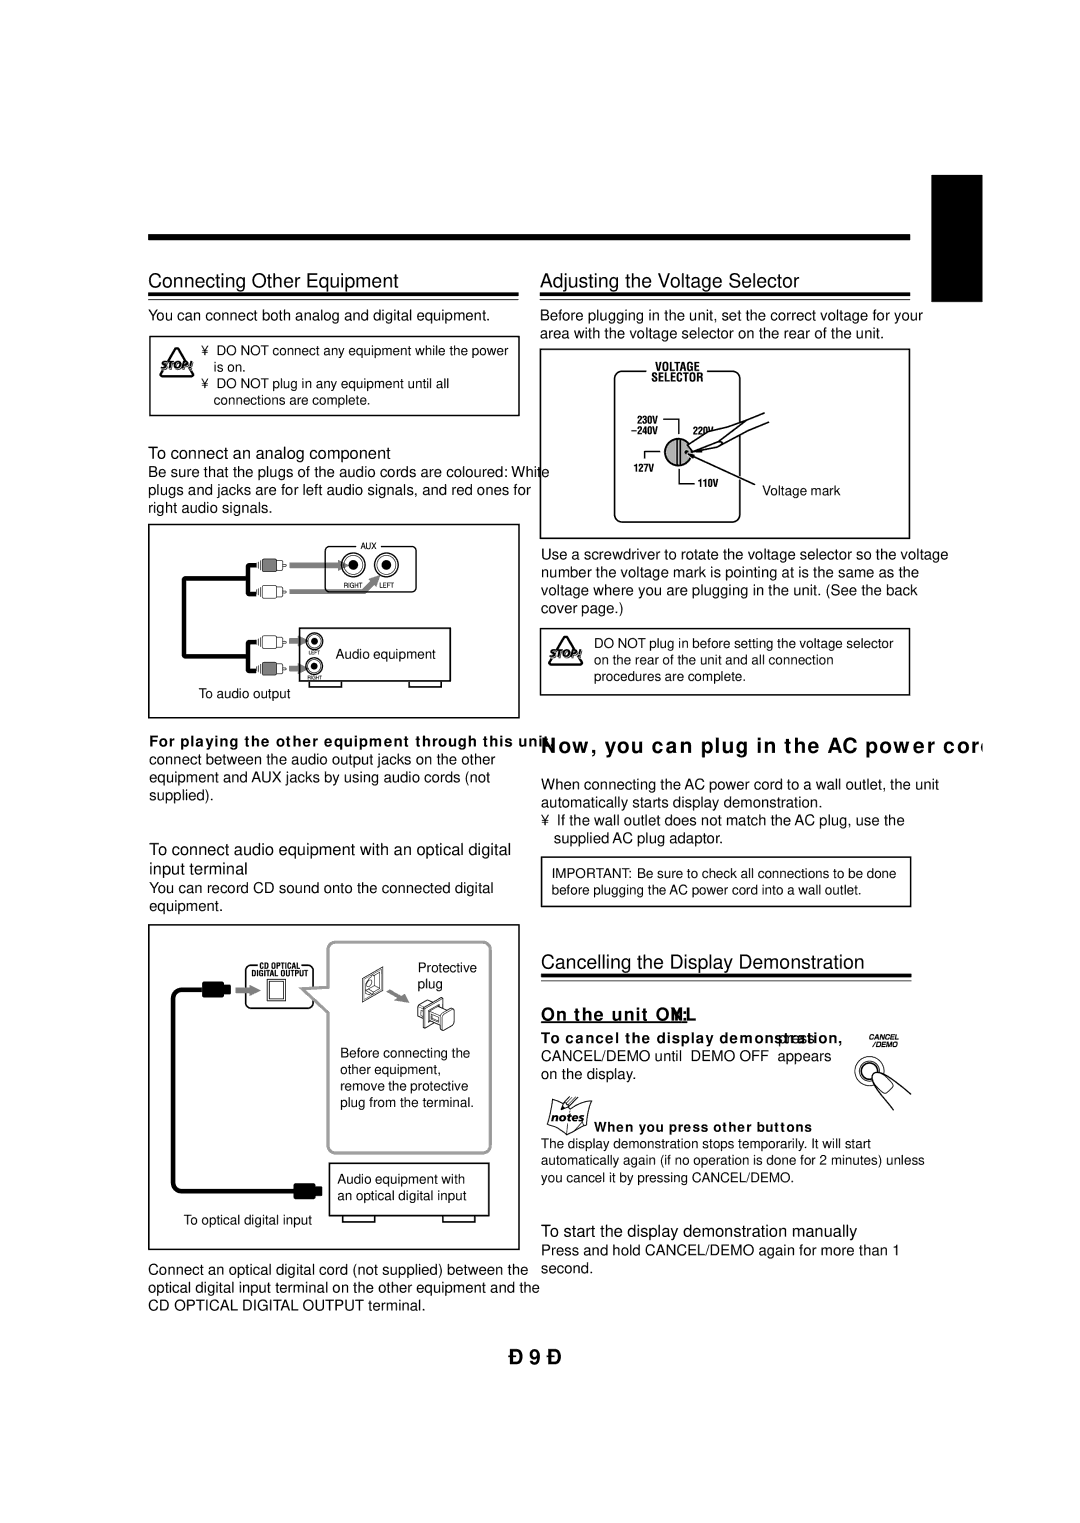
Connecting Other Equipment

You can connect both analog and digital equipment.

• DO NOT connect any equipment while the power is on.

DO NOT plug in any equipment until all connections are complete.

To connect an analog component

Be sure that the plugs of the audio cords are coloured: White plugs and jacks are for left audio signals, and red ones for right audio signals.

Audio equipment

To audio output

English

Adjusting the Voltage Selector

Before plugging in the unit, set the correct voltage for your area with the voltage selector on the rear of the unit.

Voltage mark

Use a screwdriver to rotate the voltage selector so the voltage number the voltage mark is pointing at is the same as the voltage where you are plugging in the unit. (See the back cover page.)

DO NOT plug in before setting the voltage selector on the rear of the unit and all connection procedures are complete.

For playing the other equipment through this unit,

connect between the audio output jacks on the other equipment and AUX jacks by using audio cords (not supplied).

To connect audio equipment with an optical digital input terminal

You can record CD sound onto the connected digital equipment.

Now, you can plug in the AC power cord.

When connecting the AC power cord to a wall outlet, the unit automatically starts display demonstration.

If the wall outlet does not match the AC plug, use the supplied AC plug adaptor.

IMPORTANT: Be sure to check all connections to be done before plugging the AC power cord into a wall outlet.

To optical digital input

Protective plug

Before connecting the other equipment, remove the protective plug from the terminal.

Audio equipment with an optical digital input

Cancelling the Display Demonstration

On the unit ONLY:

To cancel the display demonstration, press

CANCEL/DEMO until “DEMO OFF” appears on the display.

When you press other buttons

The display demonstration stops temporarily. It will start automatically again (if no operation is done for 2 minutes) unless you cancel it by pressing CANCEL/DEMO.

To start the display demonstration manually

Press and hold CANCEL/DEMO again for more than 1

Connect an optical digital cord (not supplied) between the optical digital input terminal on the other equipment and the CD OPTICAL DIGITAL OUTPUT terminal.

second.

– 9 –

Page 13
Image 13
JVC CA-MXG950V manual Connecting Other Equipment, Adjusting the Voltage Selector, Cancelling the Display Demonstration

CA-MXG950V specifications

The JVC CA-MXG950V is a compact and powerful mini system that combines cutting-edge technology with impressive audio performance. Designed for both functionality and style, the CA-MXG950V is perfect for music enthusiasts looking to enhance their home audio experience.

One of the standout features of the JVC CA-MXG950V is its robust sound output. With a total power output of 120 watts, this mini system provides a rich audio experience that can fill any room. The dual 2-way speaker design ensures that both mid and high frequencies are reproduced with clarity, while the integrated subwoofer delivers deep bass, creating a full-range sound that is both immersive and dynamic.

The JVC CA-MXG950V is equipped with various playback options to cater to diverse listening preferences. It includes a CD player that supports CD-RW as well as MP3 playback, allowing users to enjoy their favorite music collections with ease. Additionally, the system features a built-in FM/AM tuner with 30 presets, providing access to a wide range of radio stations for endless entertainment.

For those who wish to connect their devices, the CA-MXG950V includes multiple connectivity options. It features USB ports for direct playback from flash drives, as well as an auxiliary input for connecting external devices such as smartphones and tablets. Bluetooth technology allows users to stream music wirelessly from compatible devices, adding convenience and flexibility to the listening experience.

Another notable aspect of the JVC CA-MXG950V is its user-friendly interface. The clear LCD display makes it easy to navigate through tracks, radio stations, and settings. The system also comes with a remote control, allowing users to adjust volume levels, change tracks, and access functions from a distance.

In terms of aesthetics, the JVC CA-MXG950V is designed with a modern look that can complement any room decor. Its sleek lines and silver finish give it an elegant appearance, while the compact size makes it easy to position in tight spaces.

Overall, the JVC CA-MXG950V mini system is a versatile audio solution that caters to a wide range of listening needs. With its powerful sound, multiple playback options, and stylish design, it is an excellent choice for anyone looking to enhance their audio experience at home. Whether for casual listening, parties, or relaxing evenings, the JVC CA-MXG950V is sure to impress with its performance and features.