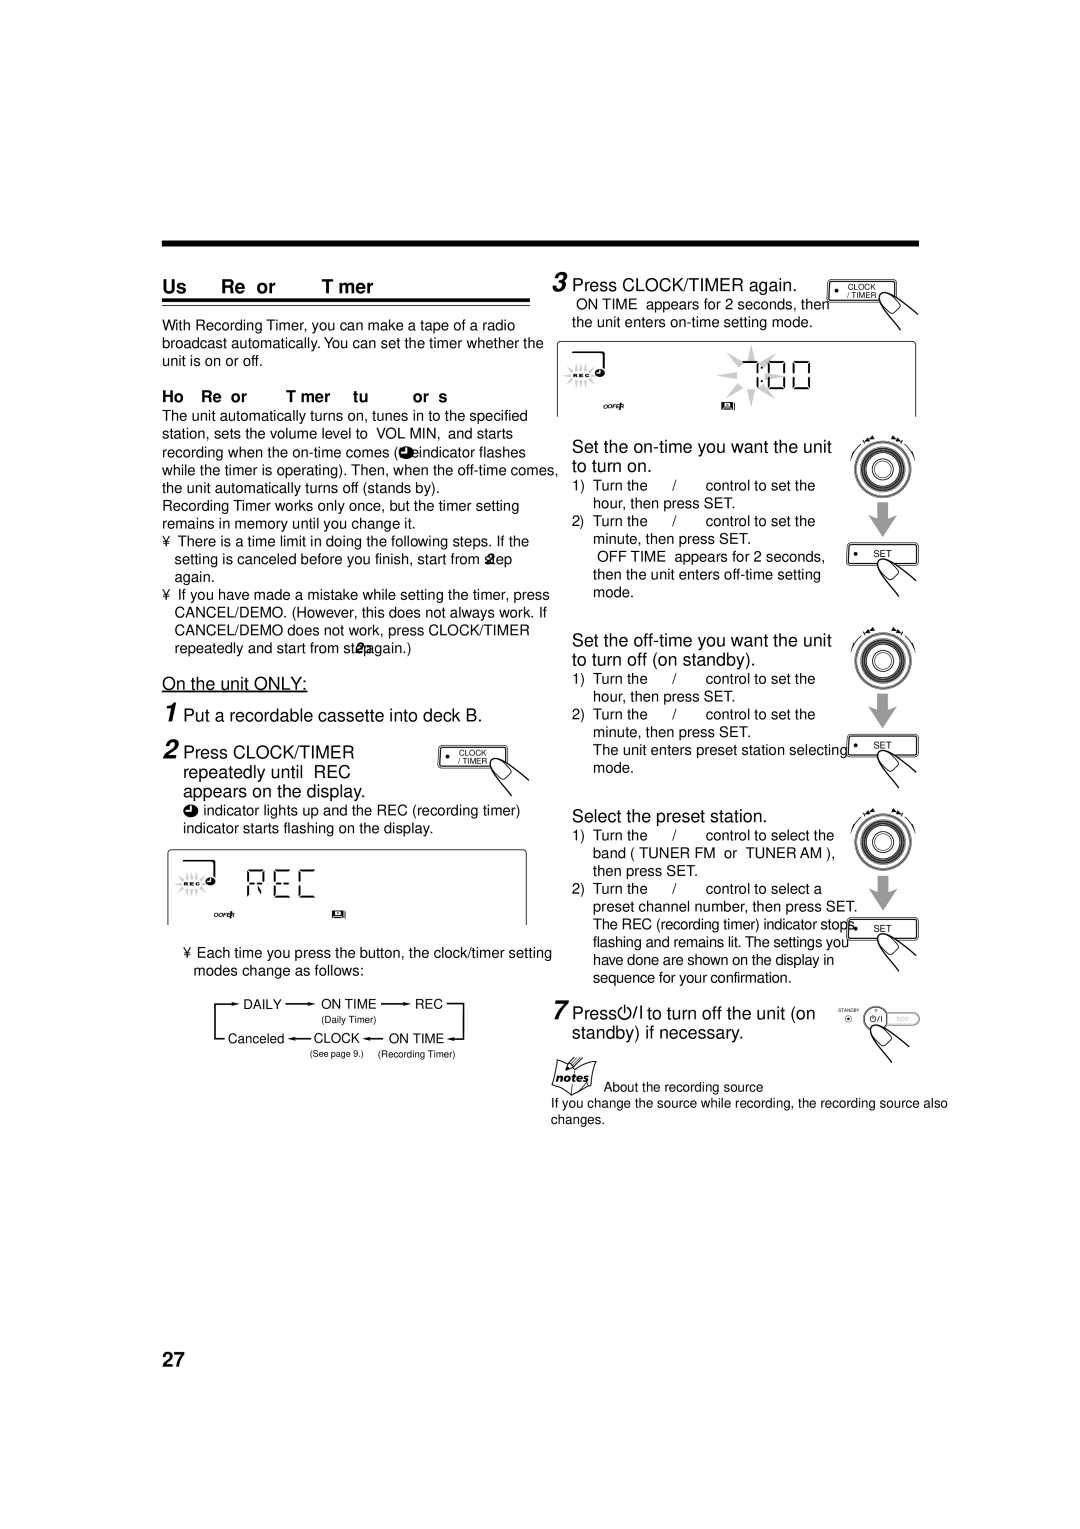
Using Recording Timer

With Recording Timer, you can make a tape of a radio broadcast automatically. You can set the timer whether the unit is on or off.

How Recording Timer actually works

The unit automatically turns on, tunes in to the specified station, sets the volume level to “VOL MIN,” and starts recording when the on-time comes (the indicator flashes while the timer is operating). Then, when the off-time comes, the unit automatically turns off (stands by).

Recording Timer works only once, but the timer setting remains in memory until you change it.

There is a time limit in doing the following steps. If the setting is canceled before you finish, start from step 2 again.

If you have made a mistake while setting the timer, press CANCEL/DEMO. (However, this does not always work. If CANCEL/DEMO does not work, press CLOCK/TIMER repeatedly and start from step 2 again.)

On the unit ONLY:

1 Put a recordable cassette into deck B.

2 Press CLOCK/TIMER


/ TIMER


CLOCK

repeatedly until “REC”


appears on the display.


indicator lights up and the REC (recording timer) indicator starts flashing on the display.

WOOFER

Each time you press the button, the clock/timer setting modes change as follows:

DAILY ON TIME REC

(Daily Timer)

Canceled CLOCK ON TIME

(See page 9.) (Recording Timer)

3 Press CLOCK/TIMER again.


/ TIMER


CLOCK

“ON TIME” appears for 2 seconds, then


the unit enters on-time setting mode.

WOOFER

4 Set the on-time you want the unit to turn on.

1)Turn the 4/¢ control to set the hour, then press SET.

2) Turn the 4/¢ control to set the minute, then press SET.

“OFF TIME” appears for 2 seconds, SET then the unit enters off-time setting

mode.

5 Set the off-time you want the unit to turn off (on standby).

1)Turn the 4/¢ control to set the hour, then press SET.

2)Turn the 4/¢ control to set the minute, then press SET.

The unit enters preset station selecting

SET


mode.


6 Select the preset station.

1)Turn the 4/¢ control to select the band (“TUNER FM” or “TUNER AM”), then press SET.

2)Turn the 4/¢ control to select a preset channel number, then press SET.

The REC (recording timer) indicator stops

SET

flashing and remains lit. The settings you


have done are shown on the display in


sequence for your confirmation.


7 Press

to turn off the unit (on

ECO

STANDBY

standby) if necessary.

About the recording source

If you change the source while recording, the recording source also changes.

27

Page 30
Image 30
JVC CA-MXGT88, CA-MXGA77 Using Recording Timer, Repeatedly until REC Appears on the display, Select the preset station

CA-MXGA77, CA-MXGT88 specifications

The JVC CA-MXGA77 and CA-MXGT88 are compact stereo systems designed to deliver powerful audio performance while fitting seamlessly into modern living spaces. Both models exemplify JVC’s commitment to quality sound and innovative technology, catering to consumers who appreciate robust audio without the bulkiness of traditional audio setups.

The JVC CA-MXGA77 is equipped with a high-power amplifier that pumps out an impressive output, ensuring that your music is delivered with clarity and force. This model features a dual cassette deck, allowing users to enjoy their favorite tape collections while also incorporating a CD player for versatility. The built-in FM/AM tuner expands your listening options, enabling access to a diverse range of radio stations.

Advanced features such as USB connectivity enable playback from various devices, including flash drives, while the Bluetooth capability allows for wireless streaming from smartphones, tablets, or laptops. This seamless integration makes the CA-MXGA77 a convenient choice for tech-savvy users.

On the other hand, the JVC CA-MXGT88 takes the audio experience a step further. This model not only retains the strong performance features of the CA-MXGA77 but also boasts enhanced audio technologies, including a more sophisticated equalizer and effects processing. Users can customize their audio experience to suit their preferences, whether they prefer punchy bass or crisp treble.

Both models come with a sleek design, incorporating stylish speaker grilles and intuitive controls, making them aesthetically pleasing additions to any home or entertainment area. The size of these systems is particularly appealing to users with limited space; they pack high-performance capabilities into a compact frame.

In addition to audio playback features, the CA-MXGT88 includes a dedicated karaoke function and microphone input, making it perfect for social gatherings. Its enhanced sound processing ensures that vocals are clear and well-mixed, providing an engaging karaoke experience.

Overall, the JVC CA-MXGA77 and CA-MXGT88 provide flexibility, style, and high-quality audio performance, embodying the essence of JVC’s dedication to producing user-friendly and feature-rich audio systems for every music lover. Whether you are a casual listener or a dedicated audiophile, these models deliver an impressive sound experience that elevates your listening to new heights.