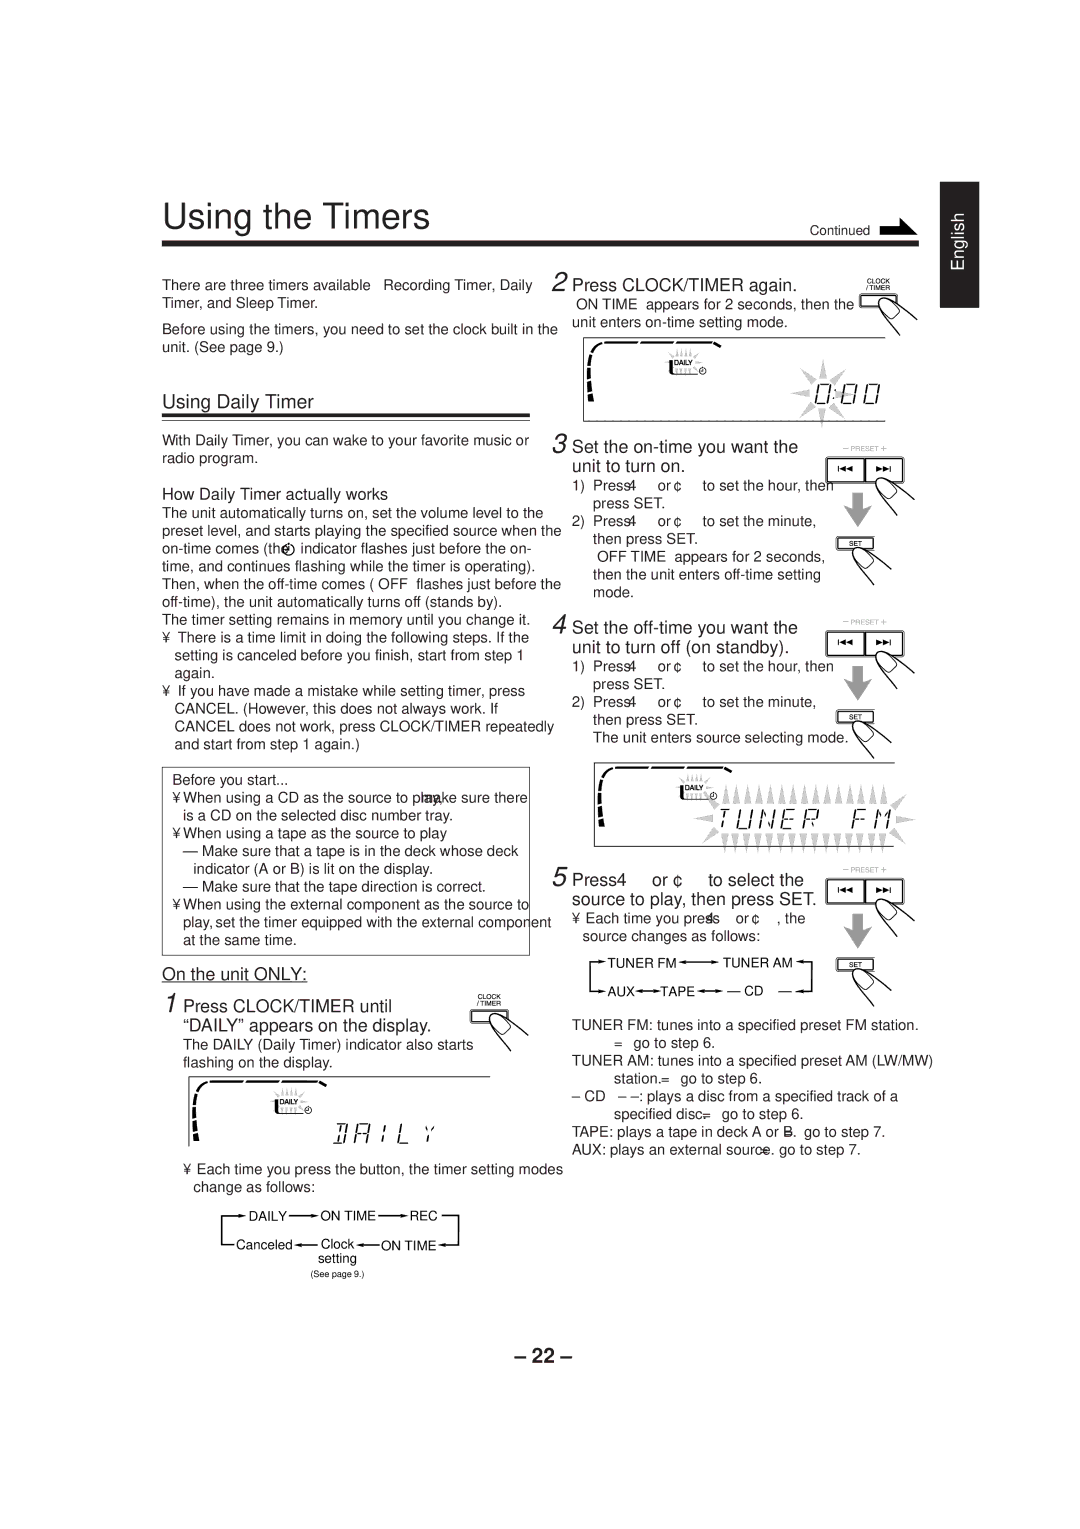
Using the Timers

Continued


English

There are three timers available — Recording Timer, Daily Timer, and Sleep Timer.

Before using the timers, you need to set the clock built in the unit. (See page 9.)

Using Daily Timer

With Daily Timer, you can wake to your favorite music or radio program.

How Daily Timer actually works

The unit automatically turns on, set the volume level to the preset level, and starts playing the specified source when the

on-time comes (the indicator flashes just before the on- time, and continues flashing while the timer is operating). Then, when the off-time comes (“OFF” flashes just before the off-time), the unit automatically turns off (stands by).

The timer setting remains in memory until you change it.

There is a time limit in doing the following steps. If the setting is canceled before you finish, start from step 1 again.

If you have made a mistake while setting timer, press CANCEL. (However, this does not always work. If CANCEL does not work, press CLOCK/TIMER repeatedly and start from step 1 again.)

Before you start...

When using a CD as the source to play, make sure there is a CD on the selected disc number tray.

When using a tape as the source to play —

Make sure that a tape is in the deck whose deck indicator (A or B) is lit on the display.

Make sure that the tape direction is correct.

When using the external component as the source to play, set the timer equipped with the external component at the same time.

On the unit ONLY:

1 Press CLOCK/TIMER until “DAILY” appears on the display.

The DAILY (Daily Timer) indicator also starts flashing on the display.

Each time you press the button, the timer setting modes change as follows:

DAILY ON TIME REC

Canceled Clock ON TIME setting

(See page 9.)

2 Press CLOCK/TIMER again.

“ON TIME” appears for 2 seconds, then the unit enters on-time setting mode.

3 Set the on-time you want the unit to turn on.

1)Press 4 or ¢to set the hour, then press SET.

2)Press 4 or ¢to set the minute,

then press SET.

“OFF TIME” appears for 2 seconds, then the unit enters off-time setting mode.

4 Set the off-time you want the unit to turn off (on standby).

1)Press 4 or ¢to set the hour, then press SET.

2)Press 4 or ¢to set the minute,

then press SET.

The unit enters source selecting mode.

5 Press 4or ¢to select the source to play, then press SET.

Each time you press 4 or ¢, the source changes as follows:

TUNER FM TUNER AM

AUX


TAPE


– CD – –


TUNER FM: tunes into a specified preset FM station.

=go to step 6.

TUNER AM: tunes into a specified preset AM (LW/MW) station. =go to step 6.

– CD – : plays a disc from a specified track of a specified disc. =go to step 6.

TAPE: plays a tape in deck A or B. = go to step 7.

AUX: plays an external source. = go to step 7.

– 22 –

Page 27
Image 27
JVC CA-MXJ500 manual Using the Timers, Using Daily Timer

CA-MXJ500 specifications

The JVC CA-MXJ500 is a compact yet powerful mini stereo system that has gained popularity for its impressive sound quality and robust feature set. Designed with versatility in mind, the CA-MXJ500 caters to a variety of audio needs, making it an excellent choice for music lovers and home entertainment enthusiasts alike.

One of the standout features of the JVC CA-MXJ500 is its powerful amplifier, which delivers a substantial output of 120 watts. This level of power ensures that users can fill their spaces with dynamic sound without sacrificing clarity or detail. The system is equipped with dual speakers that are designed to enhance bass response, allowing for a richer listening experience across various music genres.

Additionally, the CA-MXJ500 includes multiple audio sources, providing users with the flexibility to play their favorite tracks from various platforms. The system comes with a built-in CD player, which supports CD-R and CD-RW formats, allowing you to enjoy your favorite albums or compilations with ease. For added convenience, the stereo system also features an FM/AM tuner, enabling users to access a wide range of radio stations. A USB port allows for direct playback from USB flash drives, making it easy to listen to your digital music collection.

Moreover, the JVC CA-MXJ500 incorporates Bluetooth technology, allowing users to wirelessly connect their smartphones, tablets, or computers. This feature facilitates seamless streaming of music from popular services, enhancing the functionality and ease of use of the system. The inclusion of a remote control further adds to its convenience, allowing users to manage playback from a distance.

The design of the CA-MXJ500 is sleek and modern, fitting well into various home decor styles. Compact in size, it does not occupy much space, making it suitable for small apartments, dorm rooms, or even as a supplementary audio solution in larger homes.

In terms of build quality, the CA-MXJ500 is crafted with durable materials, ensuring longevity and resilience. The intuitive interface and clearly labeled controls make it user-friendly for individuals of all ages.

In conclusion, the JVC CA-MXJ500 is an exceptional mini stereo system that combines power, versatility, and modern features. Its ability to play multiple audio formats, wireless streaming capability, and powerful sound output make it an excellent choice for those seeking a compact yet high-performing audio solution.