English

Common Operations

Setting the Clock

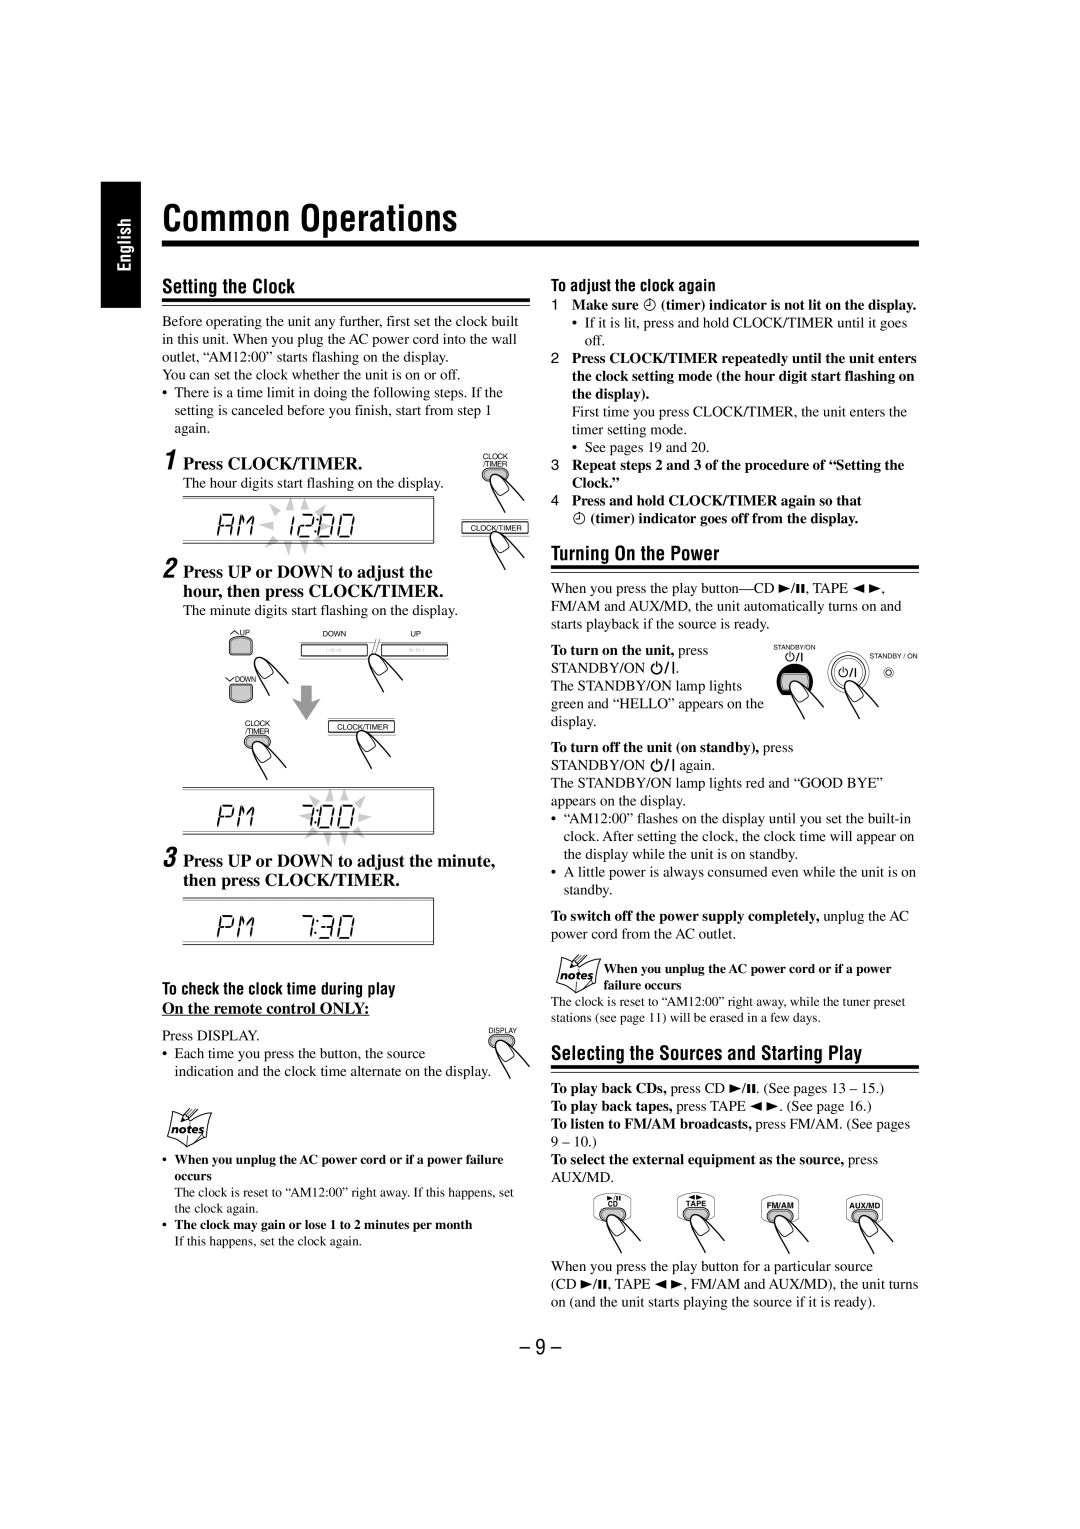
Before operating the unit any further, first set the clock built in this unit. When you plug the AC power cord into the wall outlet, “AM12:00” starts flashing on the display.

You can set the clock whether the unit is on or off.

There is a time limit in doing the following steps. If the setting is canceled before you finish, start from step 1 again.

1

Press CLOCK/TIMER.

CLOCK

/TIMER


The hour digits start flashing on the display.

CLOCK/TIMER

To adjust the clock again

1Make sure (timer) indicator is not lit on the display.

If it is lit, press and hold CLOCK/TIMER until it goes off.

2Press CLOCK/TIMER repeatedly until the unit enters the clock setting mode (the hour digit start flashing on the display).

First time you press CLOCK/TIMER, the unit enters the timer setting mode.

See pages 19 and 20.

3Repeat steps 2 and 3 of the procedure of “Setting the Clock.”

4Press and hold CLOCK/TIMER again so that

(timer) indicator goes off from the display.

2 Press UP or DOWN to adjust the hour, then press CLOCK/TIMER.

The minute digits start flashing on the display.

UP

DOWN

UP

DOWN

CLOCK

CLOCK/TIMER

/TIMER


3 Press UP or DOWN to adjust the minute, then press CLOCK/TIMER.

To check the clock time during play

On the remote control ONLY:

Press DISPLAY.

DISPLAY


• Each time you press the button, the source indication and the clock time alternate on the display.

When you unplug the AC power cord or if a power failure occurs

The clock is reset to “AM12:00” right away. If this happens, set the clock again.

The clock may gain or lose 1 to 2 minutes per month If this happens, set the clock again.

Turning On the Power

When you press the play button—CD 3/8, TAPE 2 3, FM/AM and AUX/MD, the unit automatically turns on and starts playback if the source is ready.

To turn on the unit, press

STANDBY / ON


STANDBY/ON

STANDBY/ON

.


The STANDBY/ON lamp lights green and “HELLO” appears on the display.

To turn off the unit (on standby), press

STANDBY/ON again.

The STANDBY/ON lamp lights red and “GOOD BYE” appears on the display.

“AM12:00” flashes on the display until you set the built-in clock. After setting the clock, the clock time will appear on the display while the unit is on standby.

A little power is always consumed even while the unit is on standby.

To switch off the power supply completely, unplug the AC

power cord from the AC outlet.

When you unplug the AC power cord or if a power failure occurs

The clock is reset to “AM12:00” right away, while the tuner preset stations (see page 11) will be erased in a few days.

Selecting the Sources and Starting Play

To play back CDs, press CD 3/8. (See pages 13 – 15.) To play back tapes, press TAPE 2 3. (See page 16.)

To listen to FM/AM broadcasts, press FM/AM. (See pages

9 – 10.)

To select the external equipment as the source, press

AUX/MD.

3/8

23


CD

TAPE

FM/AM

AUX/MD

When you press the play button for a particular source

(CD 3/8, TAPE 2 3, FM/AM and AUX/MD), the unit turns on (and the unit starts playing the source if it is ready).

– 9 –

Page 12
Image 12
JVC FS-L30 manual Common Operations, Setting the Clock, Turning On the Power, Selecting the Sources and Starting Play

FS-L30 specifications

The JVC FS-L30 is a notable entry in the realm of compact Hi-Fi systems, designed for those who crave powerful sound without compromising on space. This system masterfully combines aesthetics and audio performance, making it an excellent choice for music enthusiasts and casual listeners alike.

One of the standout features of the FS-L30 is its robust audio performance. The system is equipped with dual 3.5-inch woofer drivers and a 1-inch tweeter, which work in harmony to produce a well-balanced sound. This speaker configuration enables deep bass response and clear highs, creating an immersive listening experience that can fill a room without distortion, even at higher volumes.

Connectivity is another area where the FS-L30 shines. It offers multiple input options, including Bluetooth, USB, and AUX, allowing users to connect their smartphones, tablets, or other audio devices effortlessly. The Bluetooth capability, in particular, enables wireless streaming of music, ensuring convenience and flexibility for modern users who prefer to enjoy their favorite tracks without the hassle of cables.

Adding to its versatility, the FS-L30 includes a built-in FM tuner, making it easy for users to access radio stations. The inclusion of digital presets allows for quick access to favorite stations, enhancing the overall listening experience. Furthermore, the system supports various music formats via USB playback, including MP3 and WMA, catering to a wide range of user preferences.

The JVC FS-L30 is also designed with user-friendly controls, featuring an intuitive interface that makes navigation simple. The remote control adds another layer of convenience, enabling users to adjust settings from a distance.

Additionally, the compact design of the FS-L30 makes it an excellent fit for different environments, whether in a small living space or a home office. Its sleek appearance ensures it can blend seamlessly into any decor.

In summary, the JVC FS-L30 is a compelling choice for anyone seeking a compact yet powerful audio system. With its outstanding sound quality, diverse connectivity options, and user-centric design, it caters to the needs of various listeners, making it a valuable addition to any audio setup.