KD-S685/S585

Installation/Connection Manual

°“√µ‘¥µ—Èß/§ŸË¡◊Õ°“√µ‘¥µ—Èß

ØVO

O²ÒÒ

GET0067-002A

qO


[U]


ENGLISH


￿￿


This unit is designed to operate only on 12V DC,

12V

NEGATIVE ground electrical systems.


JVC 1101HISFLEJEIN

EN, CH, TH, AR


‰∑¬


wÐdŽ


—UOð WDÝ«uÐ jIqLFO“UN'« «c¼ rL


™ÿ¥ª√–°Õ∫™ÿ¥π’ȉ¥È√—∫°“√ÕÕ°·∫∫¡“‡æ◊ËÕ„™Èß“π°—∫

DC d???ýU???³?? w???zU???Ðd???N???


√–∫∫°√–· ‰øøÈ“ “¬¥‘π¢—È«≈∫°√–· 12µ√ß‚«≈∑Ï

W???L???E???½« ¨X???


ÆV


INSTALLATION (IN-DASH

￿￿ !

MOUNTING)


The following illustration shows a typical installation.


However, you should make adjustments


corresponding to your specific car. If you have any


questions or require information regarding installation


J V C

kits, consult your JVC car audio dealer or a company


supplying kits.


￿￿

uKÐUð ‡ qš«œ ® “UN'« VO dð

°“√µ‘¥µ—Èß (°“√ª√–°Õ∫·ºßÀπÈ“ª—∑¡Ï‡¢È“)


©…—UO

«


¿“æµ—«Õ¬Ë“ßµËÕ‰ªπ’È· ¥ß∂÷ß°“√µ‘¥µ—Èß·∫∫∑—Ë«‰ª լ˓߉√°Áµ“¡W??I??¹d??Þ w??w??×??O??{u??²??r??Ýd??s??

O??³??¹Ò

§ÿ≥§«√ª√—∫·µËß„ÀȇÀ¡“– ¡°—∫√∂¢Õߧÿ≥‡Õß À“°§ÿ≥¡’

q?L?Ž p?O?K?Ž V−¹ ¨p


ª—≠À“À√◊ÕµÈÕß°“√¢ÈÕ¡Ÿ≈‡°’ˬ«°—∫™ÿ¥µ‘¥µ—Èß °√ÿ≥“ª√÷°ÆUN?JK?²9 w?²?

«—U

H²Ý« „UM?¼ ÊU

«–«

°—∫ºŸÈ¢“¬‡§√◊ËÕ߇ ’¬ß√∂¬πµÏJVC ¢Õß∑Ë“πÀ√◊Õ∫√‘…—∑


U? uKF?* WłUŠ Ë«

…—U?A?²?Ý« vłd?¹ ¨V?O d?²? «

«Ëœ« ’u?B

Ð


∑’Ë®”ÀπË“¬™ÿ¥µ‘¥µ—Èßπ’È


JVC W —U «—UO K

WOðuB « …eNłô« Ÿ“u


Æ «Ëœô« …cN

WŽ“u*« W dA « Ë«

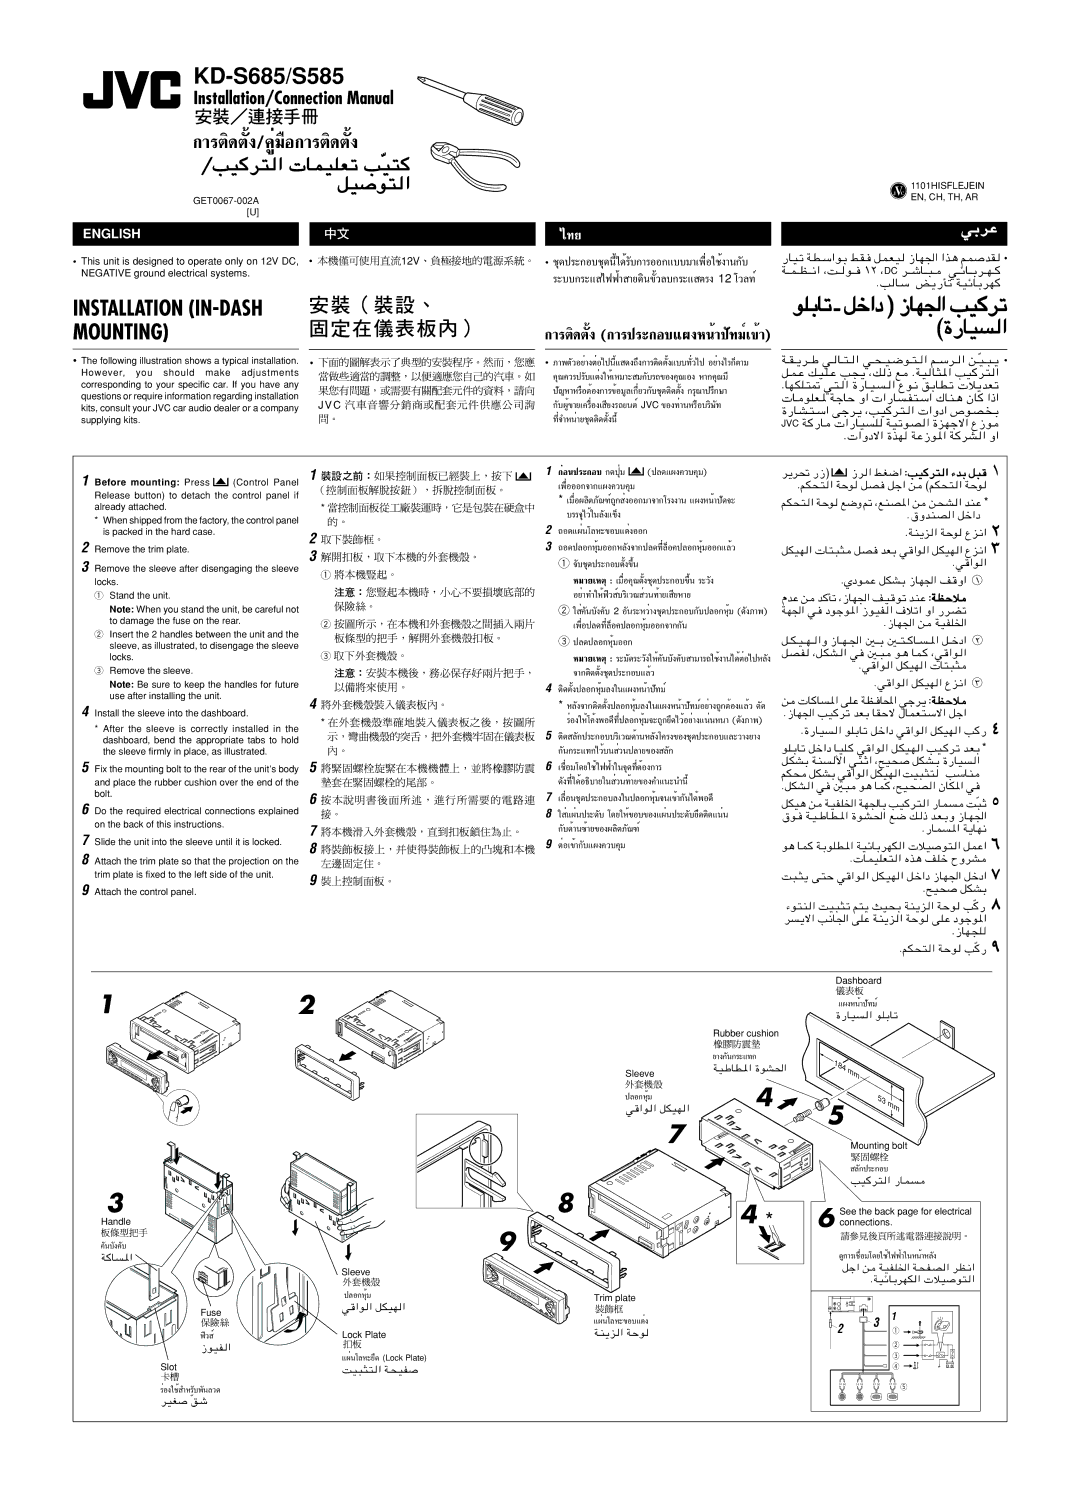
1 Before mounting: Press


(Control Panel


Release button) to detach the control panel if already attached.

*When shipped from the factory, the control panel is packed in the hard case.

2 Remove the trim plate.

3 Remove the sleeve after disengaging the sleeve locks.

1Stand the unit.

Note: When you stand the unit, be careful not to damage the fuse on the rear.

2Insert the 2 handles between the unit and the sleeve, as illustrated, to disengage the sleeve locks.

3Remove the sleeve.

Note: Be sure to keep the handles for future use after installing the unit.

4 Install the sleeve into the dashboard.

*After the sleeve is correctly installed in the dashboard, bend the appropriate tabs to hold the sleeve firmly in place, as illustrated.

5 Fix the mounting bolt to the rear of the unit’s body and place the rubber cushion over the end of the bolt.

6 Do the required electrical connections explained on the back of this instructions.

7 Slide the unit into the sleeve until it is locked.

8 Attach the trim plate so that the projection on the trim plate is fixed to the left side of the unit.

9 Attach the control panel.

1

*

￿￿

2

3

1

2

3

4

*

￿￿

5

6

￿￿

7

8

9

1

°ËÕπª√–°Õ∫°¥ªÿË¡


(ª≈¥·ºß§«∫§ÿ¡)

d¹d% —“®


“d « jG{« ∫VO d² « ¡bÐ q³ ±


qB qł« s ©rJײ « WŠu


‡æ◊ËÕÕÕ°®“°·ºß§«∫§ÿ¡


ÆrJײ « WŠu


* ‡¡◊ËÕº≈‘µ¿—≥±Ï∂Ÿ° ËßÕÕ°¡“®“°‚√ßß“π ·ºßÀπÈ“ª—¥®–

rJײ « WŠu l{Ë - ¨lMB*« s

s×A « bMŽ *


∫√√®ÿ‰«È„π≈—ß·¢Áß


Æ‚ËbMB « qš«œ

2

∂Õ¥·ºËπ‚≈À–¢Õ∫·µËßÕÕ°


ÆWM¹e « WŠu

Ÿe½«

3

∂Õ¥ª≈Õ°ÀÿÈ¡ÕÕ°À≈—ß®“°ª≈¥∑’Ë≈ÁÕ§ª≈Õ°ÀÿÈ¡ÕÕ°·≈È«

qJON «


U²³¦

qB bFÐ w «u « qJON « Ÿe½«


1 ®—∫™ÿ¥ª√–°Õ∫µ—Èߢ÷Èπ


Æw «u «


À¡“¬‡Àµÿ : ‡¡◊ËÕ§ÿ≥µ—Èß™ÿ¥ª√–°Õ∫¢÷Èπ √–«—ß


ÆÍœuLŽ qJAÐ “UN'« n Ë«

±


լ˓∑”„ÀÈø‘« Ï∫√‘‡«≥ Ë«π∑È“¬‡ ’¬À“¬

ÂbŽ s

b Q𠨓UN'« nO uð bMŽ ∫WEŠö


2 „ ˧—π∫—ߧ2—Õ∫—π√–À«Ë“ß™ÿ¥ª√–°Õ∫°—∫ª≈Õ°ÀÿÈ¡ (¥—ß¿“æ)WN'« w?


œułu*« “uOH « ·öð« Ë« —dCð


‡æ◊ËÕª≈¥∑’Ë≈ÁÕ§ª≈Õ°ÀÿÈ¡ÕÕ°®“°°—π


Æ“UN'« s


WOHK)«


3 ª≈¥ª≈Õ°ÀÿÈ¡ÕÕ°

q???J??O???N???

«Ë “U??N???'« 5???Ð 5??²???

U???

*« q???šœ«


qB?H ¨q?JA? « w 5?³ u?¼ UL?

¨w «u? «


À¡“¬‡Àµÿ : √–¡—¥√–«—ß„Àȧ—π∫—ߧ—∫ “¡“√∂„™Èß“π‰¥ÈµËÕ‰ªÀ≈—ß


Æw «u « qJON «


U²³¦


®“°µ‘¥µ—Èß™ÿ¥ª√–°Õ∫·≈È«


Æw «u « qJON « Ÿe½«

4

µ‘¥µ—Èߪ≈Õ°ÀÿÈ¡≈ß„π·ºßÀπÈ“ª—∑¡Ï

s

U U


*« vKŽ WE U;« włd¹ ∫WEŠö


* À≈—ß®“°µ‘¥µ—Èߪ≈Õ°ÀÿÈ¡≈ß„π·ºßÀπÈ“ª—∑¡Ïլ˓ß∂Ÿ°µÈÕß·≈È« ¥—¥


Æ“UN'« VO dð bFÐ UIŠô ‰ULF²Ýô« qł«


√ËÕß„ÀÈ‚§ÈßæÕ¥’∑’˪≈Õ°ÀÿÈ¡®–∂Ÿ°¬÷¥‰«Èլ˓߷πËπÀπ“ (¥—ß¿“æ)


« uKÐUð qš«œ w «u « qJON « V — ¥

5

µ‘¥ ≈—°ª√–°Õ∫∫√‘‡«≥¥È“πÀ≈—ß‚§√ߢÕß™ÿ¥ª√–°Õ∫·≈–«“߬“ß

Æ…—UO


°—π°√–·∑°‰«È∫π Ë«πª≈“¬¢Õß ≈—°

uK?ÐUð qš«œ U?OK?

w «u « q?JO?N « VO?

dð b?FÐ *

6

‡™◊ËÕ¡‚¥¬„™È‰øøÈ“„π®ÿ¥∑’˵ÈÕß°“√

q?JAÐ WM


_« wM?Ł« ¨`O×

qJA?Ð …—UO


«


¥—ß∑’ˉ¥ÈÕ∏‘∫“¬„π Ë«π∑È“¬¢Õߧ”·π–π”π’È

rJ× qJAÐ w «u « qJON « XO³¦²

VÝUM


ÆqJA « w


u¼ UL ¨`O×B « ÊUJ*« w


7

‡≈◊ËÕπ™ÿ¥ª√–°Õ∫≈ß„πª≈Õ°ÀÿÈ¡®π‡¢È“°—π‰¥ÈæÕ¥’

qJO¼ s

WOHK)« WN'UÐ VO d² « —UL


X³ÒŁ µ

8

Ë·ºËπª√–¥—∫ ‚¥¬„ÀÈ¢Õ∫¢Õß·ºËπª√–¥—∫¬÷¥µ‘¥·πËπ

‚u?

W?O?ÞU?D?*« …u?A?(« l?{ p? – b?F?ÐË “U?N?'«


°—∫¥È“π´È“¬¢Õߺ≈‘µ¿—≥±Ï


Æ—UL

*« W¹UN½

9

µËÕ‡¢È“°—∫·ºß§«∫§ÿ¡

u¼ UL WÐuKD*« WOzUÐdNJ «

öO

u² « qLŽ«


Æ

ULOKF² « Ác¼ nKš ÕËdA


X³?¦¹ v?²Š w «u? « qJ?ON « q?š«œ “UN?'« qšœ«


Æ`O×

qJAÐ


¡u²M « XO³¦ð r²¹ YO×Ð WM¹e « WŠu

VÒ—


d

¹ô« V½U'« vKŽ WM¹e « WŠu

vKŽ œułu*«


Æ“UN−K


ÆrJײ « WŠu

VÒ— π

Dashboard

1

3

Handle

§—π∫—ߧ—∫

W

10

Fuse

ø‘« Ï “uOH

Slot

￿￿

√ËÕß„™È ”À√—∫æ—π≈«¥ dOG Òoý

2


Rubber cushion


¬“ß°—π°√–·∑°


Sleeve

WOÞUD*« …uA(«


ª≈Õ°ÀÿÈ¡

4


w

7


8

4 *


9


Sleeve


ª≈Õ°ÀÿÈ¡

Trim plate


w

·ºËπ‚≈À–¢Õ∫·µËß


Lock Plate

WM¹e


￿￿


·ºËπ‚≈À–¬÷(Lock¥

Plate)


XO³¦²W×OH


·ºßÀπÈ“ª—∑¡Ï

…—UOuKÐUð

184

mm


5

53

mm


Mounting bolt

≈—°ª√–°Õ∫

VO—UL

6 See the back page for electrical connections.

¥Ÿ°“√‡™◊ËÕ¡‚¥¬„™È‰øøÈ“„πÀπÈ“À≈—ß

qł« sWOHK)« W×HBdE½«


ÆWOzUÐdNJ


10

1

2

3

1


2


3


4


5

Page 23
Image 23
JVC KD-S585, GET0067-001A, KD-S685 manual Before mounting Press

KD-S585, GET0067-001A, KD-S685 specifications

The JVC KD-S685, GET0067-001A, and KD-S585 are a trio of innovative car audio receivers that enhance any car entertainment experience. These models showcase JVC's commitment to delivering quality sound while integrating advanced technologies.

The JVC KD-S685 features a sleek design with a bright LED display that provides clear visibility even in sunlight. One of its standout features is the ability to play CD, CD-R, and CD-RW formats, giving users the flexibility to enjoy their favorite albums or self-burned compilations. Additionally, with MP3/WMA playback capability, music lovers can carry their entire library in digital format on a single disc.

Equipped with Bluetooth technology, the KD-S685 allows for hands-free calling and audio streaming from compatible devices. Users can effortlessly connect their smartphones, ensuring they stay connected without compromising safety on the road. The receiver also supports Siri Eyes Free, allowing iPhone users to interact with Siri through the car audio system.

Moreover, the KD-S685 includes a built-in 24-bit DAC (Digital-to-Analog Converter), ensuring high-quality audio playback, while a powerful amplifier ensures clear sound reproduction across a range of frequencies. Equalizer presets and a high-pass filter enable users to tailor the audio output to match their personal preferences and vehicle acoustics.

The JVC KD-S585 is another high-performing receiver in this lineup. It shares many features with the KD-S685 but excels in its affordable pricing while still offering essential functionalities. The KD-S585 boasts USB input for direct connection to smartphones and portable media players, allowing easy access to music libraries. It also features a front auxiliary input for direct connection of other devices.

Both models include a customizable 3-band parametric equalizer, allowing users to adjust the sound profile. They also support various sound enhancements like Loudness control and high-voltage pre-outs for connecting an external amplifier, enhancing the overall listening experience.

In summary, the JVC KD-S685, GET0067-001A, and KD-S585 represent excellent options for those seeking reliable and feature-rich car audio receivers. With their combination of connectivity, audio customization, and playback versatility, these models cater to diverse audio enthusiasts, ensuring that every journey is accompanied by great sound quality. Whether you prioritize Bluetooth connectivity, USB playback, or custom audio settings, these JVC receivers deliver on multiple fronts for an enjoyable listening experience on the road.