GR-AX227
GR-AX227
Dear Customer
It is recommended that you
This unit is produced to comply with Standard IEC Publ
Installation
Antenna Installation Instructions
USE
Servicing
Playback
Supply Power
Inserting a Video Cassette
Shooting
Remember
Ajor Features
Provided Accessories
Zoom-in Zoom-out
Contents
Attach Battery Pack
Power
Supply Power
Detach Battery Pack
Charge marker
To AC outlet DC OUT terminal AC Power DC cord
Charge Marker
AA-V11EG
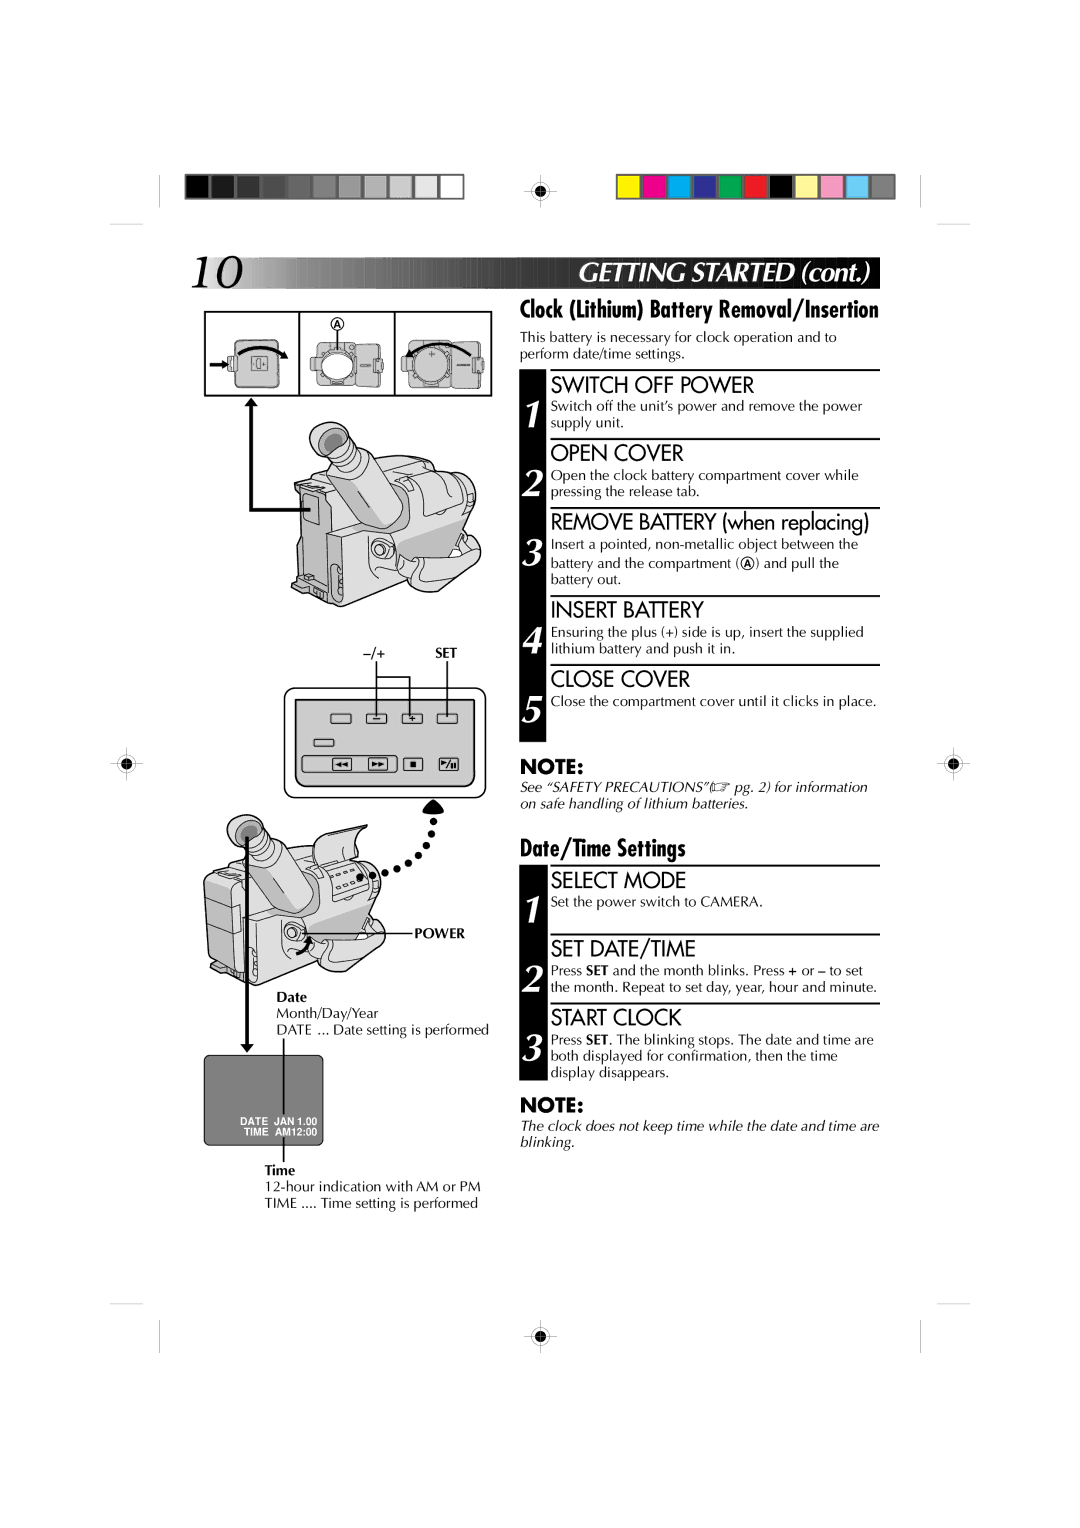
Date/Time Settings
Clock Lithium Battery Removal/Insertion
Getting Started
Tape Length/Recording Mode Setting
Viewfinder Adjustment
Loading/Unloading a Cassette
Shoulder Strap Attachment
Grip Adjustment
Tripod Mounting
RM-V20U Remote Control Unit
To Remote Buttons Functions
Start/Stop Power indicator Tape remaining time indicator
Lens Cover Switch Power
Tally lamp
Retake
Zoom indicator Zoom-in
Power zoom switch
START/STOP Viss
Recording Advanced Features
Program AE With Special Effects
Adjust White Balance
White Balance Adjustment
Adjust Focus
White balance mode indicator
Fader
Cinema mode Cinema
Engage Cinema Mode
Restore Normal Screen
Press F2
Release Focus Lock
Focusing
Lock Focus
F1 F2 Function SEL
To Nearer Subject
Release Manual Focus Mode
To Farther Subject
Button
Brighten Image
Restore Initial Setting
Exposure Control
Darken Image
Select Display
Choose Display Mode
Date/Time Character Insert
Connect Camcorder to Monitor
SET Character or Title
Access Character Mode
Character Generator
Screen
Example of Character Generator & Title
Select Preset Title
Instant Titles
Character Generator
Tally lamp Program AE
Recording
START/STOP Interval REC Time
4 for the desired number
Release Animation Mode
Press REC Time until disappears from the viewfinder
Insert Cassette in Adapter
Playba CK Using The Cassette Adapter
Cassette Adapter VHS PlayPak
Play Back on Connected VCR
Connection To a VCR a Editing, Dubbing and Playback
Connect Camcorder to VCR
Connect Camcorder to TV
Turn on the camcorder, the VCR and the TV
Load a Cassette
Playba CK Basic Playback
Rewind or Fast-forward the tape
Playback
Tracking PLAY/PAUSE Counter R/M REW Stop Play Pause
Playback Features
Feature
Purpose
PLAY/PAUSE
Power switch
VCR Recording deck
To Audio out To Video out
01234Tape Counter
Counter R/M Power
REW Play Pause Audio DUB Insert
Audio Dubbing
Engage Audio DUB Standby Mode
Editin G
Find EDIT-IN Point
Cleaning The Camcorder
User Maintenance
After Use
Symptom Possible Causes
Roubleshooting
Controls
Shooting Clock Battery Compartment
Index
Grip Strap Tripod Mounting Socket
Recording Mode SP/EP Indicator
Almost gone, the indicator blinks, then the unit
Index Viewfinder
Contents Counter Memory Darken the Image
Auto Mode Lock Mode
Cinama Mode Clock Lithium Battery
Electronic Fog Filter Mode
To avoid hazard
To prevent damage and prolong service life
To prevent damage to the camcorder
During use
For safety, do not
Avoid using the unit
Store cassettes
Speci Fications
Memo
Uso de este manual de instrucciones
Precauciones
Notas
Advertencia sobre la pila de litio
Instrucciones Para LA Instalacion DE LA Antena
Utilizacion
Reparacion
Reproduccion
Guia Para Operacion Rapida
Alimentacion
Filmacion
Accesorios Suministrados
CA R AC T Eristica S P Rincipales
Recuerde
BN-V12U
Contenido
Preparativos
Alimentacion
PRE Para Tivos
Alimentación
Colocacion DEL Paquete DE Pilas
Nota
Indicador DE Carga
Seleccion DEL Modo
Ajustes de fecha/hora
Cierre DE LA Cubierta
Ajuste DE LA FECHA/HORA
Ajuste del visor
Colocación y extracción de un cassette
Colocación de la correa para el hombro
Prepara T Ivos
Ajuste de la empuñadura
Montaje del trípode
El mando a distancia RM-V20U
Hacia Remote Funciones Botones
Colocacion DEL Cassette
Lens Cover Power
Rabacion Grabación básica
Inicio DE LA Filmacion
Grabacion Funciones básicas
RM-V20U opcional
Visor Modo
Grab ACI on Funciones a va nzadas
Program AE
Ajuste DEL Enfoque
Ajuste del balance del blanco
Ajuste DEL Balance DEL Blanco
Activacion DEL Modo DE Pausa DE Fundido
Fundido
Introduccion DE LA Seleccion
Inicio DE LA Grabacion
Cine
Modo de cine
Bloqueo DEL Enfoque
Enfoque
Funciones a vanzadas
Desbloqueo DEL Enfoque
Para Alejar EL Sujeto
Desactivacion DEL Modo DE Enfoque Manual
Para Acercar EL Sujeto
RAB AC ION Funciones a vanzadas
Control de exposición
Seleccion DEL Modo DE Indicacion
Inserción de fecha, hora y caracteres
Seleccion DE LA Indicacion
Conexion DE LA Videocamara AL Monitor
Introduccion DEL Caracter O Titulo
Funciones avanzadas
Generador de caracteres
Acceso a LA Pantalla DEL Modo DE Caracter
Ejemplo de generación de caracteres y título
Títulos instantáneos
Seleccion DEL Titulo Preajustado
PARIS, France
Lámpara testigo Program AE
Animación
Lapso de tiempo
Reproduccion Uso del adaptador de cassette
Adaptador de cassette VHS Playpak
Conexión con un TV con conectores B de
Reproduccion Conexiones básicas
Reproducción Exclusivamente
Reproduccion
Reproducc ION Reproducción básica
Colocacion DE UN Cassette
Parada DE Reproduccion
Reproduccion Funciones
Notas
Hacia salida de
VCR platina de grabación
Cable de audio y video opcional Hacia Audio Hacia Video
Edición por inserción
Inicio DE LA Copia DE Audio
EDI Cion
Copia de audio
Indicador de copia de audio Visor Micrófono
Después de usar
Mantenimiento POR Parte DEL Usuario
Limpieza de la videocámera
Localizacio N Y Reparaci on DE AV Erias
Sintoma CAUSA/S PROBABLE/S
Indice Controles
$ Advertencia del cubreobjetivo
Indice Visor
Program AE de una posición a otra. Luego
Títulos instantáneos
Indice Términos
Para evitar daños y prolongar la vida de servicio
Prec Auci Ones
Para evitar peligro
Para evitar daños a la videocámara
Por seguridad, no
Durante el uso
Almacene los cassettes
Evite utilizar la unidad
Especificaciones DEL ADAPTADOR/ Cargador DE CA AA-V11EG
ESP Ecificaci Ones
Generalidades
Especificaciones DEL Adaptador DE Cassette C-P7U
Memorandum
Recomenda-se
Avisos
Utilização deste manual de instruções
Advertência sobre a pilha de lítio
Instruções Para a Instalação DA Antena
Utilização
Manutenção
Reprodução
Alimentação
Para Introduzir a Fita
Para Gravar
Acessórios Fornecidos
CA Ract Erístic AS Básicas
LEMBRE-SE
Zoom Positivo
Índice
Prenda a Bateria
Alimentação
Ligue a Alimentação
Solte a Bateria
Marcador DE Carga
Observação
AP-V7U
Selecione O Modo
Ajustes de Data/Hora
Feche a Tampa
Ajuste a DATA/HORA
Ajuste do Comprimento da Fita/Modo de Gravação
Ajuste do Visor
Para Colocar/Retirar a Fita
Prender a Alça do ombro
Ajuste da Empunhadeira
Montagem do Tripé
Unidade de Controle Remoto RM-V20U
Tomada Remote Funções Botões
Entre no Modo Espera DE Gravação
Gravação Gravaç ão Básica
Coloque a Fita
Comece a Filmar
Retake Retomar
Gravação Características Básicas
Indicador de Zoom Zoom positivo Zoom negativo
Chave de alimentação do zoom
Visor Modo Do Visor
Gravaçã O Funções Avançadas
Program AE Com Efeitos Especiais
Símbolo Visor Modo Do Visor
Ajuste O Equilíbrio DE Branco
Ajuste de Equilíbrio de Branco
Ajuste O Foco
Indicador do modo equilíbrio de branco
Gravação Funções Avançadas
Fader Aparecer/Desaparecer
Restaure a Tela
Cinema
Ative O Modo Cinema
Modo Cinema
Libere a Trava do Foco
Para focalizar
Trave O Foco
F1 F2 SEL. de Função
Para Assunto Mais Próximo
Libere O Modo Foco Manual
Para Assunto Mais Distante
Botão F1
Clareie a Imagem
Controle de Exposição
Escureça a Imagem
Escolha O Modo DE Exibição
Inserção de Caracteres de Data/Hora
Selecione a Exibição
Ligue a Câmera AO Monitor
Caractere
Gerador de Caracteres
Acesse a Tela Modo DE
Registre OS Caracteres Desejados
Título OUR Vacation Nossas Férias
Títulos Instantâneos
Selecione O Título PRÉ-AJUSTADO
Aperte SEL. de Função até aparecer Title à direita de F1
Lâmpada Indicadora Program AE
Animação
Intervalo de Tempo
Reprodução
Fecho deslizante Fita de vídeo compacta Carretéis
Ligue a Câmera AO VCR
Reprodução Conexões Básicas
Conexão a um VCR a Edição, Cópia e Reprodução
Reproduza
Reprodução Reprodução Básica
Rebobine ou avance rápido a fita
Suspenda a Reprodução
Reprodução Características
Operação
Deck de gravação
Saída Audio Saída Video
Localize O Ponto DE Entrada DA Edição
Edição com Inserção
Localize O Ponto DE Saída DA Edição
Ative O Modo Editar COM Inserção
Ative O Modo Espera DE Dublagem DE Áudio
Edição
Dublagem de Áudio
Comece a Dublagem DE Aúdio
Depois de utilizar
Manutenção Pelo Usuário
Para Limpar a Câmera
Dificuldades
Sintomacausas Possíveleis
Índice Controles
Chave Eject ..................................... pág
Índice Viso r
Índice Condições
Para evitar danos e prolongar a vida útil
Avisos
Para evitar riscos
Para evitar dano à câmera
Por questão de segurança, NÃO
Durante a utilização
Armazene as fitas
Evite usar a unidade
ES Pecificações
Anotações
Compac


 GETTING
 STARTED
 (cont.)