Manuals
/
JVC
/
Photography
/
Camcorder
JVC
GR-AXM33
specifications
46EN
Models:
GR-AXM33
1
46
52
52
Download
52 pages
45 b
43
44
45
46
47
48
49
50
Tape remaining time indicator
Select Preset Title
Access Menu Screen
OUT connector
Attach Battery Pack
Grip Adjustment
Recording Mode Setting
Bright Volume
Safety
Power Switch Start/Stop Button
Page 46
Image 46
46
EN
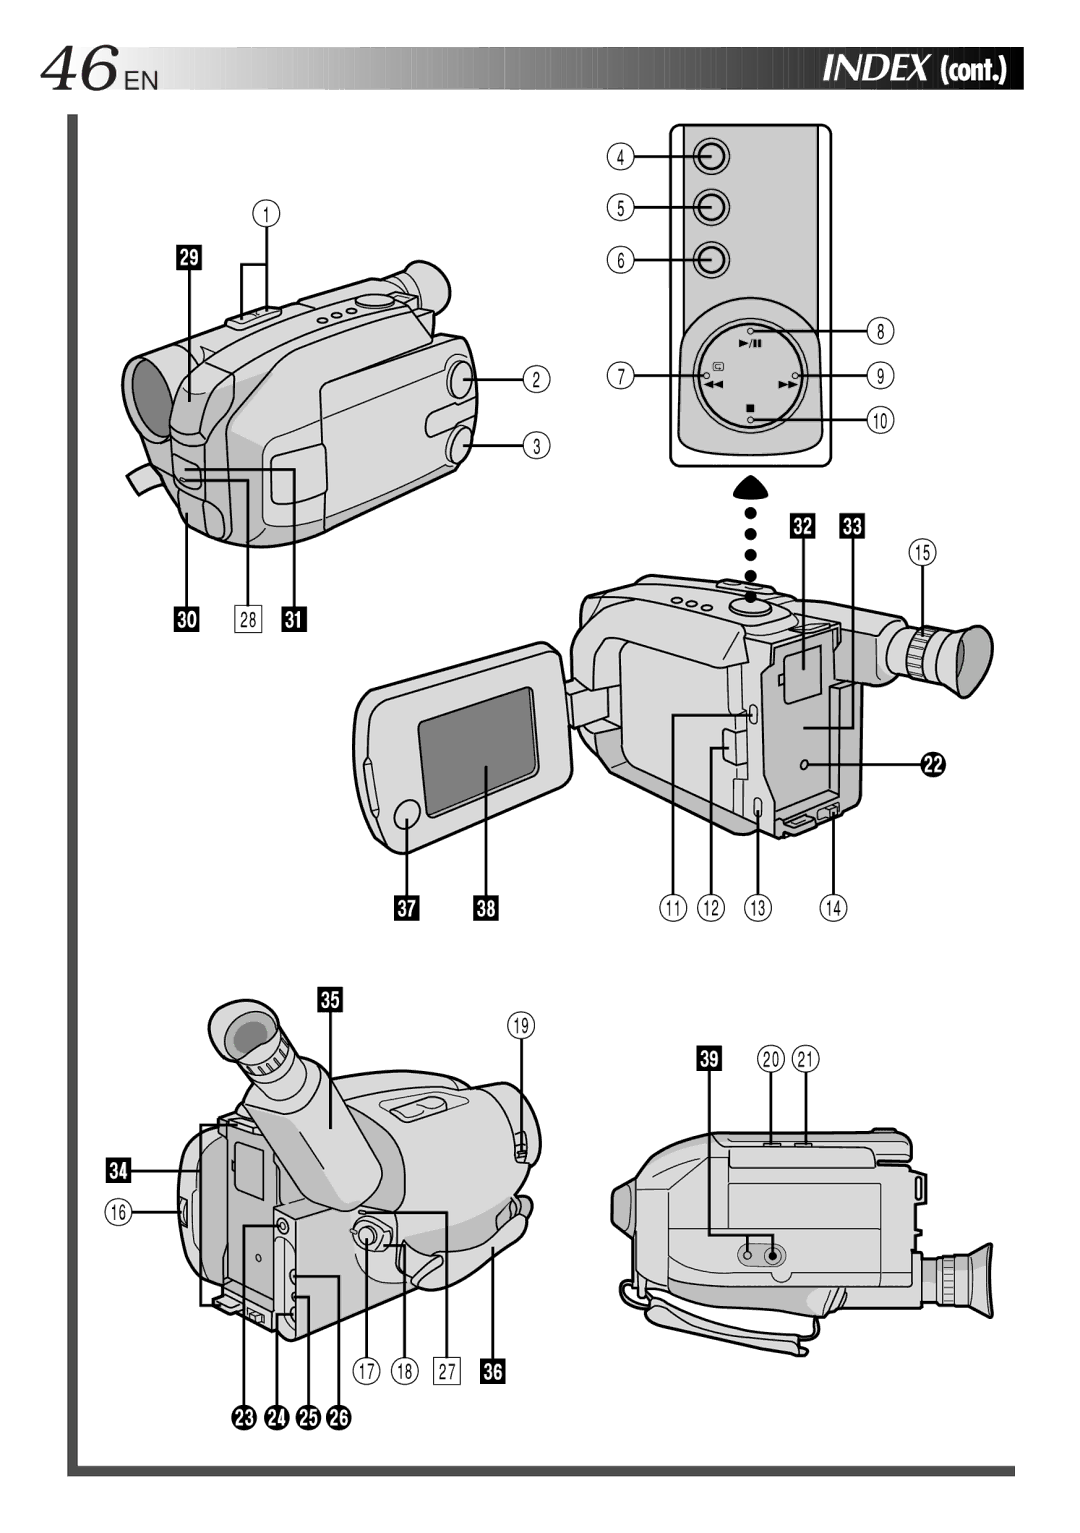
INDEX
(cont.)
4
1
5
o
6
8
2
7
9
3
0
W E
%
p
i
Q
w
U
I
! @ #
$
T
(
O
) q
R
^
& * u
Y
e rty
Page 45
Page 47
Page 46
Image 46
Page 45
Page 47
Contents
GR-AXM33 GR-AXM23
It is recommended that you
Connection to the mains supply in the United Kingdom
Some DO’S and DON’TS on the Safe USE of Equipment
This unit is produced to comply with Standard IEC Publ
P7U BN-V12U
PLAY/PAUSE REW
Push Eject BATT. Release
Lens Cover
Attach Battery Pack
Power
Supply Power
Detach Battery Pack
DC OUT
AA-V15EK
Close Cover
Insert Battery
Close the compartment cover until it clicks in place
Date/Time Setting
Access Menu Screen
Recording Mode Setting
SET Recording Mode
Loading/Unloading a Cassette
Grip Adjustment
Viewfinder Adjustment
Tripod Mounting
Adjust Length
Shoulder Strap Attachment
Attach Strap
Load a Cassette
Enter RECORD-STANDBY Mode
Basic Recording
Start Shooting
Now calculating
Tape remaining time indicator
Stop Recording
Blinking
EN Recording Basic Recording
Power Switch Start/Stop Button
Tally lamp Lights while recording is in progress
Interface shooting
Journalistic shooting
Brightness control
Feature Purpose Operation
EN Recording Basic Features
Zoom-in Zoom-out Zoom indicator bar Power Zoom button
Zoom Speed Setting Menu Zooming Speed 1 4 in order of speed
Feature
5SEC. REC Retake R/F
Set the Light OFF/AUTO/ON Switch as required
Basic Features
To brighten the scene when natural lighting is too dim
Mode when you use the video light
Display Select Dial
DATE/TIME
Date/Time/Character Insert
After 1 sec
Recording Advanced Features
Programme AE With Special Effects
Mark
Viewfinder indication
Captures faster action than Sports mode
Dial
High shutter speed clearly captures fast-moving action
Fader
Advanced Features
Wide
Super LoLuxGain Up
Select Super Lolux Mode
Select Preset Title
Instant Titles
Menu Jog Dial Menu Screen
LCD monitor or viewfinder
Using Menu For Detailed Adjustment
Adjusts exposure automatically
Adjusts focus automatically
Allows you to adjust focus manually pg
Allows you to adjust exposure manually pg
Lapse recording pg
Setting is
Recording pg
Tally lamp remains off at all times
Focusing
Patterns that are regularly repeated
Focus Menu Screen
END Adjustment of Focus
Manual Focus Screen
Manual Exposure Screen To brighten the image
To darken the image
Manual White Balance Adjustment M.W.B
INT. Time
Menu
REC Time
SET Interval Between Recordings
Release Animation Mode
Time-Lapse
SET Recording Time
Play Back
Basic Playback
Rewind or Fast-forward the tape
Stop Playback
Bright Volume
Speaker volume control
Adjust Volume
Tracking
Features
Counter R/M PLAY/PAUSE REW FF Stop Feature
Insert Cassette in Adapter
Using The Cassette Adapter EN
Cassette Adapter
Play Back on Connected VCR
Connect Camcorder to TV
Basic Connections
Connect Camcorder to VCR
Turn on the camcorder, the VCR and the TV
Power Switch
BATT. Release Push Eject
Open/Close Switch Set to Power OFF
Remove Marks
Playback picture is blurred or
Recording cannot be performed
Not been set to Video
Interrupted
Tape won’t eject
Indicators and the picture
Review or Retake mode
Shooting a very bright object
Pgs ,34
Recording Mode SP/LP Indicator Programme AE Indicator
@ Interval Timer/Recording Time
Condensation Warning
46EN
Power Indicator Tally Lamp
# Light OFF/AUTO/ON Switch GR-AXM33 only
Power Switch Pg.14
Clock Battery Compartment
Manual Focus ND Effect Mode Playback
Contents
Demo Mode
Self-Timer
During use
For safety, do not
Avoid using the unit
To avoid hazard
Cont
Special Notes on Video Heads
Output DBs, 1 k-ohm Via Audio OUT Connector Speaker
Dimensions X 117 H Including viewfinder
Adjustment Auto/Manual adjustment
Dimensions 188 25 H 104 Weight Approx g Accessory
GR-AXM23
Top
Page
Image
Contents