![]()
![]()
![]()
![]()
![]()
![]()
![]()
![]()
![]()
![]()
![]()
![]()
![]()
![]()
![]()
![]()
![]()
![]()
![]()
![]()
![]()
![]()
![]()
![]()
![]()
![]()
![]()
![]()
![]()
![]()
![]()
![]()
![]()
![]()
![]()
![]()
![]()
![]()
![]()
![]()
![]()
![]()
![]()
![]()
![]()
![]()
![]()
![]()
![]()
![]()
![]()
![]()
![]()
![]()
![]()
![]()
![]()
![]()
![]()
![]()
![]()
![]()
![]()
![]()
![]()
![]()
![]()
![]()
![]()
![]()
![]()
![]()
![]()
![]()
![]()
![]()
![]()
![]()
![]()
![]()
![]()
![]()
![]()
![]()
![]()
![]()
![]()
![]()
![]()
![]()
![]()
![]()
![]()
![]()
![]()
![]()
![]()
![]()
![]()
![]()
![]()
![]()
![]()
![]()
![]()
![]()
![]()
![]()
![]()
![]()
![]()
![]()
![]()
![]()
![]() EN
EN![]() 9
9
Date/Time Setting
|
|
|
|
|
|
|
|
|
|
|
|
| 1 |
| ACCESS MENU SCREEN |
|
|
|
|
|
|
|
|
|
|
|
|
|
| First set the Power Switch to “CAMERA”. Turn the | |
|
|
|
|
|
|
|
|
|
|
|
|
|
| Select Dial to any position except AUTO LOCK, | |
|
|
|
|
|
|
|
|
|
|
|
|
|
|
| then press the MENU Jog Dial. |
|
|
|
|
|
|
|
|
|
|
|
|
|
|
|
|
|
|
|
|
|
|
|
|
|
|
|
|
| 2 |
| SELECT FUNCTION |
|
|
|
|
|
|
|
|
|
|
|
|
|
| ||
|
|
|
|
|
|
|
|
|
|
|
|
|
| Rotate the MENU Jog Dial to move the highlight bar | |
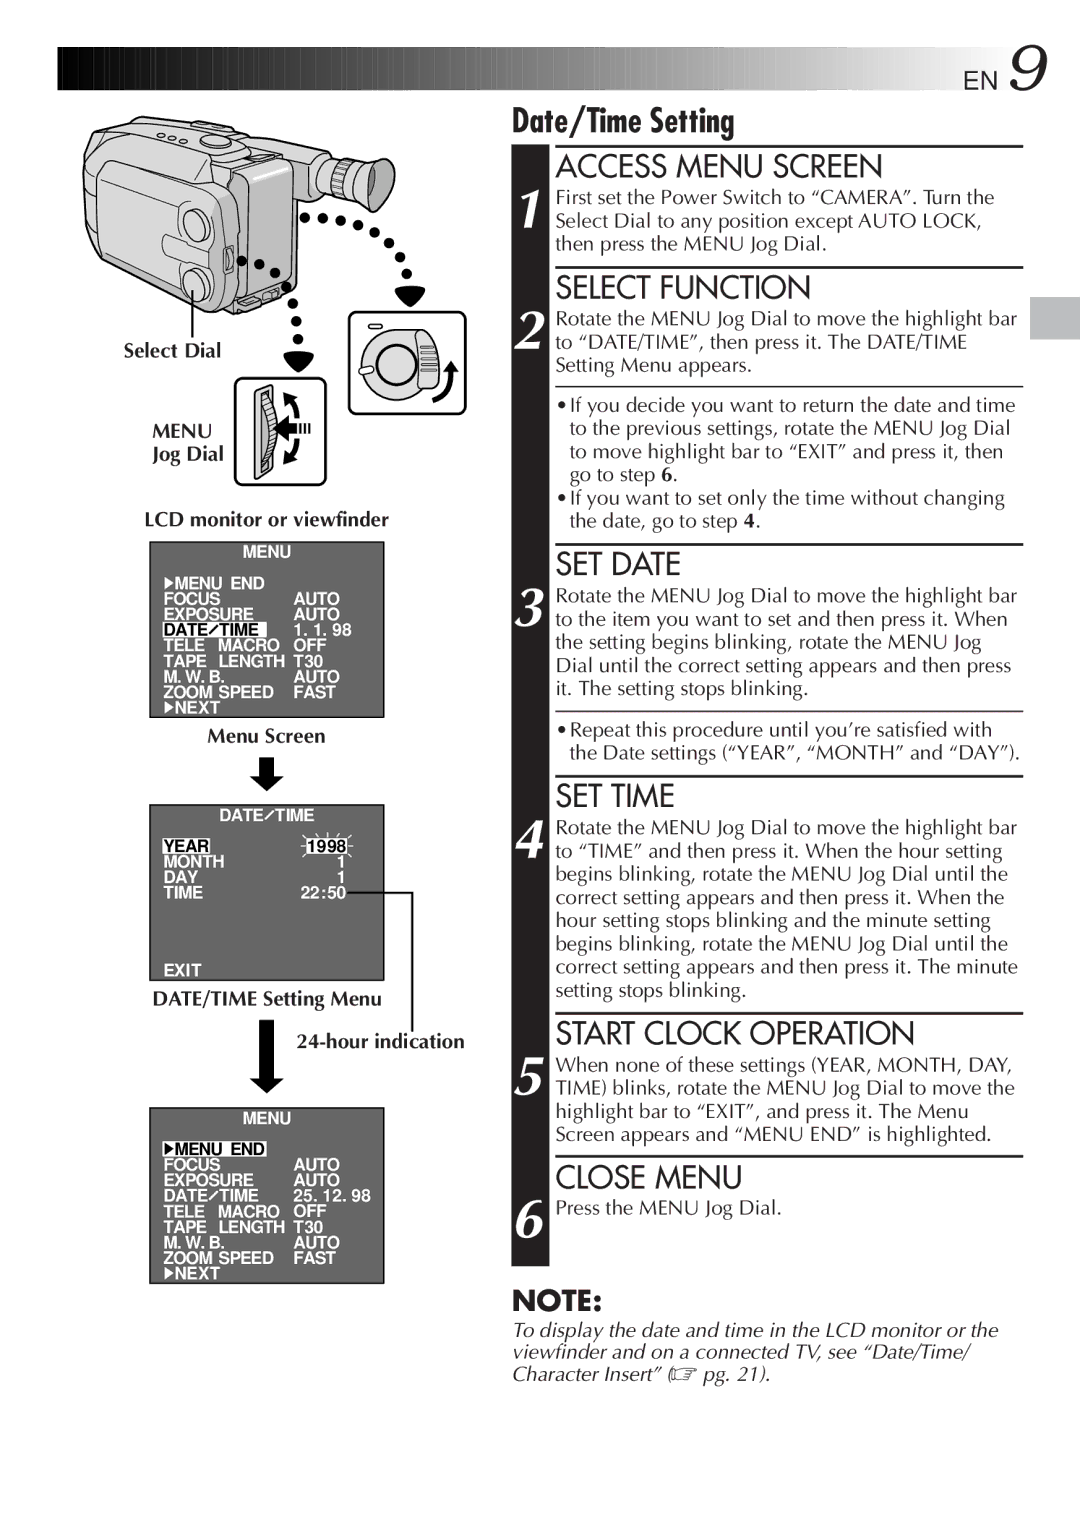
Select Dial |
|
|
|
|
|
| to “DATE/TIME”, then press it. The DATE/TIME | ||||||||
|
|
|
|
|
|
|
|
|
|
|
|
|
|
| Setting Menu appears. |
|
|
|
|
|
|
|
|
|
|
|
|
|
|
| •If you decide you want to return the date and time |
| MENU |
|
|
|
|
|
|
|
|
|
| to the previous settings, rotate the MENU Jog Dial | |||
| Jog Dial |
|
|
|
|
|
|
| to move highlight bar to “EXIT” and press it, then | ||||||
|
|
|
|
|
|
|
|
|
|
|
|
|
|
| go to step 6. |
LCD monitor or viewfinder |
| •If you want to set only the time without changing | |||||||||||||
|
| the date, go to step 4. | |||||||||||||
|
|
|
|
|
|
|
|
|
|
|
|
|
|
|
|
|
|
|
|
| MENU |
|
|
|
|
|
|
| SET DATE | ||
|
| 4MENU END |
|
|
|
|
| 3 |
| ||||||
|
| AUTO |
|
|
| Rotate the MENU Jog Dial to move the highlight bar | |||||||||
|
| FOCUS |
|
|
| ||||||||||
|
| EXPOSURE | AUTO |
|
|
| to the item you want to set and then press it. When | ||||||||
|
| DATE | TIME |
| 1. 1. 98 |
|
|
| |||||||
|
| TELE | MACRO |
| OFF |
|
|
|
| the setting begins blinking, rotate the MENU Jog | |||||
|
| TAPE LENGTH T30 |
|
|
|
| Dial until the correct setting appears and then press | ||||||||
|
| M. W. B. | AUTO |
|
|
|
| it. The setting stops blinking. | |||||||
|
| ZOOM SPEED | FAST |
|
|
|
| ||||||||
|
| 4NEXT |
|
|
|
|
|
|
|
| |||||
|
|
| Menu Screen |
|
|
| •Repeat this procedure until you’re satisfied with | ||||||||
|
|
|
|
| the Date settings (“YEAR”, “MONTH” and “DAY”). | ||||||||||
|
|
|
|
|
|
|
|
|
|
|
|
|
|
| |
|
|
|
|
|
|
|
|
|
|
|
|
|
|
|
|
|
|
|
|
|
|
|
|
|
|
|
|
|
|
| SET TIME |
|
|
|
|
| DATE TIME |
|
| 4 |
| ||||||
|
|
|
|
|
|
|
| Rotate the MENU Jog Dial to move the highlight bar | |||||||
|
|
|
|
|
|
|
|
|
|
|
|
|
| ||
|
| YEAR |
|
|
|
|
| 1998 |
|
|
|
| to “TIME” and then press it. When the hour setting | ||
|
| MONTH |
|
| 1 |
|
|
|
| ||||||
|
| DAY |
|
|
| 1 |
|
|
|
|
| begins blinking, rotate the MENU Jog Dial until the | |||
|
| TIME |
|
|
| 22:50 |
|
|
|
|
| correct setting appears and then press it. When the | |||
|
|
|
|
|
|
|
|
|
|
|
|
|
|
| hour setting stops blinking and the minute setting |
|
|
|
|
|
|
|
|
|
|
|
|
|
|
| begins blinking, rotate the MENU Jog Dial until the |
|
| EXIT |
|
|
|
|
|
|
|
|
|
| correct setting appears and then press it. The minute | ||
| DATE/TIME Setting Menu |
|
|
| setting stops blinking. | ||||||||||
|
|
|
|
| |||||||||||
|
|
|
|
|
|
|
|
|
|
|
| START CLOCK OPERATION | |||
|
|
|
|
|
|
|
| 5 |
| ||||||
|
|
|
|
|
|
|
|
|
|
|
|
|
| When none of these settings (YEAR, MONTH, DAY, | |
|
|
|
|
|
|
|
|
|
|
|
|
|
| TIME) blinks, rotate the MENU Jog Dial to move the | |
|
|
|
|
|
|
|
|
|
|
|
|
|
| highlight bar to “EXIT”, and press it. The Menu | |
|
|
|
|
| MENU |
|
|
|
|
|
|
| |||
|
|
|
|
|
|
|
|
|
|
|
|
|
|
| Screen appears and “MENU END” is highlighted. |
|
| 4MENU END |
| AUTO |
|
|
|
|
| ||||||
|
| FOCUS |
|
|
|
|
| CLOSE MENU | |||||||
|
| EXPOSURE | AUTO |
|
|
|
| ||||||||
|
| DATE | TIME | 25. 12. 98 |
|
| 6 |
| Press the MENU Jog Dial. | ||||||
|
| TELE | MACRO | OFF |
|
|
| ||||||||
|
| TAPE LENGTH T30 |
|
|
|
| |||||||||
|
| M. W. B. | AUTO |
|
|
|
| ||||||||
|
| ZOOM SPEED | FAST |
|
|
|
|
| |||||||
|
| 4NEXT |
|
|
|
|
|
|
|
| |||||