40![]()
![]()
![]() EN
EN![]()
![]()
![]()
![]()
![]()
![]()
![]()
![]()
![]()
![]()
![]()
![]()
![]()
![]()
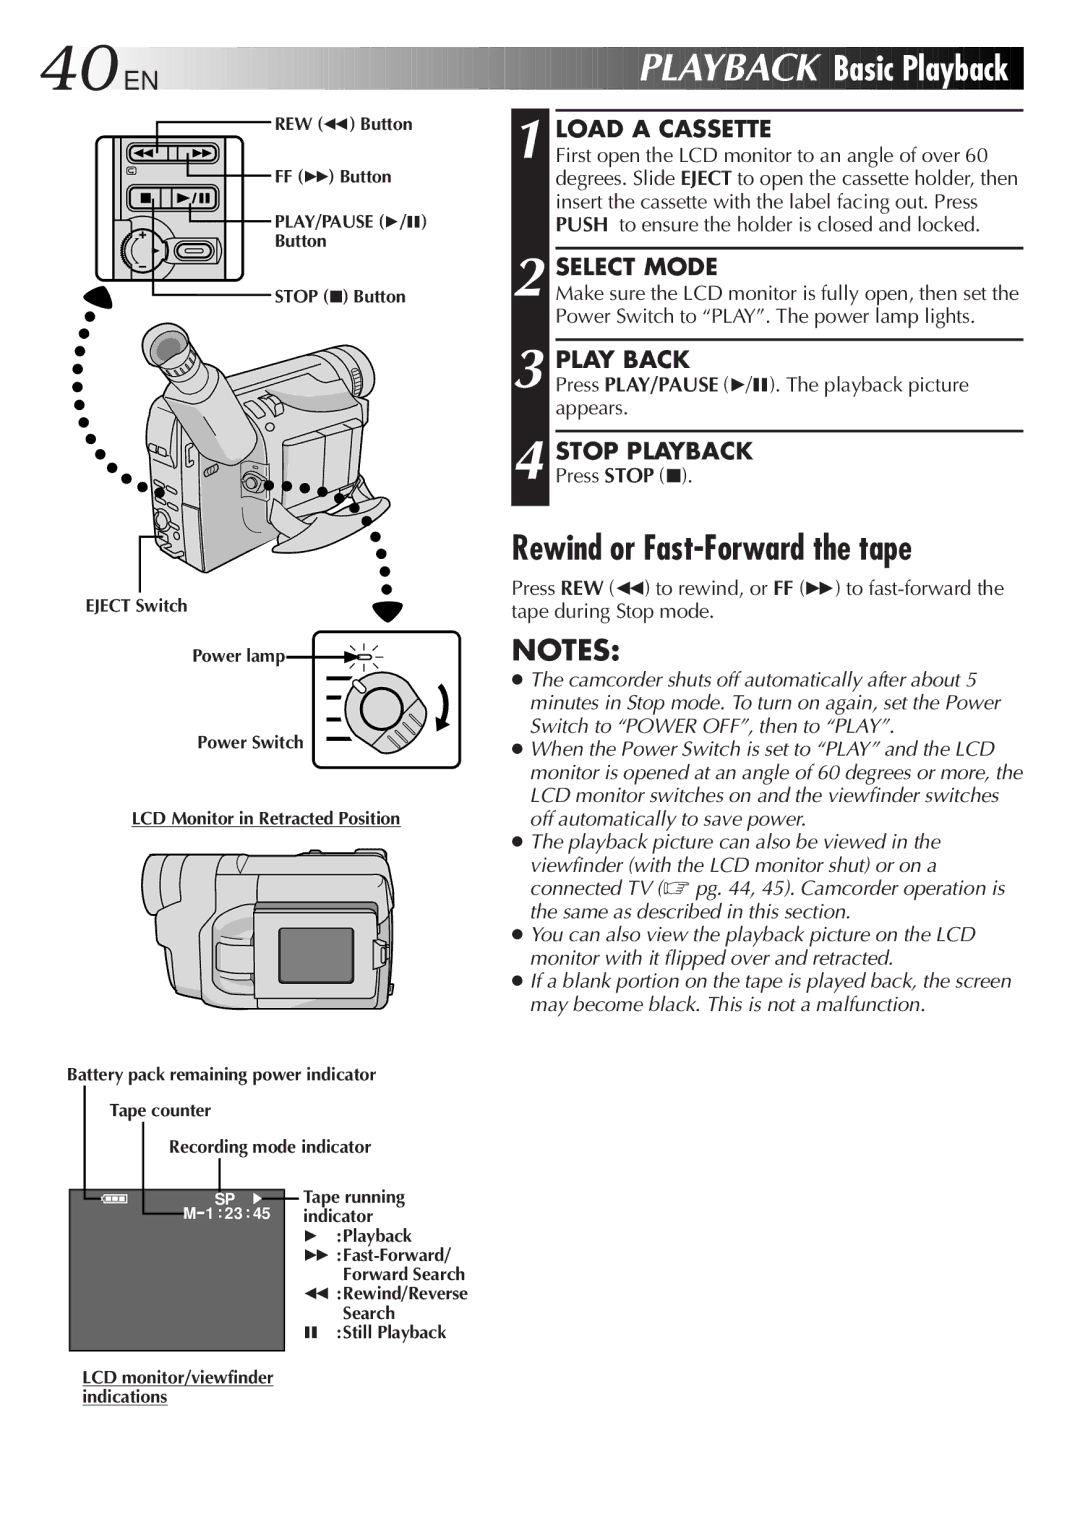
REW (2) Button
FF (3) Button
PLAY/PAUSE (4/6)
Button
STOP (5) Button
EJECT Switch
Power lamp![]()
![]()
Power Switch
LCD Monitor in Retracted Position
Battery pack remaining power indicator
Tape counter
Recording mode indicator
|
|
|
|
|
| Tape running | |
|
|
|
|
|
| ||
|
|
| SP |
|
| ||
|
| M 1 : 23 : 45 |
| indicator | |||
|
| ||||||
|
|
|
|
| 4 | :Playback | |
|
|
|
|
| 3 | ||
|
|
|
|
|
|
| Forward Search |
|
|
|
|
| 2 | :Rewind/Reverse | |
|
|
|
|
|
|
| Search |
|
|
|
|
| 6 | :Still Playback | |
|
|
|
|
|
|
|
|
LCD monitor/viewfinder indications


 PLAYBACK


 Basic
Basic Playback


1 LOAD A CASSETTE
First open the LCD monitor to an angle of over 60 degrees. Slide EJECT to open the cassette holder, then insert the cassette with the label facing out. Press PUSH to ensure the holder is closed and locked.
2 SELECT MODE
Make sure the LCD monitor is fully open, then set the Power Switch to “PLAY”. The power lamp lights.
3 PLAY BACK
Press PLAY/PAUSE (4/6). The playback picture appears.
4 STOP PLAYBACK
Press STOP (5).
Rewind or Fast-Forward the tape
Press REW (2) to rewind, or FF (3) to
NOTES:
●The camcorder shuts off automatically after about 5 minutes in Stop mode. To turn on again, set the Power Switch to “POWER OFF”, then to “PLAY”.
●When the Power Switch is set to “PLAY” and the LCD monitor is opened at an angle of 60 degrees or more, the LCD monitor switches on and the viewfinder switches off automatically to save power.
●The playback picture can also be viewed in the
viewfinder (with the LCD monitor shut) or on a connected TV (☞ pg. 44, 45). Camcorder operation is the same as described in this section.
●You can also view the playback picture on the LCD monitor with it flipped over and retracted.
●If a blank portion on the tape is played back, the screen may become black. This is not a malfunction.
