EN 39

To DV

IN/OUT

Lock Button

Core filter

DV cable (optional)

Core filter

MANUAL

AUTO

OFF

PLAY

Power Switch

Dubbing To Or From A Video Unit

Equipped With A DV Connector

(Digital Dubbing)

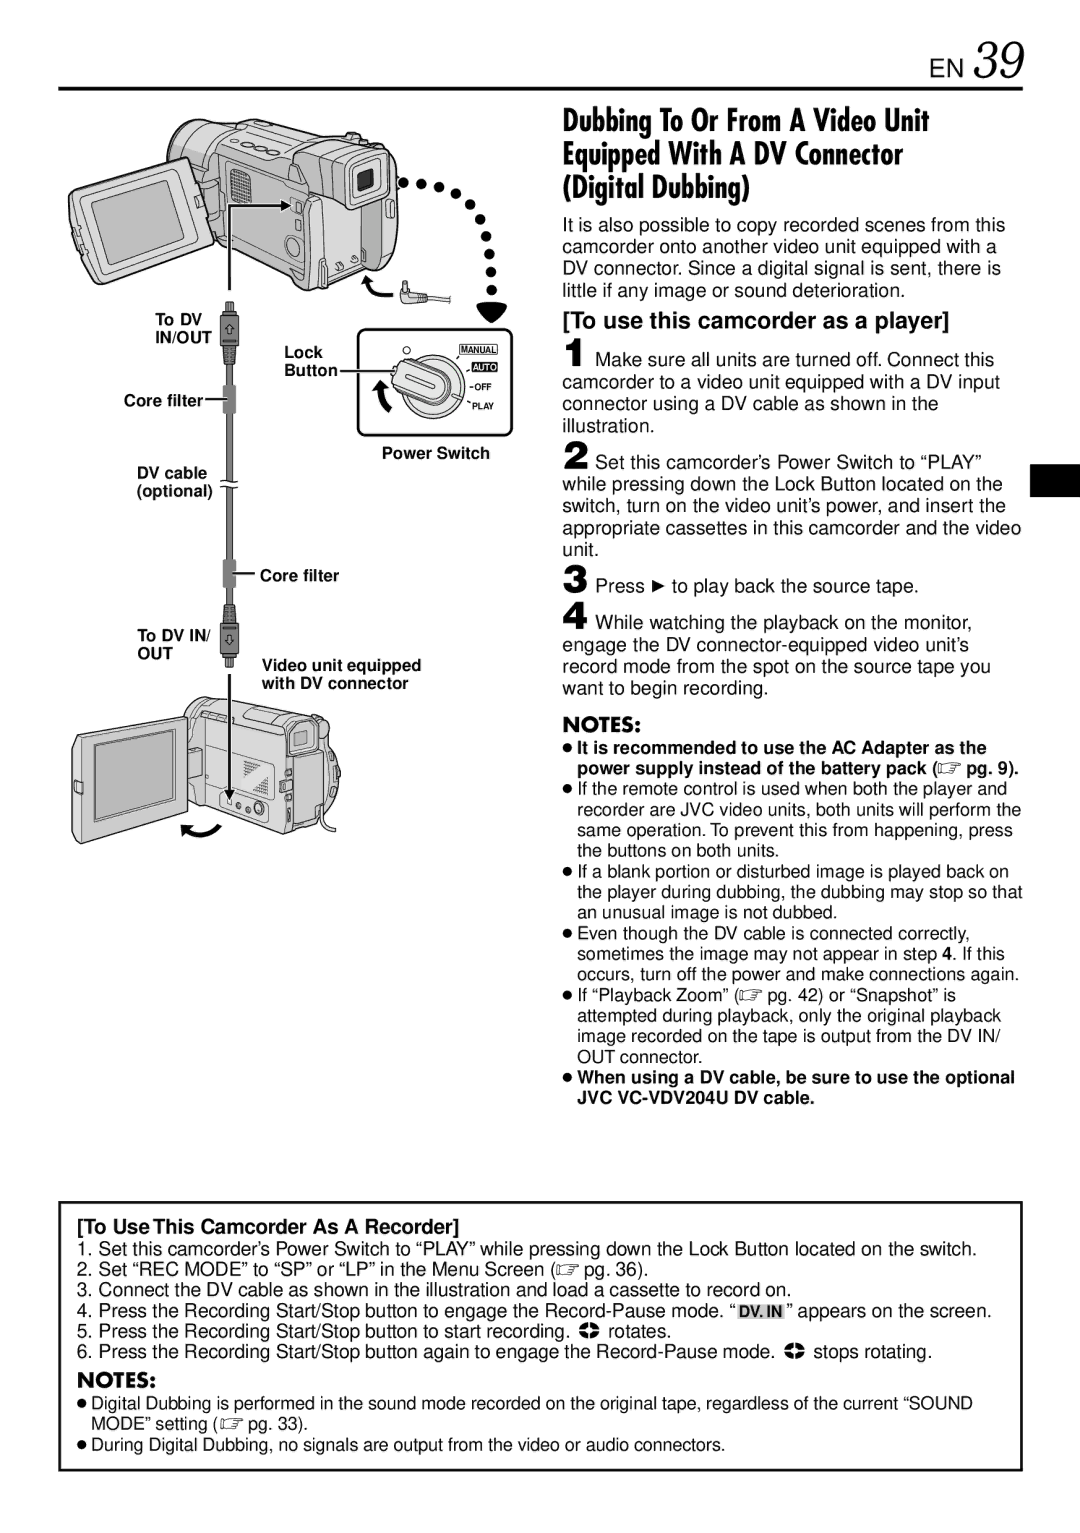
It is also possible to copy recorded scenes from this camcorder onto another video unit equipped with a DV connector. Since a digital signal is sent, there is little if any image or sound deterioration.

[To use this camcorder as a player]

1 Make sure all units are turned off. Connect this camcorder to a video unit equipped with a DV input connector using a DV cable as shown in the illustration.

2 Set this camcorder’s Power Switch to “PLAY” while pressing down the Lock Button located on the switch, turn on the video unit’s power, and insert the appropriate cassettes in this camcorder and the video unit.

3 Press 4 to play back the source tape.

To DV IN/

OUT

Video unit equipped with DV connector

[To Use This Camcorder As A Recorder]

4 While watching the playback on the monitor, engage the DV connector-equipped video unit’s record mode from the spot on the source tape you want to begin recording.

NOTES:

It is recommended to use the AC Adapter as the power supply instead of the battery pack ( pg. 9).

If the remote control is used when both the player and recorder are JVC video units, both units will perform the same operation. To prevent this from happening, press the buttons on both units.

If a blank portion or disturbed image is played back on the player during dubbing, the dubbing may stop so that an unusual image is not dubbed.

Even though the DV cable is connected correctly, sometimes the image may not appear in step 4. If this occurs, turn off the power and make connections again.

If “Playback Zoom” ( pg. 42) or “Snapshot” is attempted during playback, only the original playback image recorded on the tape is output from the DV IN/ OUT connector.

When using a DV cable, be sure to use the optional JVC VC-VDV204U DV cable.

1.Set this camcorder’s Power Switch to “PLAY” while pressing down the Lock Button located on the switch.

2.Set “REC MODE” to “SP” or “LP” in the Menu Screen ( pg. 36).

3.Connect the DV cable as shown in the illustration and load a cassette to record on.

4.Press the Recording Start/Stop button to engage the Record-Pause mode. DV. IN ” appears on the screen.

5.Press the Recording Start/Stop button to start recording. rotates.

6.Press the Recording Start/Stop button again to engage the Record-Pause mode. stops rotating.

NOTES:

Digital Dubbing is performed in the sound mode recorded on the original tape, regardless of the current “SOUND MODE” setting ( pg. 33).

During Digital Dubbing, no signals are output from the video or audio connectors.

Page 39
Image 39
JVC GR-DVL220 specifications To use this camcorder as a player, To DV, Core filter DV cable optional

GR-DVL220 specifications

The JVC GR-DVL220 is a versatile and compact digital camcorder that has been designed to cater to both novice filmmakers and seasoned videography enthusiasts. This model, part of JVC's GR-DV line, stands out for its user-friendly features, advanced technologies, and exceptional performance in a portable form factor.

One of the primary highlights of the GR-DVL220 is its impressive image quality, which is powered by a 1/4-inch 680,000-pixel CCD sensor. This allows users to capture vibrant and clear videos in resolutions up to 720x480 pixels, making it suitable for various applications, from home videos to more professional projects. The camcorder also boasts a 10x optical zoom, complemented by a 120x digital zoom, providing great flexibility for framing shots from a distance without compromising much on quality.

The lens of the GR-DVL220 features a f/1.6 aperture, which plays a pivotal role in low-light performance, enabling users to shoot impressive footage even in less-than-ideal lighting conditions. Additionally, the camcorder is equipped with JVC's proprietary Digital Image Stabilization (DIS) technology, which minimizes the unwanted shake and jitter that can occur during handheld shooting. This results in smoother footage, contributing to a more professional final product.

Another notable characteristic is the built-in firewire (IEEE 1394) connectivity, which allows for high-speed data transfer between the camcorder and other digital devices. This feature is essential for video editing, as it enables seamless uploads to a computer for further enhancement. The GR-DVL220 is also compatible with a variety of video formats, including DV and MPEG-1, ensuring that users can choose the best option for their needs.

The camcorder comes with a 2.5-inch color LCD screen that provides a clear view for composing shots and navigating menus. With easy-to-use controls, the GR-DVL220 ensures that users can quickly adapt to its functionalities. Additionally, it includes various scene modes and digital effects, allowing for creative storytelling through video.

Powering the GR-DVL220 is a rechargeable lithium-ion battery, which provides a decent amount of recording time, suitable for most shooting sessions. The compact design makes it easy to carry around, making it a great companion for travel and outdoor shoots.

In conclusion, the JVC GR-DVL220 is a well-rounded digital camcorder that combines user-friendly features with advanced technologies, offering great image quality, flexibility, and convenience for both amateur and professional users. Whether capturing special family moments or creating cinematic projects, this model provides a reliable option to meet diverse filming needs.