t


Viewing File Information


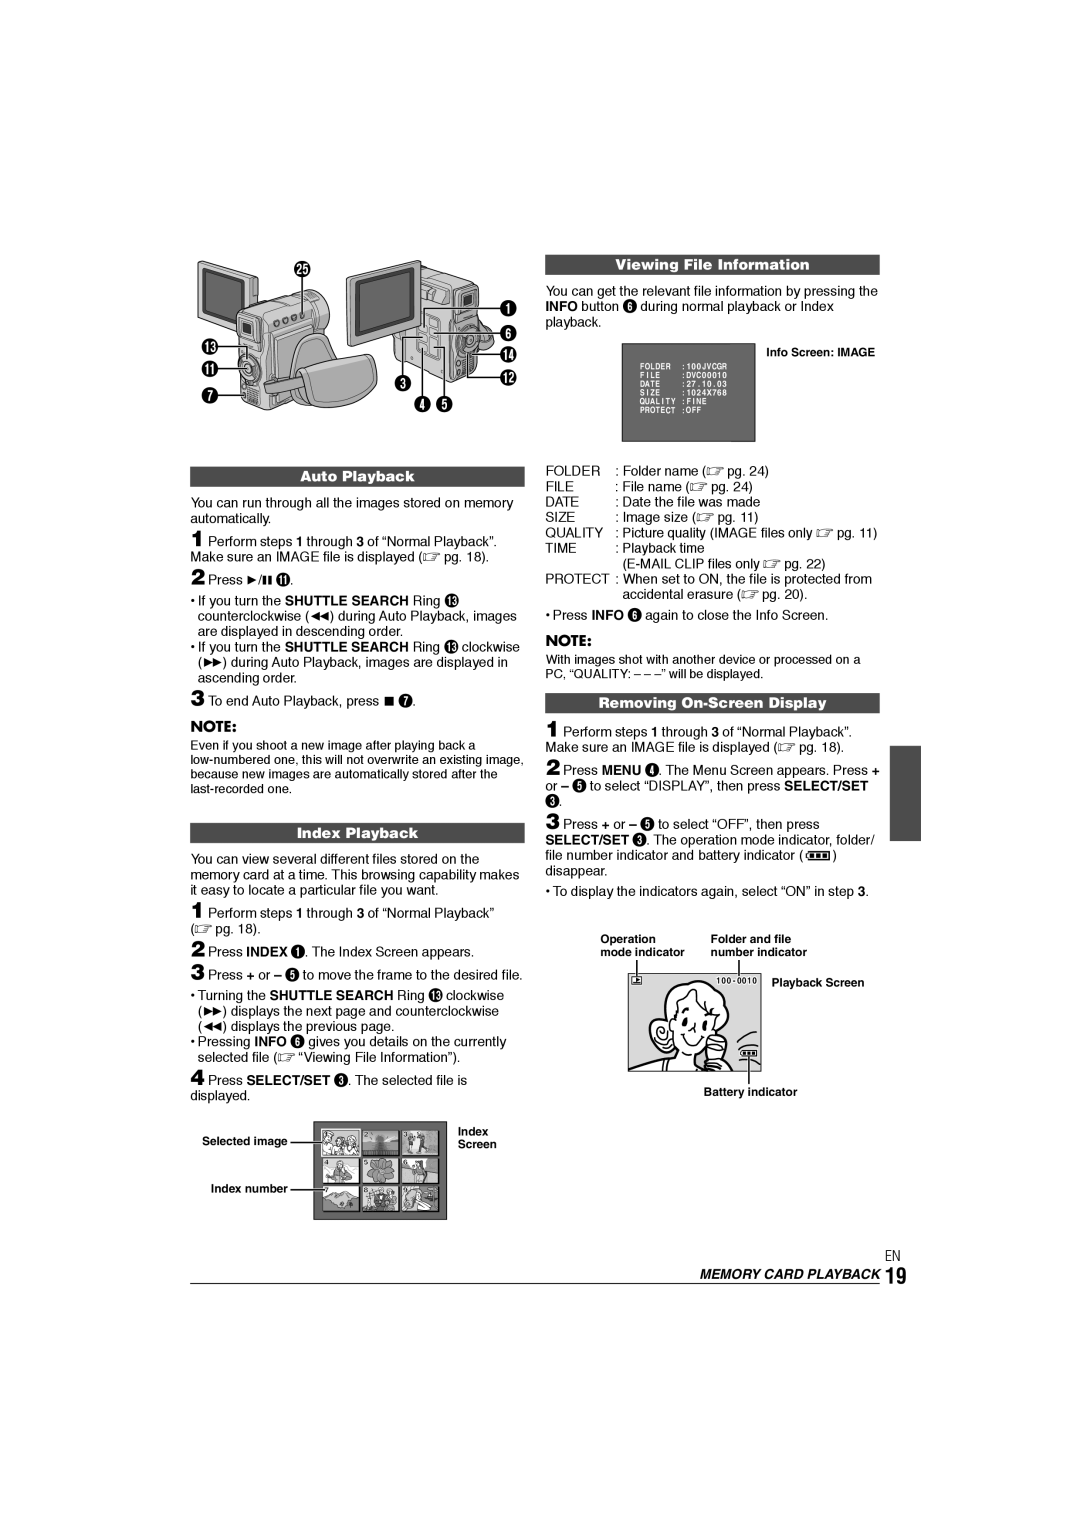
You can get the relevant file information by pressing the


1

INFO button 6 during normal playback or Index


6

playback.


#


$


Info Screen: IMAGE


!


@

FOLDER

: 100 J VCGR

3

F I LE

: DVC00010

7

DATE

: 27 . 10 . 03

4 5

S I ZE

: 1024X768


QUAL I TY

: F I NE


PROTECT

: OF F

Auto Playback

You can run through all the images stored on memory automatically.

1 Perform steps 1 through 3 of “Normal Playback”. Make sure an IMAGE file is displayed ( pg. 18).

2 Press 4/6 !.

If you turn the SHUTTLE SEARCH Ring # counterclockwise (2) during Auto Playback, images are displayed in descending order.

If you turn the SHUTTLE SEARCH Ring # clockwise (3) during Auto Playback, images are displayed in ascending order.

3 To end Auto Playback, press 5 7.

NOTE:

Even if you shoot a new image after playing back a low-numbered one, this will not overwrite an existing image, because new images are automatically stored after the last-recorded one.

Index Playback

You can view several different files stored on the memory card at a time. This browsing capability makes it easy to locate a particular file you want.

1 Perform steps 1 through 3 of “Normal Playback” ( pg. 18).

2 Press INDEX 1. The Index Screen appears.

3 Press + or 5 to move the frame to the desired file.

Turning the SHUTTLE SEARCH Ring # clockwise (3) displays the next page and counterclockwise

(2) displays the previous page.

Pressing INFO 6 gives you details on the currently selected file ( “Viewing File Information”).

4 Press SELECT/SET 3. The selected file is displayed.

FOLDER

: Folder name ( pg. 24)

FILE

: File name ( pg. 24)

DATE

: Date the file was made

SIZE

: Image size ( pg. 11)

QUALITY

: Picture quality (IMAGE files only  pg. 11)

TIME

: Playback time

(E-MAIL CLIP files only  pg. 22)

PROTECT : When set to ON, the file is protected from accidental erasure ( pg. 20).

• Press INFO 6 again to close the Info Screen.

NOTE:

With images shot with another device or processed on a PC, “QUALITY: – – –” will be displayed.

Removing On-Screen Display

1 Perform steps 1 through 3 of “Normal Playback”. Make sure an IMAGE file is displayed ( pg. 18).

2 Press MENU 4. The Menu Screen appears. Press + or 5 to select “DISPLAY”, then press SELECT/SET

3.

3 Press + or 5 to select “OFF”, then press SELECT/SET 3. The operation mode indicator, folder/ file number indicator and battery indicator ( ) disappear.

• To display the indicators again, select “ON” in step 3.

Operation

Folder and file

mode indicator

number indicator


100 - 0010 Playback Screen

Battery indicator

Selected image

Index number

1

2

3

Index


Screen

4

5

6


7

8

9


EN

MEMORY CARD PLAYBACK 19

Page 19
Image 19
JVC GR-DX106/76AG manual Viewing File Information, Auto Playback, Index Playback, Removing On-Screen Display

GR-DX106/76AG specifications

The JVC GR-DX106/76AG is a compact and versatile MiniDV camcorder that has gained attention for its robust feature set and user-friendly design. Launched in the early 2000s, this camcorder is ideal for both amateur filmmakers and those who want to capture life's precious moments with high-quality video.

One of the standout features of the GR-DX106/76AG is its advanced optical zoom capabilities. With a powerful 10x optical zoom lens, users can capture distant subjects without sacrificing image quality. Additionally, the camcorder is equipped with a digital zoom that can reach up to 400x, allowing for extreme close-ups when needed. This versatility makes it suitable for various shooting conditions, from family gatherings to outdoor adventures.

The camcorder utilizes a 1/6-inch CCD sensor, providing clear and vibrant images even in challenging lighting conditions. The CCD technology ensures high-resolution video capture, enabling users to record in a resolution of up to 640 x 480 pixels in MPEG format. The GR-DX106/76AG also supports progressive scan recording, further enhancing the quality of the footage.

Another notable technology found in the JVC GR-DX106/76AG is its built-in image stabilization system. This feature is crucial for reducing the blurriness caused by hand movements, ensuring that videos remain smooth and professional-looking. The camcorder also offers a variety of shooting modes, including night mode, which enhances low-light performance, as well as various scene modes that tailor the camera’s settings to specific environments.

User convenience is prioritized in the design of the GR-DX106/76AG. The camcorder features a flip-out LCD screen that allows for easy framing and playback of recorded videos. This screen provides a clear view of the scene, making it easier to capture the perfect shot. Additionally, the camcorder has an intuitive menu system, allowing users to quickly adjust settings without feeling overwhelmed.

The GR-DX106/76AG also includes various connectivity options, such as USB and AV outputs, enabling easy transfer of footage to computers or TVs. This compatibility allows for seamless editing and sharing of videos, catering to the needs of the modern user.

In summary, the JVC GR-DX106/76AG is a feature-rich camcorder that combines portability with advanced recording capabilities. Its optical zoom, image stabilization, and user-friendly interface make it an excellent choice for capturing high-quality video in a variety of scenarios. Whether for documenting family events or exploring creative filmmaking, this camcorder remains a solid option for enthusiasts.