EN


7


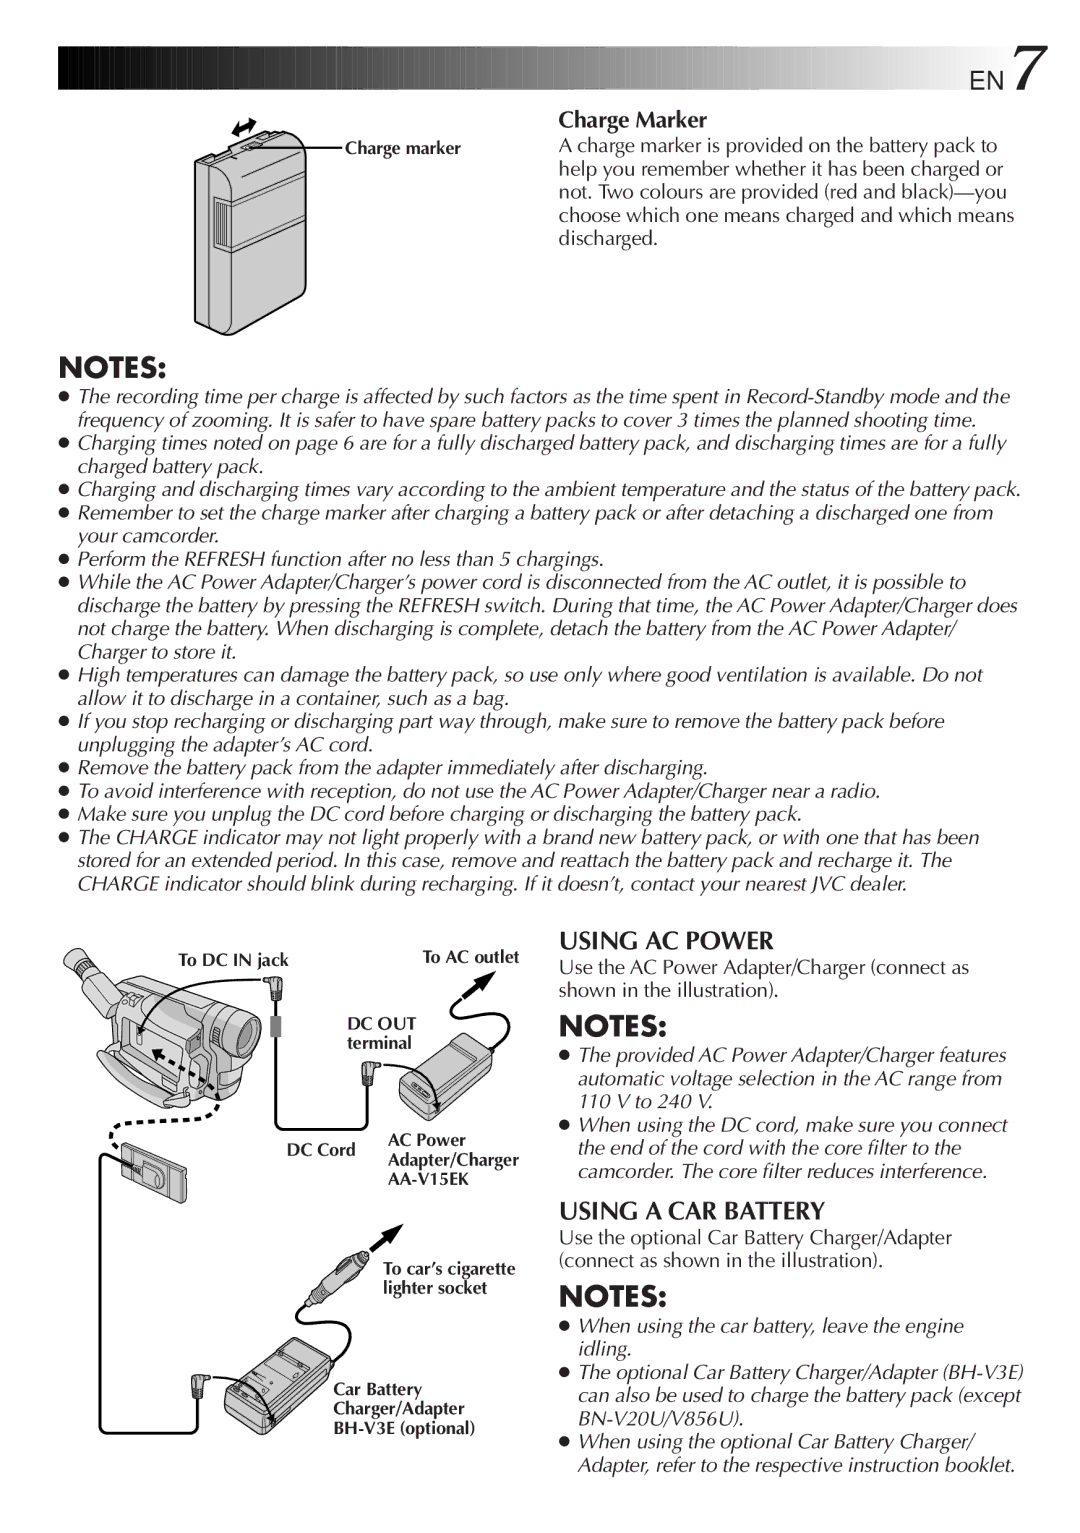
Charge Marker


Charge marker

A charge marker is provided on the battery pack to


help you remember whether it has been charged or


not. Two colours are provided (red and black)—you


choose which one means charged and which means


discharged.

NOTES:

The recording time per charge is affected by such factors as the time spent in Record-Standby mode and the frequency of zooming. It is safer to have spare battery packs to cover 3 times the planned shooting time.

Charging times noted on page 6 are for a fully discharged battery pack, and discharging times are for a fully charged battery pack.

Charging and discharging times vary according to the ambient temperature and the status of the battery pack.

Remember to set the charge marker after charging a battery pack or after detaching a discharged one from your camcorder.

Perform the REFRESH function after no less than 5 chargings.

While the AC Power Adapter/Charger’s power cord is disconnected from the AC outlet, it is possible to discharge the battery by pressing the REFRESH switch. During that time, the AC Power Adapter/Charger does not charge the battery. When discharging is complete, detach the battery from the AC Power Adapter/ Charger to store it.

High temperatures can damage the battery pack, so use only where good ventilation is available. Do not allow it to discharge in a container, such as a bag.

If you stop recharging or discharging part way through, make sure to remove the battery pack before unplugging the adapter’s AC cord.

Remove the battery pack from the adapter immediately after discharging.

To avoid interference with reception, do not use the AC Power Adapter/Charger near a radio.

Make sure you unplug the DC cord before charging or discharging the battery pack.

The CHARGE indicator may not light properly with a brand new battery pack, or with one that has been stored for an extended period. In this case, remove and reattach the battery pack and recharge it. The CHARGE indicator should blink during recharging. If it doesn’t, contact your nearest JVC dealer.

To DC IN jack

To AC outlet

DC OUT terminal

DC Cord

AC Power

Adapter/Charger


AA-V15EK


To car’s cigarette


lighter socket

Car Battery

Charger/Adapter

BH-V3E (optional)

USING AC POWER

Use the AC Power Adapter/Charger (connect as shown in the illustration).

NOTES:

The provided AC Power Adapter/Charger features automatic voltage selection in the AC range from 110 V to 240 V.

When using the DC cord, make sure you connect the end of the cord with the core filter to the camcorder. The core filter reduces interference.

USING A CAR BATTERY

Use the optional Car Battery Charger/Adapter (connect as shown in the illustration).

NOTES:

When using the car battery, leave the engine idling.

The optional Car Battery Charger/Adapter (BH-V3E) can also be used to charge the battery pack (except BN-V20U/V856U).

When using the optional Car Battery Charger/ Adapter, refer to the respective instruction booklet.

Page 7
Image 7
JVC GR-FXM75 manual Using AC Power, Using a CAR Battery, Discharged

GR-FXM75 specifications

The JVC GR-FXM75 is a compact and versatile camcorder that has made a mark in the realm of home video recording. This model stands out for its combination of portability, ease of use, and advanced features, making it an excellent choice for both amateur videographers and those capturing special moments.

One of the most notable features of the GR-FXM75 is its high-resolution 1/6-inch CCD sensor, which delivers sharp and vibrant video quality. This camera captures footage in the standard DV format, ensuring that recordings maintain a professional quality that can be easily edited or shared. The camcorder’s ability to record in full color and high contrast makes it ideal for various shooting conditions.

The GR-FXM75 comes equipped with a 20x optical zoom lens, which allows users to get close to the action without sacrificing image quality. This zoom capability is complemented by a powerful digital zoom feature, enabling further magnification while maintaining clarity. The lens also includes a built-in optical stabilization system, reducing the risk of shaky recordings for smoother playback.

Another significant aspect of the JVC GR-FXM75 is its user-friendly interface. The camcorder features an intuitive control layout, with a flip-out LCD viewfinder that allows for flexible shooting angles and easy framing of shots. The viewfinder provides real-time feedback, ensuring that users can monitor their recordings effortlessly.

In terms of audio, the GR-FXM75 includes a built-in microphone that captures sound clearly, alongside the option for external microphone input for more advanced audio needs. This feature enhances the overall quality of video projects, ensuring that both visuals and sound are immersive.

Connectivity is another strong point for the JVC GR-FXM75. It includes USB and FireWire ports, facilitating easy transfer of footage to a computer for editing or storage. This connectivity allows for streamlined sharing of videos, making it easy to distribute special moments to friends and family.

Overall, the JVC GR-FXM75 exemplifies a balance of technical performance and user-centric design. With its impressive shooting capabilities, portability, and connectivity options, it remains a reliable choice for anyone looking to capture high-quality video experiences. Whether used for family vacations, events, or personal projects, the GR-FXM75 continues to be a valuable tool for preserving memories.