!


Remote sensor


OF

A


Y

@F

M

ATlY

Ss;a

L

A


P


RM-V700U (optional)

SELECT CENES

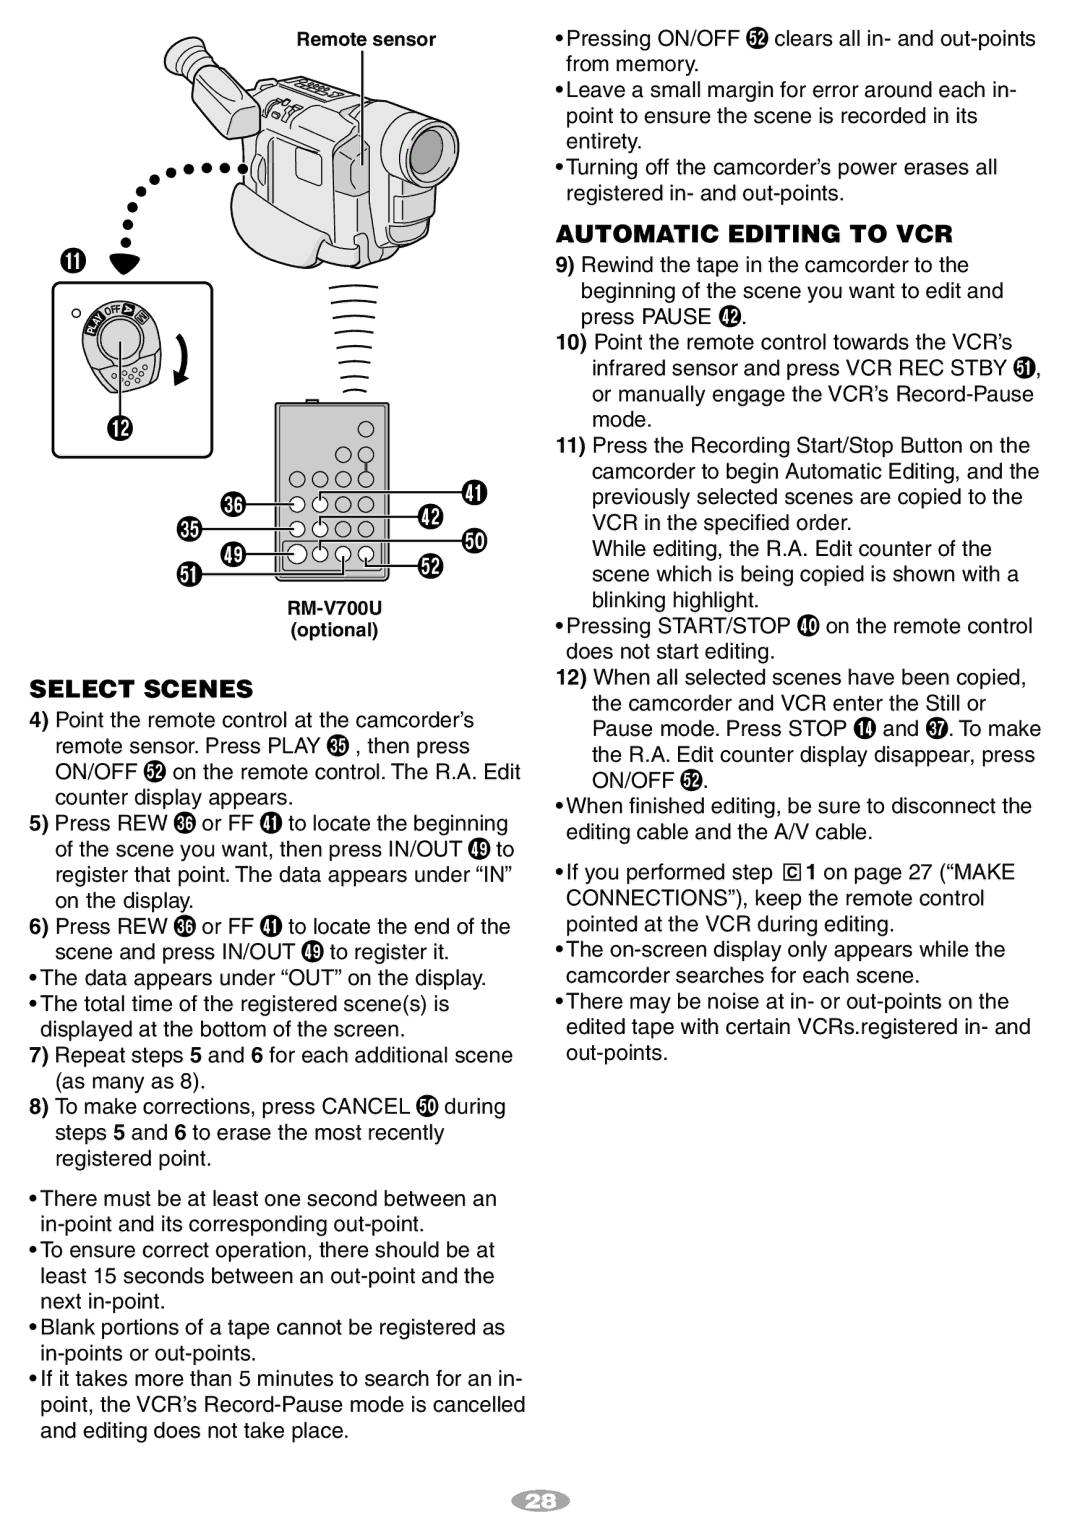
4)Point the remote control at the camcorder’s remote sensor. Press PLAY T, then press ON/OFF Son the remote control. The R.A. Edit counter display appe rs.

5)Press REW Yor FF ato ocate the beginning of the scene you want, then press IN/OUT lto register that point. The data appears under “IN” on the display.

6)Press REW Yor FF ato ocate the end of the scene and press IN/OUT lto register it.

The data appears under “OUT” on the display.

The total time of the registered scene(s) is displayed at the bottom of the screen.

7)Repeat steps 5 and 6 for each additional scene (as many as 8).

8)To make corrections, press CANCEL ;during steps 5 and 6 to erase the most recently registered point.

There must be at least one second between an in-point and its corresponding out-point.

To ensure correct operation, there should be at least 15 seconds between an out-point and the next in-point.

Blank portions of a tape cannot be registered as in-points or out-points.

If it takes more than 5 minutes to search for an in- point, the VCR’s Record-Pause mode is cancelled

and editing does not take place.

• Pressing ON/OFF clears all in- and out-points from memory.

Leave a small margin for error around each in- point to ensure the scene is recorded in its entirety.

Turning off the camcorder’s power erases all registered in- and out-points.

AUTOMATIC EDITING TO VCR

9)Rewind the tape in the camcorder to the beginning of the scene you want to edit and press PAUSE s.

10)Point the remote control towards the VCR’s infrared sensor and press VCR REC STBY A, or manually engage the VCR’s Record-Pause mode.

11)Press the Recording Start/Stop Button on the camcorder to begin Automatic Editing, and the previously selected scenes are copied to the VCR in the specified order.

While editing, the R.A. Edit counter of the scene which is being copied is shown with a

blinking highlight.

Pressing START/STOP Pon the remote control does not start editing.

12)When all selected scenes have been copied, the camcorder and VCR enter the Still or Pause mode. Press STOP $and U. To make the R.A. Edit counter display disappear, press

ON/OFF S.

When finished editing, be sure to disconnect the editing cable and the A/V cable.

If you performed step 1 on page 27 (“MAKE CONNECTIONS”), keep the remote control pointed at the VCR during editing.

The on-screen display only appears while the camcorder searches for each scene.

There may be noise at in- or out-points on the edited tape with certain VCRs.registered in- and out-points.

28

Page 28
Image 28
JVC GR-SX140A, GR-SXM780A, GR-SXM78EA, GR-SXM480A, GR-SXM48EA manual Select Cenes, Automatic Editing to VCR

GR-SXM48EA, GR-SX140A, GR-SXM480A, GR-SXM780A, GR-SXM78EA specifications

The JVC GR-SXM78EA, GR-SXM780A, GR-SXM480A, GR-SX140A, and GR-SXM48EA are notable camcorders that exemplify JVC's commitment to innovation in video recording technology. Each model showcases a unique blend of features that cater to various filming needs, making them excellent choices for both amateur and semi-professional videographers.

The GR-SXM78EA features a compact design that accommodates portability without compromising on performance. It comes with a high-quality 16x optical zoom, allowing users to capture distant subjects with clarity. With a built-in image stabilizer, this camcorder reduces the effects of camera shake, resulting in smooth and steady videos even during dynamic filming situations. The model also supports digital effects and scene transitions, providing creative options for video editing.

On the other hand, the GR-SXM780A enhances the video recording experience with its advanced picture quality capabilities. It integrates a 3CCD sensor system, which ensures vibrant and accurate color reproduction. This model excels in low-light conditions, making it an ideal choice for nighttime filming or indoor events. The GR-SXM780A also supports multiple recording formats, allowing versatility in content creation.

The GR-SXM480A is designed for user-friendly operation, featuring a straightforward interface and a flip-out LCD screen for easy framing of shots. This camcorder is equipped with a powerful 30x optical zoom lens, making it suitable for capturing intricate details from a distance. Additionally, its onboard editing features empower users to create polished videos directly from the device.

In contrast, the GR-SX140A emphasizes high-definition recording capabilities. This camcorder supports HD video capture, ensuring sharp and lifelike footage. Its robust battery life allows for extended recording sessions, which is perfect for long events or outdoor filming. The GR-SX140A also features various connectivity options, including HDMI output for easy playback on larger screens.

Lastly, the GR-SXM48EA offers a balance of performance and affordability. It is equipped with essential recording features, including digital zoom and built-in microphone for high-quality audio capture. Its lightweight design makes it highly portable, appealing to casual users or vloggers who need to film on the go.

In summary, the JVC GR-SXM78EA, GR-SXM780A, GR-SXM480A, GR-SX140A, and GR-SXM48EA each bring distinct capabilities to the table, catering to a broad spectrum of videography requirements. With their advanced technologies and practical features, these camcorders represent JVC's dedication to providing high-quality solutions for modern content creators.